Feeds:
Posts
Comments

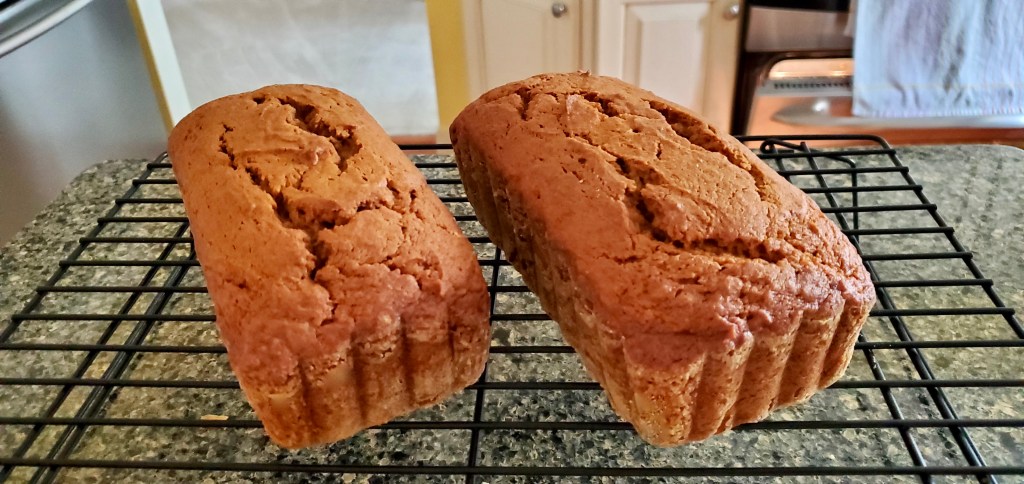
Pumpkin Bread

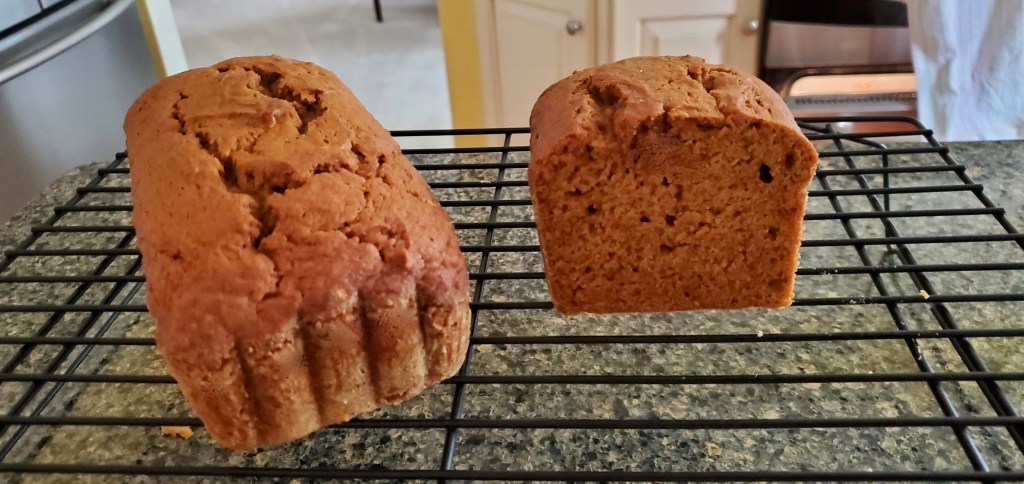
When the air turns cool and Fall is in the air, you know what time it is. It’s anything Pumpkin time. I came across this recipe, tried it out and just had to share it with you. It’s very delicious, light and soft in texture, not heavy and dense like some recipes.

The size loaf pans (8 x 4 inch) used in this recipe is not a size that I have (mine are 9 x 5 in). You could just watch the baking time closely or you could buy some 8 x 4 inch foil pans at the grocery store, which is what I did, and it worked out perfectly.

Pumpkin bread freezes really, well up to circa 3 months. Just thaw in the refrigerator overnight before serving. Since this makes two loaves, I brought one loaf into work and the other I sliced up and placed a piece of waxed (or parchment) paper in-between slices and wrapped all of it up good before placing in freezer. That way I can just pull out however many slices I want to thaw and 15 sec in the microwave will give you a warm, delicious slice of Pumpkin bread to enjoy.

Pumpkin Bread, make 2 loaves

Ingredients:

2 cups all-purpose flour (260 grams)

1/2 tsp salt

1 tsp baking soda

1/2 tsp baking powder

1 tsp ground cloves

1 tsp ground cinnamon

1 tsp ground nutmeg

1 1/2 stick unsalted butter (170 grams), room temperature

2 cups sugar (420 grams)

2 large eggs

1 (15 oz) can pumpkin puree (Libby’s) (425 grams)

Directions:

Preheat oven to 325 degrees F (163 degrees C). Grease and lightly flour two 8 x 4-inch loaf pans (20 x 10 cm), set aside.

Combine dry ingredients in a bowl (flour, salt, baking soda, baking powder, cloves, cinnamon and nutmeg), set aside. In a large bowl using an electric mixer beat softened butter and sugar until blended. Add eggs one at the time and beat until smooth and fluffy. Add pumpkin and beat until incorporated, it may look grainy which is ok. Add flour mixture in 2-3 increments and mix on low speed until incorporated.

Divide batter evenly and pour into prepared loaf pans. Bake 65-75 minutes or until inserted toothpick comes out clean. Let loaves cool in pans for 10 minutes before turning out onto baking rack to cool completely.

Source: Once Upon a Chef

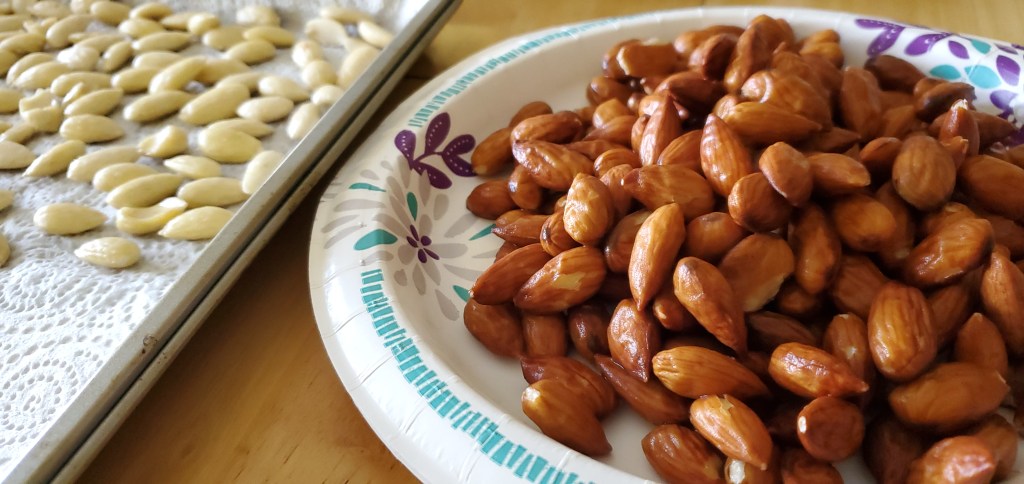
It seems simple enough, but when you find yourself faced with having to remove the skin from a big pile of almonds and the skin is not coming off, well let’s just say it’s going to be a very long morning. It really IS simple enough, you just have to remember the most important part…shock your almonds!

Bring a small pot of water to a boil. Dump the almonds into the boiling water and let them simmer for 1 to 1 1/2 minutes. Pour water and almonds into a strainer, place hot almonds into a bowl and cover with cold water to shock the almonds. The shocking part is what loosens the skin from the almonds. Now the skin will slip right off the almond.

To dry the almonds just spread them out on a baking sheet in a single layer and let them sit. If you’re in a hurry you can heat your oven on its lowest temperature setting for 1 minute, then turn oven off, and let your almonds rest in the warm oven until dry. They dry pretty quickly, maybe 30 plus minutes.

Delicious Leverpostej

Can you have too many Leverpostej recipes? Never! The more the merrier. This is a wonderful Leverpostej loaded with flavor. Serve it warm with sautéed mushrooms and maybe some extra bacon. This recipe is less complicated than my original Leverpostej recipe and has just a couple more ingredients than my Easy Leverpostej. If you have a food processor it’s so easy to make, or you can always make it the danish way by running the first four ingredients through a meat grinder twice and then adding remaining ingredients.

Making Leverpostej

For this recipe I wrote it up to make a full portion (which makes 5-6 small loaf pans or 3 large loaf pans) or if you want to make only half the amount, measurements are in parentheses. I personally only make half of a portion since we don’t eat Liver pate every day. If not baking right away, store the unbaked pate in the freezer.

Leverpostej (full portion makes 5-6 small or 3 large loafs)

Ingredients:

600 g or 21 oz Calf liver (300 g)

170 g  or 6 oz onion (85 g)

90 g or 3.2 oz mushrooms (45 g)

240 g or 8.5 oz bacon (120 g)

250 g or 8.8 oz butter (125 g)

200 ml or 6.8 fluid oz heavy whipping cream (100 ml)

75 g or 2.6 oz flour (38 g)

2 egg (1)

20 g or 0.7 oz anchovy paste (10 g)

1/2 tsp better than bouillon paste, beef (1/4 tsp)

1 tsp salt (1/2 tsp)

1/2 tsp pepper (1/4 tsp)

1 tsp allspice (1/2 tsp)

1 tsp paprika (1/2 tsp)

Directions:

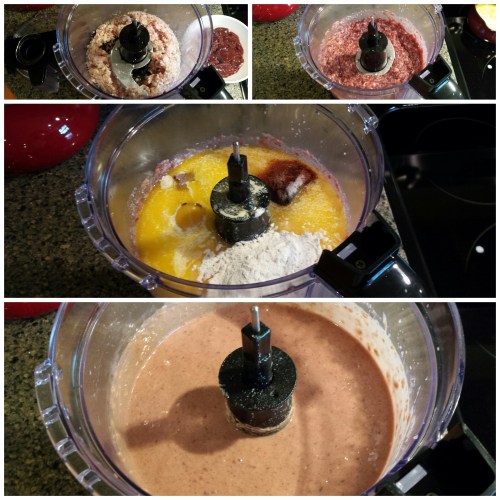
Melt butter and set aside. Cut liver, onion, mushrooms and bacon into chunks. Place onion, mushrooms and bacon into food processor and process until coarse. Add liver and process until well incorporated. Add heavy whipping cream to butter, add mixture to food processor. Add flour, egg, anchovy paste, better than bouillon paste, salt, pepper, allspice and paprika, process until smooth (several minutes).

Pour into small aluminum forms and if freezing cover top tightly with aluminum foil and store in freezer safe bags. When ready to cook Liver Pate, fill an oven-proof dish with warm water 1/2 way up the side of aluminum form. Bake uncovered in oven at 200 degree C (390 degrees F) for 1 hour 30 minutes. Enjoy!

Source: slightly adapted from Sweet, Sour, Savory

Print Friendly and PDF

Swirled Black-Bottom Cupcake

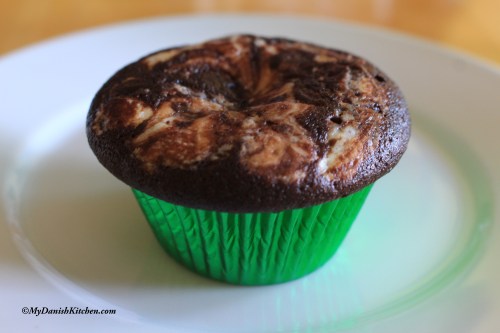
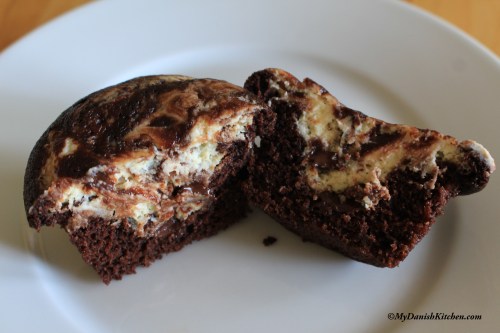
Black-bottom cupcakes are seriously delicious and super moist, hence no frosting needed at all on these little babies. Funny name though and think it comes from the cupcake originally having the cream cheese encased in chocolate, sort of like a peanutbutter cup. Here I made half of the cupcakes with the  cream cheese center and the other half with a swirling effect. You pick what you like the best and enjoy.

Making Black-Bottom Cupcakes

Black-Bottom Cupcakes, makes 12 cupcakes.

Ingredients

For the filling:

8 oz cream cheese, low fat, at room temperature (226 g)

1/3 cup sugar (75 g)

1 large egg, at room temperature

2 oz semi-sweet chopped chocolate or chocolate chips (60 g)

For the cupcakes:

1 1/2 cup all-purpose flour (195 g)

5 tablespoons unsweetened cocoa powder(33 g)

1 teaspoon baking soda

1/4 teaspoon salt

1 cup firmly packed light brown sugar (190 g)

1 cup water (225 ml or 2.25 dl)

1/3 cup vegetable oil (75 ml or 0.75 dl)

1 tablespoon white or cider vinegar

1 teaspoon vanilla extract

Directions

Preheat oven to 350 degrees F (175 degrees C). Line a 12 cup muffing pan with cupcake liners, set aside.

Make the filling:

Beat together cream cheese, sugar and egg until smooth. Stir in chopped chocolate (or chocolate chips) and set aside.

Make the cupcakes: 

In a large bowl sift together flour, cocoa powder, baking soda and salt. In a separate bowl mix together brown sugar, water, vegetable oil, vinegar and vanilla extract. Make a well in the center of dry ingredients and stir in wet ingredients. Stir only until smooth, careful not to over-stir.

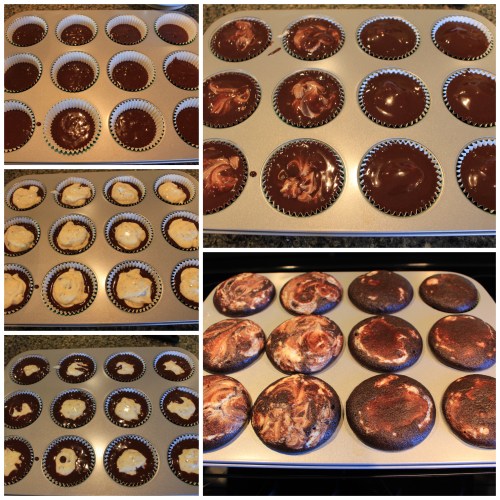
Fill each cupcake liner half-way with chocolate batter, leaving a small amount of batter in the bowl which you will need later on. Spoon a couple of tablespoons of cream cheese batter into center of each cupcake, trying to not let cream cheese batter touch the sides of cupcake liner. Divide cream cheese batter evenly among all 12 cupcakes. Using the remaining chocolate batter, spoon batter over cream cheese to seal it off. Cupcakes will be 90% full which is ok. If you wish to swirl the batter, insert a butter knife only about 1/2 inch into each cupcake moving the knife around in an abstract pattern to create the swirling effect.

Bake for 25 minutes until the cupcakes are slightly golden brown and the cupcakes feel springy when gently pressed.

Black-Bottom Cupcake

Source: Smitten Kitchen via David Lebovitz

Print Friendly and PDF

Lagkage – Danish Layered Cake

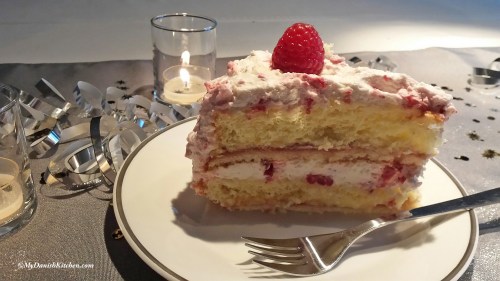
There are no real rules on how to make a Lagkage (layered cake) but typically it starts with 3 to 6 cake layers. I used 4 cake layers and the recipe I link to here makes one cake which is sliced into two cake layers. I also have another recipe here which makes one cake that is sliced into 3 cake layers, but the methode is a little more involved. These cake layers incidentally freezes really well which makes for easy Lagkage making. Filling can be anything your heart desires and I chose a combination of Kagecreme, jam, whipped cream with fresh raspberries and crushed meringue cookies. The Kagecreme I used is a powder mixed with milk which is whipped into a cream, so basically it’s like a pudding. I have not tried using a vanilla pudding mix but I would think you could use it as long as it’s not too thin. Or you could choose to make a super delicious custard but it does take a little extra time. The meringue cookies was store bought but you can also bake them yourself as long as they are completely dried out and not sticky in the middle.

Hindbærlagkage

Layered Cake With Raspberries (10-12 servings)

Ingredients:

4 round cakes

1 package vanilla flavored KageCreme (or homemade custard)

raspberry jam, seedless

1 pint heavy whipping cream (473 ml)

1 tablespoon confectioners sugar

2-3 big handfull broken-up meringue cookies (or Danish macaroons)

12 oz fresh raspberries, crushed (340 g)

Directions:

Prepare KageCreme according to package directions or make your custard and set aside.

Stir up raspberry jam to loosen it.

Beat heavy whipping cream with confectioners sugar until it starts to thicken. Set aside a few raspberries for decorating, then crush the remaining raspberries using a fork. Add crushed raspberries to whipped cream. Crush meringue cookies into small pieces and add to whipped cream. Fold crushed raspberries and meringue cookies into whipped cream.

Select your serving platter. Cut 4 pieces of waxed paper (or parchment paper)and arrange on serving platter so all edges of the platter is covered with waxed paper. Place first cake on top of waxed paper. Spread with a thin layer of raspberry jam. Spread a generous layer of KageCreme (or custard). Place the second cake on top. Spread a layer of whipped cream. Place third cake on top. Spread a thin layer of raspberry jam. Spread a generous layer of KageCreme (or custard). Place fourth cake on top. Spread the remaining whipped cream on top and around the sides of cake. Decorate with the reserved fresh raspberries. Finally pull out the waxed paper from beneath the cake leaving a clean edge on the serving platter. Refrigerate until ready to serve. Enjoy!

Source: My Danish Kitchen

Print Friendly and PDF

Easy cake for making layered cakes

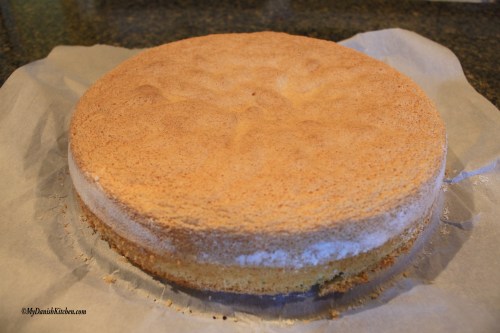
Layered cake is so delicious but can be a time consuming project. However, if you bake the cake layers ahead and store them in the freezer, it will save you time and the task becomes less overwhelming. Simply just pull the cakes out when needed and assemble the cake. This recipe for cake layers is quick and easy and the cakes freeze really well.

Cake layer

I did learn a lesson when baking this particular cake. To prevent the cake from taking on too much color too fast, I placed a piece of foil over the pan, however, the foil touched to top of the cake and pulled off the very top layer. Not that it really matters because the cake will be covered with cream anyway but I am a type-A kind of person so little things like that annoys me 🙂 Lesson learned, if using foil tap a dome into it so it doesn’t touch the cake…I knew that….I just forgot.

Lock parchment paper in springform pan

Lagkagebunde (makes 1 cake, cut into 2 cake layers)

Ingredients:

3 large eggs

125 g sugar (4.4 oz or 3/4 cup)

60 g flour (2.1 oz or 1/2 cup)

60 g cornstarch (2.1 oz or 1/2 cup)

1 tsp. baking powder

Directions:

Preheat oven to 390 degrees F (200 degrees C).

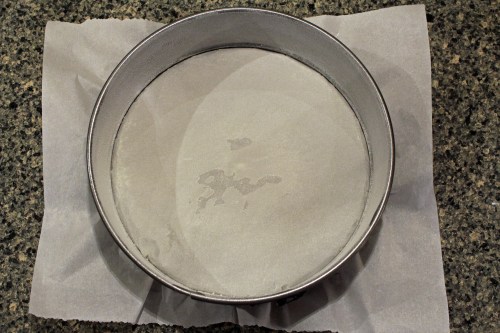
Use a 9 inch (23 cm) springform pan, place a piece of parchment paper in bottom of springform and lock in place. Spray a light layer of baking spray in pan, add a tablespoon of flour to pan, rotate pan to coat sides and bottom with flour, bang out excess flour into a trash can and set pan aside.

Place eggs and sugar in the bowel of an electrical mixer and mix on high-speed for 10 minutes until eggs are pale and thick. Mix dry ingredients in a small bowel and sift over egg mixture. Gently fold in the dry ingredients, careful not to deflate the dough by over-mixing. Pour batter into prepared springform pan. Bake for 15-20 minutes or until light golden, careful not to over-bake. The cake is done when the cake feels firm to the touch or test by inserting a toothpick into the middle of the cake, the toothpick should come out clean. Allow to cool completely in pan. Once cooled, run a small knife around the edges to loosen it, then open springform. Using a serrated knife cut cake horizontally into 2 cake layers. If you are not using the cake layers right away they can be frozen. Separate the two cakes with parchment paper and store in freezer-safe bags.

Source: My Danish Kitchen

Print Friendly and PDF

Making Æbleskiver pour batter, rotate 1/4 turn, backfill with more batter, rotate last 1/4 turn and finish frying until baked through.

It’s that time of year again and although it’s a little early, I just had to make some delicious danish Æbleskiver. They are wonderful served warm with a little jam and perhaps some warm red or white Gløgg (mulled wine). By the way, they can also be made ahead of time, tossed in the freezer and quickly reheated in the oven. Here’s a slightly different recipe with egg whites which makes them a little lighter. Also the technique is different than my previous Æbleskive post, in that I backfill each Æbleskive with a little more dough which helps get a rounder Æbleskive. If you want to see the previous post or want to read more about the traditions surrounding Æbleskiver click the above link. I hope you enjoy these super delicious Æbleskiver.

Æbleskiver (makes 40-45)

Ingredients:

500 g all-purpose flour (17.6 oz)

2 tsp salt

2 tsp baking soda

3 tsp vanilla sugar

3 tbsp sugar

4 egg yolks

8 dl buttermilk (27 fluid oz)

zest from 1 lemon

4 egg whites

Canola oil for frying

Directions:

Combine flour, salt, baking soda, vanilla sugar and sugar, set aside. Stir egg yolks and buttermilk together and beat into dry ingredients. Zest lemon into batter and beat to combine. In a separate bowl, beat egg whites stiff and fold into batter.

Preheat æbleskive pan to medium high. Brush pan with canola oil and pour batter. Using a knitting needle (sound odd, but works really well) or a skewer, turn æbleskiver 1/4 turn and fry a little more. Backfill each with a little more batter and turn the last 1/4 turn. Finish frying, turning æbleskiver until baked through. Serve warm with jam and/or sugar, smiles and a heavy dose of hygge. Enjoy!

Source: My Danish Kitchen

Print Friendly and PDF

Pumpkin Pie

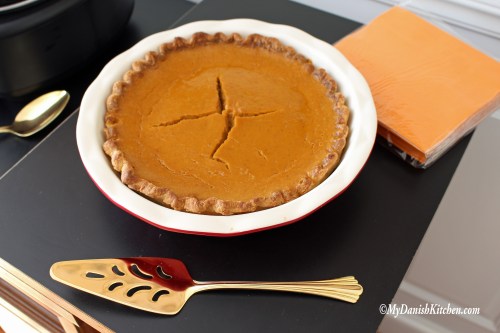
Every year I tell myself, that this year I am going to make a Pumpkin Pie myself. But every year I resolve to to a store-bought pie which is pretty good and so quick and easy. But if you make the pie crust ahead-of-time and store it in the freezer then it’s really not too much trouble making the pie yourself, not to mention, how wonderful this Pumpkin pie taste. The filling has an added wonderful orange flavor which really compliments the pumpkin and it is light in texture. I was contemplating making my own pumpkin puree as well but was concerned with getting the correct water content in the puree and possibly ending up with a soggy pie crust, so I opted for the canned puree, which is just fine. Enjoy!

Pumpkin Pie (serves 8-10)

Ingredients:

For pie crust (makes two pie crusts)

350 grams all-purpose flour ( 12.3 oz or 2 1/2 cups)

1 teaspoon salt

1 tablespoon sugar

226 grams unsalted butter, cold and cut into 1/2 inch pieces (8 oz or 2 sticks)

1/4 to 1/2 cup ice water (60-120 ml)

For the filling

15 oz canned pumpkin puree (425 grams)

1/2 cup light brown sugar, lightly packed

1/4 cup sugar

1/2 teaspoon ground cinnamon

1/4 teaspoon ground ginger

1/4 teaspoon ground nutmeg

1/2 teaspoon kosher salt

2 teaspoon grated orange zest

3 large eggs, lightly beaten

1 cup heavy cream

1/2 cup whole milk

2 tablespoons dark rum

Directions:

For the pie crust: Cut up butter and place in refrigerator until ready to use. Place flour, salt and sugar in a food processor, process of combine. Add cold butter to flour and pulse until butter is the size of small peas. Add 1/4 – 1/2 cup ice water in a steady stream through feed tube, only until dough starts to clump together when pinched. Careful not to overmix. Turn dough onto countertop and quickly work it together into a ball. Divide into two equal portions and flatten each portion into a 5 inch (12 cm) disk. Wrap each disk in plastic wrap and refrigerate for 30-60 minutes. At this point you can also freeze dough for up to 1 month. Defrost dough in refrigerator overnight before using.

On a lightly floured surface, roll out dough to fit into a 9 inch (23 cm) pie dish. To prevent dough from sticking to countertop keep lifting and rotating dough. Roll dough onto rolling pin and lift dough into pie dish. Gently press dough into place, do not pull dough as this will cause shrinkage. Trim dough with a knife around the outer edge, fold excess dough inward to form an edge and crimp edge to create a scalloped look if desired. Chill dough before blind baking.

Preheat oven to 425 degrees F (218 degrees C). After dough has chilled, place pie dish onto a baking sheet. Using a fork prick holes in the bottom and sides of dough. Line pie with parchment paper and fill 3/4 full with pie weights or dried beans. Bake crust for 15 minutes. Remove parchment paper and weights and bake for another 5 minutes.

For the Filling: Reduce oven temperature to 350 degrees F (177 degrees C). In a large bowl, whisk together pumpkin, brown sugar, granulated sugar, cinnamon, ginger, nutmeg, salt, orange zest, eggs, cream, milk and rum,  making sure egg whites are broken up. Pour filling into pre-baked pie shell and cover pie edges with foil to prevent excessive browning. Bake for 50-60 minutes or until a knife inserted 1 inch from outer edge comes out clean. Place baked pie on a wire rack to cool. Serve at room temperature with a dollop of whipped cream. Store leftovers in refrigeator. Enjoy!

Source: Pie Crust – Joy of Baking. Pumpkin Filling – BarefootContessa, Foolproof.

Print Friendly and PDF

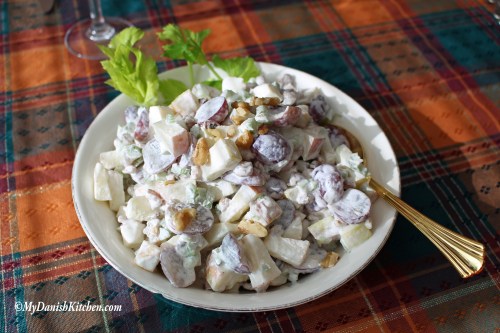
Waldorfsalat

Waldorf salad was invented around 1893 – 1896 at the Hotel Waldorf in Manhattan NY. Danes have since then taken this wonderful salad to heart. It’s enjoyed mostly during the fall and winter months and in some families it may also be found on the Christmas table. There are of course many variations of this salad. It can be made with mayonnaise or yogurt and in Denmark some may also add a little whipped cream to the dressing. It can be served as an appetizer or as a side dish to game. This recipe comes from my sister Jonna who makes a “knaldgod” or fabulous Waldorf salad. Enjoy!

Waldorf Salad

Ingredients: 

2 1/2 deciliter Creme Fraiche (212 g or 7.5 oz)

1 1/2 tablespoon sugar

1/4 teaspoon salt

juice from a small 1/2 lemon

3 celery stalks

400 gram grapes (14 oz)

100 gram walnuts (5.3 oz)

2 apples (I use Honeycrisp apples)

Directions:

Combine Creme Fraiche, sugar, salt and lemon juice, set aside. Clean and cut celery into small pieces. Cut grapes into halves. Chop walnuts into small pieces. Leaving the peel on the apples, dice them into bite size pieces. Add celery, grapes, walnuts and apples to Creme Fraiche. Store in refrigerator until ready to serve. Serve on a bed of Boston lettuce or decorate with celery leaves, top with walnuts. Enjoy!

Source: slightly adapted from my sister Jonna Pedersen

Print Friendly and PDF

Blueberry-Pumpkin Muffins

Here in Virginia we get some of the most beautiful days from mid September to late October. The temperature have changed from hot to perfect, and it’s time for Fall colors, pumpkins and Halloween. And so we must have  a pumpkin recipe! I came across this recipe and at first I didn’t think blueberries and pumpkin would compliment each other, but they do, and the oat topping brings an extra layer of delish to these tender muffins. So if you like, give them a try and enjoy your Fall 🎃🍁

Blueberry-Pumpkin Muffins (makes 15 muffins)

Ingredients:

2 1/2 cups all-purpose flour (340 g)

1 1/2 teaspoon baking powder

1/2 teaspoon salt

1/4 teaspoon baking soda

2/3 cup buttermilk (155 ml)

1/2 cup canned pumpkin (130 g)

1 teaspoon vanilla sugar

1/2 cup unsalted butter, at room temperature (112 g)

1/2 cup sugar (105 g)

1/4 cup packed brown sugar (40 g)

2 eggs, at room temperature

1/2 cup fresh blueberries (90 g)

For topping:

3 tablespoons unsalted butter (40 g)

1/4 cup packed brown sugar (40 g)

2 tablespoons old-fashioned oats (15 g)

1/2 teaspoon ground cinnamon

1/4 teaspoon salt

3-4 teaspoons all-purpose flour

Directions:

Preheat oven to 350 degrees F (176 degrees C). Line muffin tin with paper liners.

In a medium bowl combine flour, baking powder, salt and baking soda, set aside.

In a small bowl combine buttermilk, pumpkin and vanilla, set aside.

In a large bowl beat butter, sugar and brown sugar until light and creamy. Add eggs, one at the time, beating after each. On low speed add alternatively flour mixture and buttermilk mixture in small increments. Beat just until combined, batter with be somewhat stiff. Fold in blueberries.

Drop spoonfuls of batter into muffin liners filling each 2/3 full.

For topping: melt butter in microwave and add to brown sugar, oats, cinnamon and salt. Stir well. Add flour and stir to thicken. Sprinkle topping over muffin batter.

Bake in preheated oven for 18-21 minutes or until a toothpick comes out clean. Cool in muffin baking tin on a cooling rack for 5 minutes before taking muffins out of baking tin. Serve warm or at room temperature. Enjoy

Source: slightly adapted from Better Homes and Gardens magazine.