Feeds:
Posts
Comments

Archive for the ‘Quick and Easy’ Category

How To Blanch Almonds

It seems simple enough, but when you find yourself faced with having to remove the skin from a big pile of almonds and the skin is not coming off, well let’s just say it’s going to be a very long morning. It really IS simple enough, you just have to remember the most important part…shock your almonds!

Bring a small pot of water to a boil. Dump the almonds into the boiling water and let them simmer for 1 to 1 1/2 minutes. Pour water and almonds into a strainer, place hot almonds into a bowl and cover with cold water to shock the almonds. The shocking part is what loosens the skin from the almonds. Now the skin will slip right off the almond.

To dry the almonds just spread them out on a baking sheet in a single layer and let them sit. If you’re in a hurry you can heat your oven on its lowest temperature setting for 1 minute, then turn oven off, and let your almonds rest in the warm oven until dry. They dry pretty quickly, maybe 30 plus minutes.

Read Full Post »

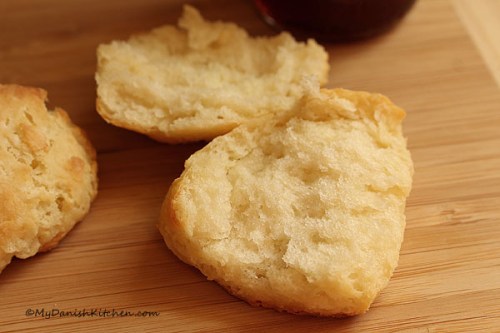
Flaky Buttermilk Biscuits

While I have been reading up on Buttermilk biscuits I discovered there are many different ways to make biscuits. Should you use butter versus shortening, all-purpose flour vs White Lily flour, different opinions on how to handle the dough, cutting vs dropping the dough and if you choose to cut the dough, how to cut. Not to mention the wide range in baking temperatures. Who knew biscuits were so controversial. In any case, I do know that it is important not to over-mix and to handle the dough as little as possible. Also using cold butter clumps makes sense to me since that is the way you get the wonderful flakiness in Wienerbrød. In this particular method I used here, I cut the dough ball in half and placed one half on top of the other, reshaped into ball and repeated this process 3 times. Did it make a big difference? I’m not really sure, but it didn’t hurt the dough. And so in conclusion, I love these Buttermilk biscuits. They are soft and buttery and flaky with a slight  crunch to the bottom, which I like. There is nothing better than homemade, right-out-of-the-oven flaky Buttermilk biscuits!

Buttermilk Biscuits (makes 9-12 biscuits)

Ingredients:

6 tablespoons unsalted butter, cold or frozen, grated (84 g)

2 cups all-purpose flour (265 g)

1 tablespoon baking powder

1/4 teaspoon baking soda

1 teaspoon salt

1 cup buttermilk, cold (236 milliliter)

Directions:

Preheat oven to 400 degrees F (204 degrees C), line baking sheet with parchment paper and set aside.

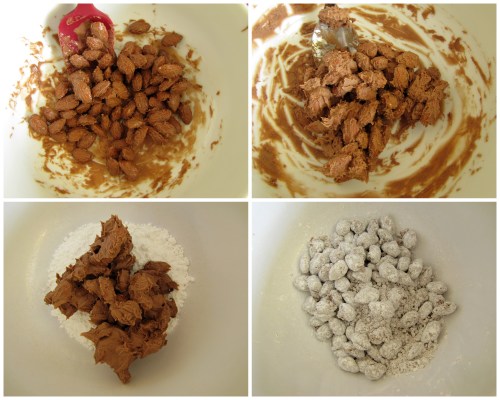
Use a box grater to grate cold butter, place grated butter in freezer while you prepare dry ingredients.

Sift flour, baking powder, baking soda and salt into a bowl. Place grated butter into flour. Using a pastry blender cut butter into pea size pieces. Add cold buttermilk, using a wooden spoon stir mixture just until dough comes together, do not overmix. Place dough onto a floured surface, gently pat dough into a ball. Cut dough ball into half, place one half on top of the other and gently press into a ball again. Repeat cutting the dough ball and placing one half on top of the other, shaping into a ball 3 more times.

Gently shape dough into a rectangle about 1 inch thick. Cut dough into 9 or 12 squares, place dough onto prepared baking sheet 1 inch apart. Place baking sheet in refrigerator for 10 minutes. Transfer baking sheet directly from the refrigerator to the preheated oven, bake 12-15 minutes or until golden brown. Serve while warm. Enjoy!

Buttermilk Biscuit

Source: slightly adapted from Girl versus Dough

Print Friendly and PDF

Read Full Post »

Nem Leverpostej

Nem Leverpostej

There are many, many different ways you can make Danish Leverpostej, as you can see in my other recipe here, and sometimes the process can be a bit lengthy. So I have been looking for a quick and easy recipe that would still give you a delicious Liver pate, and I don’t think it can get any simpler than this wonderful Leverpostej.

Nem Leverpostej

Nem Leverpostej

A quick word about liver. In my opinion, Pork liver will give you the best flavor and texture for your Liverpostej. Calf liver is your second best choice but it has a stronger liver taste. You can also use Chicken liver but the texture becomes too “mousse like” or creamy for my taste. So my first choice will always be Pork liver even though sometimes it can be a real challenge to find.

Liver Pate (makes three 1 pint ramekins plus one small foil pan)

Ingredients:

250 gram butter (8.8 oz)

500 gram pork liver (17.6 oz)

2 medium onion

2 eggs

1 teaspoon anchovy paste

70 gram all-purpose flour (2.5 oz)

1/2 deciliter whipping creme (1.7 fl oz)

1/2 teaspoon allspice

1/4 teaspoon nutmeg

2 teaspoon salt

1 teaspoon pepper

bacon for decoration, optional

Directions:

Melt butter. Cut onion and liver into chunks. Place liver, onion, melted butter and remaining ingredients into a food processor, except bacon, and process for 3-5 minutes until smooth. Pour liver mixture into baking dish and if desired decorate with bacon. When ready to bake Liver Pate, fill an oven-proof dish with hot water 1/2 way up the side of the baking dish. Bake at 350 degrees F (175 degrees C) for 1 to 1 1/2 hour depending on the baking dish size.

If freezing raw liver pate, cover baking dish tightly with aluminum foil and store in freezer safe bags. Thaw liver pate in refrigerator for 24 hours before baking.

Note: This recipe will give you enough liver pate to fill three 1 pint ramekins and one small foil pan or 1 large and 1 small foil pan.

Source: adapted from foodfanatic

Print Friendly and PDF

Read Full Post »

Mørdej - Shortcrust

Mørdej – Shortcrust

Shortcrust dough is very quick and easy to make and it’s used for both sweet and savory dishes (pies, tarts and quiches). This particular dough has sugar in it, so I would reserve it for a sweet dish. The process I describe here is using a food processor, but if you don’t have a food processor, the dough can also be made simply by using your hands. If you choose this method, rub the butter into the dry ingredients until it resembles breadcrumbs, working as quickly as possible to prevent the butter from heating up. Then add the egg to bring the dough together, careful not to over-work the dough. Hint: when I roll out the dough, I roll it out on a piece of cling wrap. It makes for easy lifting and moving of the rolled out dough.

Making Mørdej

Making Mørdej

Ingredients: (makes enough dough for a 9 or 11 inch pan – 23 or 28 cm)

300 grams all-purpose flour (10.5 oz)

175 grams butter, cold (6 oz)

75 grams confectioners sugar (2.6 0z)

1 egg

Directions:

Place flour, butter and confectioners sugar into a food processor and process until it resembles breadcrumbs. Add egg and pulse only until dough starts to come together, careful not to over-work dough. Place dough onto your work surface and press dough into a flattened disc. Wrap dough in plastic wrap and refrigerate for at least 30 minutes or overnight.

Once ready to use, roll dough out to the desired thickness. Spray pan with baking spray and fit the dough against the bottom and sides of pan. Trim the dough even with the top of pan or fold dough into a border. Re-refrigerate dough for another 10-15 minutes before baking.

Baking time and temperature will depend on what you are filling the pie/tart with. Follow your recipe for baking time and temperature.

If you want to blind bake (pre-bake) the dough before filling it, preheat oven to 200 degrees C (400 degrees F). Place parchment paper or foil over dough, fill with rice, beans or pie weights to prevent dough from bubbling up. Bake for 20 minutes, remove paper and weights and bake for another 3-5 minutes or until golden. Cool crust before filling.

Source: adapted from Kager til Kaffen

Print Friendly and PDF

Read Full Post »

Homemade Bounty Bars

Homemade Bounty Bars

In Denmark you can buy Bounty candy bars which is a coconut filling covered in chocolate. Essentially it’s like a Mounds or Almond Joy candy bar. Since my husband and I are both big coconut lovers, we have been dragging these chocolate bars across the Atlantic ocean for years. But guess what, you can make them yourself and they are so easy to make. Not to mention, they taste just like a Bounty bar. So now we can stop dragging them back to the US and we’ll have more room in our luggage for my Danish liquorice.

Homemade Bounty Bars with cracker base

Homemade Bounty Bars with cracker base

I made a little variant here from the traditional Bounty bar because Joe suggested that he would like a little crunch to the bars, so I added a Graham cracker base which turned out really good. The only disadvantage to the addition of a cracker base, is that the base do get soft with 2 days. So if you are planning on having them around the house for a week or so, then I would leave out the crackers.

Bounty Bars

Ingredients:

240 g (8.5 oz) unsweetened coconut, fine shred

396 g (14 oz) sweetened condensed milk

300 g (10.6 oz) chocolate, melting wafers

4-5 sheets graham crackers (optional)

Directions:

In a bowl, combine coconut and sweetened condensed milk. Stir to combine.

If you are not using graham crackers: simply just take a small amount of coconut mixture and shape into a rectangle (mine were 6 x 2.5 x 1.5 cm or approx 2.5 x 1 x .5 inches) or whichever shape your heart desires. Place in refrigerator and chill for 2 hours.

If you are using the graham crackers: they come in sheets with four crackers. Using a serrated knife, gently saw the sheets into crackers at the perforated line. Take a small amount of coconut mixture, place on top of cracker and shape to fit the cracker. Repeat with remaining coconut and crackers. Place in refrigerator and chill for 2 hours.

Melt chocolate wafers either over a water-bath or in the microwave (10 second increments). Once melted, place each bar on a fork and holding it over the bowl, pour a spoonful of melted chocolate over, making sure sides are coated. Then dip the fork with the bar still on top of it, into the melted chocolate to coat the bottom. Slide the bar off the fork onto a baking sheet and allow to set. Enjoy!

Source: adapted from Madling

Print Friendly and PDF

Read Full Post »

Varm Chokolade Med Amaretto

Varm Chokolade Med Amaretto

When the weather turns cold there is nothing like a nice cup of hot chocolate to keep you warm. These days I like mine with a shot of Amaretto, just to warm my bones a little more. Adding Amaretto is of course completely optional, but chocolate and Amaretto is a pair made in heaven.

Homemade hot chocolate is not overly sweet, as the store-bought kind, and I love a dollop of whipped cream on top for extra creaminess. Or if you are serving it for children, marshmallows would be a lot more fun. 🙂 Stay warm out there.

Hot Chocolate With Amaretto (Makes 2 large servings)

Ingredients:

5 deciliter (or 16.9 fluid oz) milk

75 gram (or 2.6 oz) dark chocolate 60 %

2 shots Amaretto

whipping cream, optional, for topping

Directions:

If you want a dollop of whipped cream on top of your hot chocolate, whip then cream and set aside.

Chop chocolate finely. Heat milk to 85 degrees C (185 degrees F) which is hot, but not simmering. Remove from heat and add chopped chocolate. Stir until chocolate is dissolved. Add Amaretto and stir. Pour into serving glass and top with a dollop of whipped cream if desired, serve immediately or store hot chocolate in a thermos for later. Enjoy

Hot Chocolate With Amaretto

Hot Chocolate With Amaretto

Source: My Danish Kitchen

Print Friendly and PDF

Read Full Post »

Nougatmandler

Nougatmandler

Nougat is a sinfully delicious paste that is used quite often in Denmark. Nougat can be made from sugar or honey, toasted almonds, hazelnuts, walnuts and/or pistachios. There are a number of different variations of nougat but the one I am using here is a soft nougat made with hazelnuts.

The melted Nougat is added in three additions and then gently tossed and separated with confectioners sugar.

Nougatmandler is quick and easy to make. Make sure the ceramic bowl you’re using is chilled all the way and be aware that you may have to place the bowl back in the refrigerator for a few minutes, in-between each addition of the warm melted nougat. The final outcome is a crunchy toasted almond  hidden in a soft shell of sweet nougat. Makes for a perfect little snack.

Nougatmandler – Nougat Wrapped Almonds

Ingredients:

100 grams whole almonds with skin on

100 grams nougat

50 grams confectioner sugar

Directions:

Preheat oven to 350 degrees F, place almonds on a baking sheet and toast for 5 minutes. Remove almonds from oven and place in a ceramic bowl in refrigerator until completely cold.

Place confectioner sugar in a small bowl and set aside. Over a waterbath melt the nougat. Bring the cold bowl with almonds out of refrigerator and add 1/3 of melted nougat, stir with a small rubber spatula until nougat starts to set and thicken. Add the second 1/3 of nougat and repeat stirring. Place bowl back into refrigerator between nougat additions if needed. Finally, add the last 1/3 of nougat and repeat stirring. Pour nougat almonds into bowl with confectioners sugar and gently, using your fingers, work the confectioners sugar around each almond. In the end, place almonds into a sieve and gently tap the excess sugar off the almonds. Store almonds a covered container in a cool location. Makes for a wonder snack, enjoy!

Source: Mette Blomsterberg

Soft Nougat

Soft Nougat

Print Friendly and PDF

Read Full Post »

Shrimp Salad With White Asparagus

Shrimp Salad With White Asparagus

For a beautiful, warm spring day like today I think we need a light and delicious Shrimp Salad served on a small slice of French bread. I’ve had my eye on this Shrimp Salad for quite some time now, and today is the perfect day for it. The most important thing about making it, is to make sure that you get as much liquid out of the shrimp and asparagus as possible and that is difficult to do with the fragile marinated asparagus without squashing them. I still ended up with a little too much liquid in mine but the salad was still wonderful and very fresh tasting. Perhaps next time I’ll try in addition to gently patting the asparagus dry, also letting them sit for awhile on some paper towels to try and absorb some more liquid. This is a really nice, refreshing Shrimp Salad with a hint of lemon. Enjoy!

Shrimp Salad With White Asparagus

Ingredients:

200 grams small shrimp (peeled, deveined and cooked)

16-18 thin white asparagus (marinated in water)

1 deciliter Hellmann’s mayo

1 tablespoon ketchup

a small sprinkle of fresh lemon juice

a pinch of ground chili powder

Directions:

If using frozen shrimp, defrost, drain and thoroughly pat dry the shrimp. Remove asparagus from marinade water, place on paper towel and gently pat dry. It is important to remove as much liquid from shrimp and asparagus as possible to avoid a wet shrimp salad. Cut asparagus into bite size pieces. In a small bowl add mayo, ketchup, lemon juice and chili powder, stir. Add shrimp and asparagus to mayo mixture and gently mix to combine. Cover and refrigerate until ready to use. Serve with French bread. Enjoy!

Source: Dalsgaard i Skivholme

Print Friendly and PDF

Read Full Post »

Garlic and Anchovy Farfalle

Garlic and Anchovy Farfalle

Now that the holidays are over and we are settling back into our everyday routines, I think we need something quick and easy on the dinner menu. And this pasta dish is so easy to make, not to mention very delicious. The recipe is from Giada De Laurentiis and I just made some slight little changes. Enjoy!

Fresh Baby Spinach

Fresh Baby Spinach

Garlic and Anchovy Farfalle (serves 4-6)

Ingredients:

1 pound farfalle pasta

1/4 cup extra-virgin olive oil

1 tablespoon anchovy paste

1/2 teaspoon crushed red pepper flakes, optional

3 cloves of garlic, minced

5 cups baby spinach leaves (6 ounces)

1/2 teaspoon salt

1/2 cup freshly grated Parmigiano-Reggiano cheese

Directions:

Bring a pot of salted water to a boil, add pasta and cook until tender. Drain and reserve 1 cup of pasta water.

Rinse spinach in cold water, drain and set aside. In a large pan heat olive oil over medium heat. Add anchovy paste, red pepper flakes and garlic, cook for until aromatic, 1-2 minutes.  Add spinach and salt, cook until wilted, about 3 minutes.

Add cooked pasta to pan, add 1/2 of the grated cheese to pasta, add some of the reserved pasta water to pan, if needed, to loosen the pasta. Pour pasta into serving dish and top with remaining cheese. Serve immediately. Enjoy!

Source: adapted from Giada De Laurentiis

Read Full Post »

Raspberry and Granola Parfait

Raspberry and Granola Parfait

Recently I went on a short trip to Fort Myers, Florida and I stayed at the beautiful Sanibel Harbour Marriott Resort. The hotel was gorgeous, the weather was hot and most importantly, the pool was refreshing.

Ahh lounging at the pool.

Ahh lounging at the pool.

The trip was all-inclusive and so of course the food was plenty. I have to say that their breakfast spread was amazing with anything from traditional American breakfast to a more European style breakfast with salmon and various lunch meats to plenty of fresh fruit. My favorite breakfast item was a Parfait which was layered with granola, yogurt and fresh berries. I had the Parfait on the morning of my departure, which was very early, and so I brought it with me to the airport. It made for a great on-the-go breakfast but it could also be a refreshing snack or even a light lunch or dessert. With yogurt, fresh fruit and granola made with honey, you just can’t go wrong.

Granola made with oats, coconut, almonds and honey.

Granola made with oats, coconut, almonds and honey.

Ingredients for Granola:

2 cups old fashioned quaker oats

1/3 cup shredded unsweetened coconut

1/4 cup slivered almonds, chopped

1 tablespoon brown sugar

1/4 teaspoon cinnamon

1/4 cup honey

Directions:

Preheat oven to 350 degrees F. Cover a 15 x 10 inch baking sheet with parchment paper, set aside.

Combine oats, coconut and almonds in a small bowl. Place honey, brown sugar and cinnamon into a cup and stir to combine. Pour honey mixture over the oats and stir until completely moistened.

Spread oats out onto baking sheet and bake for 15 minutes, stirring twice. Turn oven off and let the oats sit in the oven for another 10 minutes. Place baking sheet on a cooling rack and allow to cool completely. Store in an airtight container.

Ingredients for Parfait:

Vanilla flavored greek yogurt

fresh raspberries, or fruit of your choice

Granola (see recipe above)

To assemble Parfait:

In a tall glass, start with a layer of yogurt, then granola and then fresh berries. Repeat layers to fill glass. Serve immediately and enjoy!

Florida sunset.

Florida sunset.

Source: adapted from Better Homes and Gardens

Print Friendly and PDF

Read Full Post »

Older Posts »