Feeds:
Posts
Comments

Posts Tagged ‘bread’

Pumpkin Bread

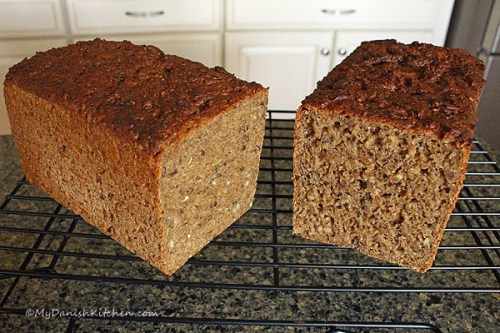
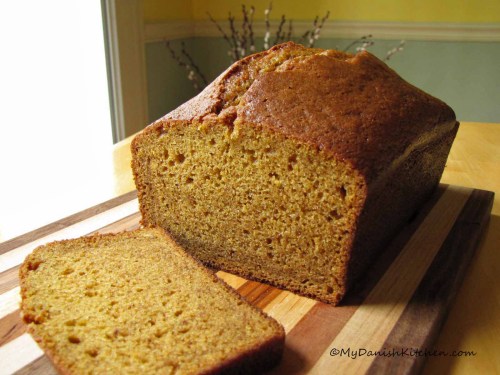
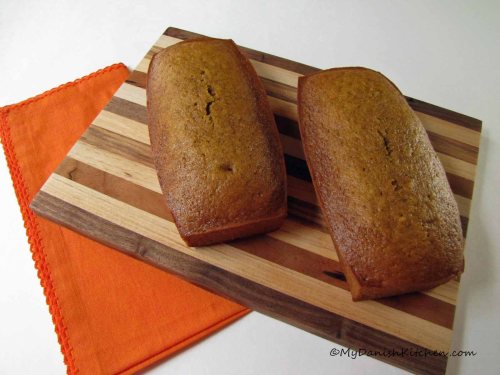
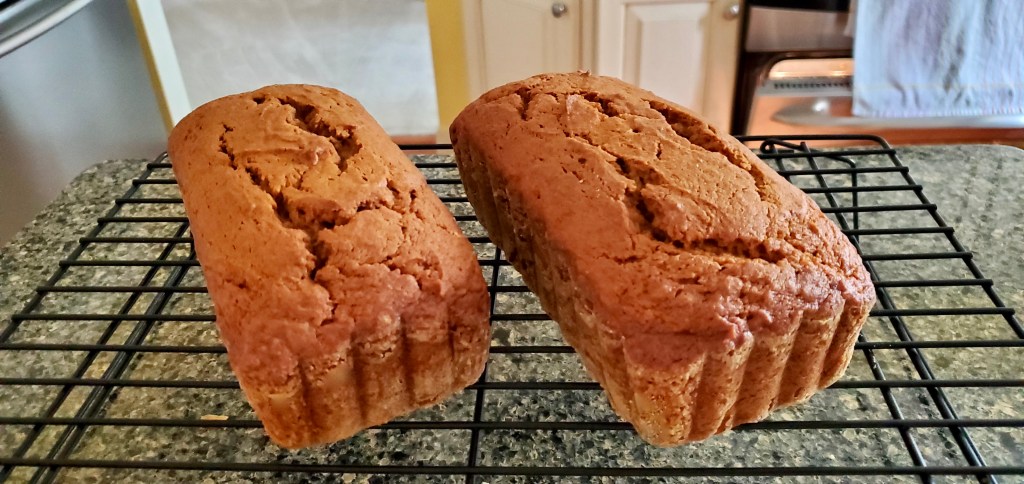
When the air turns cool and Fall is in the air, you know what time it is. It’s anything Pumpkin time. I came across this recipe, tried it out and just had to share it with you. It’s very delicious, light and soft in texture, not heavy and dense like some recipes.

The size loaf pans (8 x 4 inch) used in this recipe is not a size that I have (mine are 9 x 5 in). You could just watch the baking time closely or you could buy some 8 x 4 inch foil pans at the grocery store, which is what I did, and it worked out perfectly.

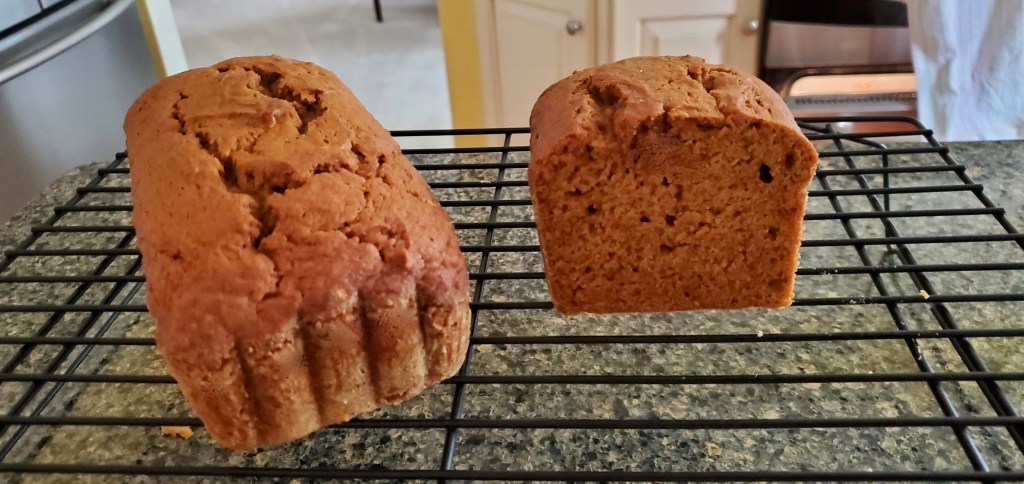
Pumpkin bread freezes really, well up to circa 3 months. Just thaw in the refrigerator overnight before serving. Since this makes two loaves, I brought one loaf into work and the other I sliced up and placed a piece of waxed (or parchment) paper in-between slices and wrapped all of it up good before placing in freezer. That way I can just pull out however many slices I want to thaw and 15 sec in the microwave will give you a warm, delicious slice of Pumpkin bread to enjoy.

Pumpkin Bread, make 2 loaves

Ingredients:

2 cups all-purpose flour (260 grams)

1/2 tsp salt

1 tsp baking soda

1/2 tsp baking powder

1 tsp ground cloves

1 tsp ground cinnamon

1 tsp ground nutmeg

1 1/2 stick unsalted butter (170 grams), room temperature

2 cups sugar (420 grams)

2 large eggs

1 (15 oz) can pumpkin puree (Libby’s) (425 grams)

Directions:

Preheat oven to 325 degrees F (163 degrees C). Grease and lightly flour two 8 x 4-inch loaf pans (20 x 10 cm), set aside.

Combine dry ingredients in a bowl (flour, salt, baking soda, baking powder, cloves, cinnamon and nutmeg), set aside. In a large bowl using an electric mixer beat softened butter and sugar until blended. Add eggs one at the time and beat until smooth and fluffy. Add pumpkin and beat until incorporated, it may look grainy which is ok. Add flour mixture in 2-3 increments and mix on low speed until incorporated.

Divide batter evenly and pour into prepared loaf pans. Bake 65-75 minutes or until inserted toothpick comes out clean. Let loaves cool in pans for 10 minutes before turning out onto baking rack to cool completely.

Source: Once Upon a Chef

Read Full Post »

Rugbrød uden Surdej

Rugbrød uden Surdej

Making and maintaining a Sourdough starter can be really overwhelming and intimidating to a lot of people, so I have been on the lookout for an alternative, and here it is. No Sourdough starter needed! However, it does need yeast, but the only thing you have to be aware of when using active dry yeast, is that the liquid temperature must be between 100-110 degrees F. If the temperature is above 110 degrees, you’ll kill the yeast. Do you have one of those small meat thermometers? Good, use it to check the liquid temperature. If you have a digital thermometer, even better.

Making Rugbrød dough

Making Rugbrød dough

Now you need a warm spot to allow the dough to rise and in the summertime that may not be a problem, but your house may not be very warm during the winter. To solve this problem I usually use my oven. It’s a small enclosed space and if you turn on the oven to 200 degrees for 30 seconds and then shut the heat off, it will be enough heat to turn the oven into a little warm space for the dough. But remember I said seconds, not minutes, and make sure you turn the oven OFF.

Dough rising in bowl x 2 hours. Dough rising in bread pans x 30 plus minutes.

Dough rising in bowl x 2 hours. Dough rising in bread pans x 30 plus minutes.

As for the outcome of this bread, I was really pleased with it. The bread turned out moist and super delicious, yet you have the wonderful chew of the seeds. A great bread without the hassle of making and maintaining a Sourdough starter. What’s not to like.

Rugbrød Uden Surdej – Rye Bread Without Sourdough (makes 2 loafs)

Ingredients:

250 g cracked rye (8.8 oz)

750 g dark rye flour (26.5 oz)

325 g whole wheat flour (11.5 oz)

7 dl warm water (23.7 fluid oz)

7 g active dry yeast (2 1/2 teaspoons)

2 dl buttermilk (6.7 fluid oz)

2 tablespoon dark syrup

1 1/2 tablespoon sea salt

50 g sunflower seeds (1.8 oz)

50 g flax seeds (1.8 oz)

50 g sesame seeds (1.8 oz)

Directions:

Spray two bread pans with baking spray, set aside. I used a Danish size 13 x 4 x 4 inch (33 x 10 x 10 cm) and an American size 9 x 6 x 3 inch (22 x 15 x 7 cm).

Place cracked rye into a bowl and pour some boiling water over, enough to cover. Let sit for 25 minutes, then pour into a sieve and allow to drain for 5-10 minutes.

Take a small amount of the 7 dl warm water, maybe 2 dl or so (6 fluid oz), place into a small dish and make sure the temperature is between 100-110 degrees F (37-43 degrees C). Sprinkle active dry yeast over water, give a quick little stir and allow to sit for 10-15 minutes.

To a large mixing bowl, add remaining warm water, yeast/water mixture, buttermilk, dark syrup and sea salt. Using the dough hook start mixing on medium-low speed. Add sunflower, flax and sesame seeds. Add drained cracked rye. Then add whole wheat flour and dark rye flour in 1/3 increments, scraping down sides as you go along. Once flour is fully incorporated, increase mixer speed to medium-high and mix for 6 minutes.

Scrape down sides of bowl, cover with a clean, dry tea towel and place in a warm location to rise for 2 hours. Divide the dough equally between the two prepared bread pans (approx 3/4 full). Place back into warm location, cover with  tea towel and allow to rise to the rim of the bread pan, approx 30-50 minutes. Before baking, pierce the dough with a thin skewer 15-20 times. Brush top of dough with an oil/water mixture and bake in a 400 degrees F preheated oven for 1 hour 15 minutes. If your bread begins to brown too fast, place a loose piece of foil over pan and finish baking. After baking allow bread to cool to a slightly warm temperature. Place bread inside a plastic bag. The condensation inside the bag will help soften the hard outer crust. Once completely cooled, remove the bread from the moist bag, wipe the bag dry before placing the bread back into the bag. The bread is now ready for slicing or freezing. Enjoy!

Source: adapted from Klappeklappekage

Print Friendly and PDF

Read Full Post »

Pumpkin Spice Bread

Pumpkin Spice Bread

Fall is finally here, my favorite time of year. I love Autumn here in Virginia, the sun is still nice and warm but the air is cool and crisp and the sky is the most brilliant blue color. The trees are showing off their beautiful Fall foliage, Pumpkins are everywhere and the evenings are for hot apple cider. What’s not to like. And to really get us into the Autumn mood, here is a delicious, soft and moist Pumpkin Spice bread which I lightened up a little by substituting some of the oil with applesauce. I promise that you can’t tell it’s a little on the healthy side. The recipe makes two regular loaves (9 x 5 inch pan) or 1 regular and 2 mini loaves (7 x 2.5 inch pan) or maybe you could make 4 mini loaves to give to friends and family. The regular size loaves bake for 60-70 minutes and the mini loaves bake for about 25 to 30 minutes or until a toothpick inserted into the center comes out clean. Happy baking!

Pumpkin Spice Bread

Pumpkin Spice Bread

Pumpkin Spice Bread (makes 2 loaves)

Ingredients:

1/2 cup vegetable oil

1/2 cup applesauce

4 eggs, at room temperature

15 oz canned pumpkin

3 cups sugar

3 1/2 cups all-purpose flour

1 teaspoon baking soda

1/2 teaspoon baking powder

1 teaspoon salt

1 teaspoon ground cinnamon

1 teaspoon ground nutmeg

1/2 teaspoon ground cloves

1/2 teaspoon ground allspice

1/2 cup water

Directions:

Preheat oven to 350 degrees F. Spray two 9×5 inch loaf pans with baking spray and set aside.

In a large bowl combine oil, applesauce, eggs, pumpkin and sugar, mix well to combine. In a second bowl combine flour, baking soda, baking powder, salt, cinnamon, nutmeg, cloves and allspice. With the mixer set to slow speed, add dry ingredients to the pumpkin mixture, while alternating with the water, mix until combined.

Pour batter into prepared pans and bake for 60-70 minutes or until a toothpick inserted into the center comes out clean. Cool in pans for 10 minutes before removing to a wire rack to cool completely. Enjoy!

Source: adapted from Taste of Home

Print Friendly and PDF

Read Full Post »

Norwegian Julekake

Julekake is a Norwegian Christmas Bread which is really easy to make. The original recipe called for candied citron which I think is what we reffer to as “Sukat” in Denmark. I had neither on hand but I did have candied orange peel which I believe is more or less in the same family. The candied orange peel does render a very unique flavor to the bread, a flavor you either love or hate 🙂 So if your not a fan, you can always just leave it out or maybe replace it with some dried cranberries, yum!

Making Julekake

The bread is served either warm or toasted with soft butter or some jam. I would like to point out that the unique candied orange flavor goes really well with Nutella, although I don’t think Nutella would be a traditional way of serving the bread, but delicious nonetheless.

Julekake (makes 1 loaf)

Ingredients:

1/4 cup butter

2 1/4 teaspoons active dry yeast (or 25 grams cake/fresh yeast)

1/4 cup water

1/2 teaspoon sugar

1/2 cup milk

1 egg

1/4 cup sugar

1/4 teaspoon salt

1/2 teaspoon cardamom

2 1/2 cups all-purpose flour

1/4 cup candied orange peel, diced (candid citron or Sukat)

1/4 cup dried cherries

1/4 cup raisins

1 egg, for egg wash

Directions:

Melt butter and set aside. Combine water, 1/2 teaspoon sugar and milk in a small sauce pan, heat to 100-110 degrees F and remove from heat. Sprinkle yeast over warm milk, give a quick stir and let sit 10 minutes. Place fruit in a small bowl with 1-2 tablespoons of the flour, mix to coat fruit with flour, set aside. Pour milk/yeast mixture into bowl of stand-mixer fitted with the dough hook. Add egg, 1/4 cup sugar, salt, cardamom and butter, start mixer on medium-low. Add flour in increments and finally add the fruit. Place dough on flour dusted work surface and knead briefly until smooth. Place dough in a greased bowl, cover with a clean, dry tea-towel and let rise for 1 hour or until double in size. Line a baking sheet with parchment paper and set aside. Give dough a quick knead to deflate and place on baking sheet. Cover dough with tea-towel and let rise for another 45 minutes. Preheat oven to 350 degrees F. Lightly beat egg to make an egg wash. Brush dough with egg wash and bake for 30 minutes. Note: you may need to cover bread loosely with foil after the first 20 minutes of baking to avoid over-browning. Serve warm or toasted with butter or jam. Glædelig Jul and Merry Christmas!

Source: adapted from Mrs. Sig Score

Print Friendly and PDF

Read Full Post »

Orange Cranberry Bread

Orange Cranberry Bread

I have been looking to change-up the holiday table a bit. I am big on traditions but there’s always room for minor improvements. Cranberries definitely belongs on the table, but serving cranberry sauce which no one in our household seems very fond of anyway, just doesn’t make sense.  So I was looking for an alternative when I came across this wonderful recipe. The only minor change I made was to toss the chopped cranberries in a little confectioners sugar to take away some of the bitterness of the berries. The bread turned out sweet and tart with a subtle background flavor of orange and a little crunch from the walnuts, very delicious. A nice addition to my holiday table.

Cranberry Bread (makes 1 loaf)

Ingredients:

165 gram all-purpose flour (5.8 oz)

135 gram whole wheat flour (4.75 oz)

200 gram sugar (7 oz)

1 small teaspoon salt

1/2 teaspoon baking soda

1 1/2 teaspoon baking powder

35 gram unsalted butter, melted (1.15 oz or 2 1/2 tablespoons)

1 egg, beaten

177 milliliter orange juice (6 oz or 3/4 cup)

1 tablespoon orange zest (zest from 1 medium orange)

50 gram walnuts, chopped (1/2 cup) – optional

160 gram fresh cranberries, roughly chopped (1 1/2 cups)

2 tablespoons confectioners sugar

Directions:

Preheat oven to 350 degrees F (176 degrees C). Grease a 9 x 5 inch loaf pan (22 x 12 cm), line bottom of pan with parchment paper and set aside.

Give cranberries a rough chop, add confectioners sugar, stir to combine and set aside.

In a medium bowl combine both types of flour, sugar, salt, baking soda and baking powder. Add melted butter, egg, orange juice and orange zest, stir until blended. Add walnuts and cranberries, stir until evenly distributed. Pour batter into loaf pan and smooth the top. Bake for 45 to 55 minutes or until a toothpick inserted into the center comes out clean. Cool in pan for 15 minutes, then remove from pan and cool completely on wire rack. Enjoy!

Source: adapted from Wild Yeast via Ocean Spray

Print Friendly and PDF

Read Full Post »

Hvedebrød aka Franskbrød

Hvedebrød aka Franskbrød

When my parents learned that I was going to move all the way to America, my mother gave me this wonderful baking book. This book has so many wonderful recipes in it and I have read the book from cover to cover many times. But imaging that in the past 27 years I have been living in this country, I have never actually baked a recipe from it…until today 🙂 The excuses as to why not, are many but the main one has always been conversions. Well by now I am finally comfortable with metric to US conversions and so I picked up this great book once again and decided that the time had finally arrived.

Lademanns Brødbagebog - a gift from my mother

Lademanns Brødbagebog – a gift from my mother

I wanted to pick something very familiar that I grew up with and Hvedebrød, aka Franskbrød as we called it, was always my favorite. I know that this bread is probably very outdated since today’s popular breads tend to be very healthy and loaded with seeds and different types of whole flour but this Franskbrød still holds a special spot in my heart ♥

Hvedebrød aka Franskbrød

Hvedebrød aka Franskbrød

Ingredients:

1/2 liter water (5 deciliter or 17 fluid ounces)

2 1/4 teaspoons active dry yeast (or 25 gram cake/fresh yeast)

1 teaspoon sugar

2 teaspoon salt

750 gram all-purpose flour (25.5 ounces)

Directions:

Heat water to 100-110 degrees F (37-43 degrees C). Sprinkle active dry yeast over warm water and give a quick stir, let sit for 10 minutes. Pour water/yeast mixture into mixing bowl, add sugar and salt. With the mixer on medium-low add flour in small increments, you may end up holding back a little of the flour . Mix until dough starts to let go from the sides of the bowl. Place dough into a clean bowl sprinkled with a little flour and cover with a clean, dry tea-towel. Place in a warm location and let rise until double in size, approx 45-55 minutes.

Spray a 9 x 5 x 3 inch baking pan with baking spray and dust pan with flour, set aside. Sprinkle work surface with a little flour and give dough a quick knead to deflate. Shape dough into a log and place into prepared baking pan. Cover with tea-towel, place in a warm location and let rise for another 20 minutes.

Preheat oven to 390 degrees F (200 degrees C). Fill an oven-proof bowl with hot water and place in oven on the lowest rack.

If desired, once the dough has risen, cut slits into dough with razor blade or a very sharp knife. Brush top of dough with a little milk or water. Place dough on the middle rack in oven and bake for 35-40 minutes. Bread is always best when eaten fresh but is also very good 1 or 2 days old and toasted. Enjoy!

Source: Lademanns Brødbagebog

This post has been submitted to YeastSpotting

Print Friendly and PDF

Read Full Post »

Gulerodsbrud

Gulerodsbrud

My sister Jonna is the one who brought this wonderful recipe to my attention. She shared pictures of her finished Gulerodsbrud on Facebook and it sounded and looked so good that I just had to try the recipe right away. And let me tell you, these rolls did not disappoint. Taste one of these rolls straight out of the oven, as is, it’s a little piece of heaven. Let them cool and you can serve them with butter, or my favorite way, with some ham and prosciutto.

Making Gulerodsbrud

Making Gulerodsbrud

Not only are these buns now one of my favorites but making them is quite an adventure. I have never encountered a process like this and it was a lot of fun. First you make your dough, it’s firm and elastic. Then you make a well in the center and add eggs, sunflower seeds and grated carrots. Wrap it up like a nice little present and then you chop up the dough until it’s in small pieces. Now it’s a real sticky mess and you make little piles of dough on your baking sheets, bake and voila…you have super soft, delicious rolls with a slight thew from the sunflower seeds. I hope you enjoy these as much as I did.

Chop dough into small pieces

Chop dough into small pieces

Gulerodsbrud, makes 12-15 buns

Ingredients:

5 1/2 dl water (18.3 fluid oz)

4 1/2 teaspoons active dry yeast (or 50 g cake/fresh yeast)

1 kg all-purpose flour (2 lb 3 oz or 35 oz)

75 g sugar (2.6 oz)

15 g salt (0.5 oz)

75 g butter (2.6 oz), at room temperature

2 eggs

150 g sunflower seeds (5.3 oz)

4 grated carrots (I got 230 g or 8 oz)

Directions:

Sprinkle yeast over warm water (100-110 degrees F) and let sit for 10-15 minutes. In your stand-mixer, combine flour, sugar and salt. Add water and yeast to flour and mix to combine, add butter and continue to mix until the dough is smooth and elastic. Place dough in a bowl and cover with a clean, dry tea towel. Allow dough to rise for one hour.

Line 2-3 baking sheets with parchment paper and set aside. Pour dough out onto your work surface and give a quick knead to deflate. Make a deep well in the center and place the eggs, sunflower seeds and grated carrots into the well. Pull outer edges of dough over the center and close like a big ball. Using a large knife or a dough scraper, cut the dough and filling into pieces. Continue to scrape the spilled eggs, seeds and carrots back into the dough and continue to cut up the dough until the dough is cut into small pieces. At this point the dough is a pretty messy affair. Take handfuls of the sticky dough and place onto the baking sheets. Let the piles of dough rise for one hour (they will not rise much).

Preheat oven to 390 degrees F (200 degrees C). Bake buns for 15 minutes or until golden in color. Enjoy!

This post has been submitted to Yeastspotting.

Source: Claus Meyer

Print Friendly and PDF

Read Full Post »

Rugbrød - Dark Rye Bread

Rugbrød – Dark Rye Bread

Rugbrød is a staple in, dare I say, all Danish households and it is the foundation for most pieces of Smørrebrød (open-faced sandwiches) whether it be the elaborate pieces bought in restaurants or the common pieces found in the daily Danish lunch box. What makes Rugbrød super healthy is that it is very low in fat, has no oils, no sugars and it is typically loaded with whole grain and fiber. That being said, there are many different versions of Rugbrød, some packed with seeds and grains, others with only the basics.

Sour Dough Starter

Sour Dough Starter

Speaking as a Dane living in the US, the lack of Rugbrød can be a source of frustration and so you have to adapt. Either you go without, or perhaps you are lucky to live close to a place where they sell a dried-out version of Rugbrød or you bake it yourself. And let me tell you that baking it yourself is worth every bit of effort you put into it, I promise! Baking Rugbrød is not difficult at all but it takes planning. It’s sometimes difficult to gather all the special ingredients required and hopefully you have the special size bread pan that everyone in Denmark possess. If not, it can be purchased on Amazon. And for all the special ingredients I use Bob’s Red Mill products because they carry everything I need. Sometimes I’ll get lucky and find some of the ingrediens at the local supermarket but I usually have to buy the rest online (once again, thank you amazon).

Making Rugbrød

Making Rugbrød

I would like to note that Danish Rugbrød is different than the German Pumpernickel bread and the two words are often a source of confusion when translating the name  into English as Dark Rye bread. Pumpernickel  is darker in color, stronger in flavor and it is steamed for a long period of time to allow the ingredients to caramelize.

Poke holes into dough to allow steam to escape.Brush with water/oil mixture. Baked Rugbrød. Place warm bread in plastic bags to soften crust.

Poke holes into dough to allow steam to escape.
Brush with water/oil mixture. Baked Rugbrød. Place warm bread in plastic bags to soften crust.

How do you maintain your sourdough starter? If you talk to ten different people you’ll likely get ten different answers. This is how I do it. To continue feeding your sourdough starter add 3 oz (1 1/2 deciliter) Dark Rye flour and 5 oz (1 1/2 deciliter) water to remaining sour dough starter, mix and allow to bubble up before storing in refrigerator. Continue to feed starter once a week while in fridge. As a general rule keep it cold when the sourdough starter is resting and at room temperature when it’s getting ready to be used for baking. Remove starter from refrigerator 24 hours before baking your bread and feed it twice (every 8 hours) at room temperature before using.

Feed your Sour Dough Starter. Keep at room temperature until it bubbles up and then refrigerate.

Feed your Sour Dough Starter. Keep at room temperature until it bubbles up and then refrigerate.

Rye Sour Dough Starter

Ingredients:

2 teaspoons active dry yeast

10 fl oz water (3 deciliter)

6.2 oz Dark Rye flour (3 deciliter or 175 gram)

Directions:

Day 1: heat water to 100-110 degrees F and remove from heat. Sprinkle yeast over water, give a quick stir and let sit for 10 minutes. Stir Rye flour into yeast mixture until smooth. Cover bowl loosely with a lid and let sit out on your counter at room temperature.

Day 2: add 2 oz Rye flour and stir (1 deciliter or 60 gram)

Day 3: stir dough.

Day 4: stir dough.

Day 5: in the morning or evening mix 1/2 of the sour dough starter with the following ingredients.

Rugbrød (makes 1 loaf)

Ingredients:

1/2 of the sour dough starter (approx 7 oz or 1 1/2 deciliter)

9.7 oz Dark Rye flour (275 gram)

11 oz Cracked Rye (Bob’s Red Mill) (5 deciliter or 315 gram)

10.5 oz Whole Wheat flour (300 gram)

2.8 oz Flaxseeds (1 deciliter or 80 gram)

23.7 liquid ounces cold water (7 deciliter)

1 tablespoon molasses

1 1/2 tablespoons sea salt

Directions:

Oil a 13 x 4 x 4 inch bread pan and set aside. Mix all of the ingredients together, stirring to make sure there are no dry pockets left within the dough. Pour into oiled pan and smooth top of dough. Cover pan with plastic wrap and allow to rise for 10 to 12 hours. Before baking, pierce the dough with a skewer 20 times. Brush top of dough with an oil/water mixture and bake in a 400 degrees F preheated oven for 1 hour 15 minutes. After baking allow bread to cool in the pan on a baking rack. When bread is still a little warm place in a plastic bag. The condensation inside the bag will help soften the very hard outer crust. Once completely cooled remove the bread from the moist bag, wipe the bag dry before placing the bread back into the bag. The bread is now ready for slicing or freezing. Enjoy!

Sliced Rugbrød

Sliced Rugbrød

This recipe has been submitted to YeastSpotting.

Source: adapted from Camilla Plum

Print Friendly and PDF

Read Full Post »

Lussekatter

Lussekatter mark the beginning of the Christmas season in Sweden and is served on December 13th. This day is St. Lucia and it’s a day which brings light into the winter darkness. St. Lucia is celebrated with a parade of girls dressed in white, carrying candles in their hands and the leading girl has a crown of candles on her head. It’s a very beautiful tradition and you can see more of it here.

In Denmark we inherited the St. Lucia tradition but not the Lussekatter, so these buns are new to me and I must say that they are super delicious when served warm right out of the oven. They have a sweet Saffron flavor and the most beautiful golden color. The down-side to the Lussekatter is that they don’t keep well and they really should be eaten the same day they are baked. However, if they feel a little hard by the end of the day you can soften them up by putting them in the microwave for 10 to 15 seconds and they will still be very delicious.

Lussekatter (makes 10 buns)

Ingredients:

100 grams butter (3.5 oz.)

0.75 gram saffron

4 1/2 teaspoons dry active yeast (50 grams cake/fresh yeast)

200 milliliter milk (6.7 oz.)

50 milliliter heavy whipping cream (1.6 oz.)

100 milliliter sugar (3.4 oz.)

1/2 teaspoon salt

1 egg

1/2 kilogram all-purpose flour (17.6 oz.)

1 egg, for egg wash

raisins (20 large)

Directions:

Line two baking sheets with parchment paper and set aside.

Melt butter and set aside.

Place saffron strands in a small dish and add a very small amount of the sugar. With the back of a spoon smash the saffron and sugar to break the saffron strands into smaller pieces. Set aside.

Heat the milk and cream to 100-110 degrees F (do not exceed 110 degrees). Add the dry yeast and saffron to the warm milk, stir to combine and let sit for 10 minutes.

In the bowl of your mixer fitted with the dough hook, add milk mixture, butter, sugar, salt and egg, start the mixer. Add flour in small increment, continue to mix until dough comes together. Do not over-mix. Transfer dough to a clean bowl, cover with a clean, dry tea-towel and let rise for 45 minutes.

Divide dough into 10 equal portions. I used my scale for this, making sure each dough ball weighed between 80-100 grams. Roll each dough ball into a long rope measuring 9 inches. Fold each rope into a tight backwards “S” figure and place on baking sheet. Press a large raisin into the middle of the swirl in each end of the dough. Cover dough with a clean, dry tea-towel and allow to rise for another 15 minutes. Preheat oven to 390 degrees F (200 degrees C).

Beat 1 egg to make an egg-wash. Press each raisin down half-way into the dough to ensure they don’t get pushed up and out during baking. Brush each bun with the egg wash. Bake for 8-10 minutes. Do not over-bake. Enjoy Lussekatter warm.

Source: adapted from Anne’s Food

This recipe will be submitted to YeastSpotting, a great site filled with Wild Yeast recipes.

Print Friendly and PDF

Read Full Post »

Ymerdrys

Ymer is a Danish milk product that was developed in the 1930’s. It’s similar to yogurt and buttermilk and it’s often served as a breakfast, snack or dessert. Unfortunately Ymer cannot be purchased in the US but I find that Greek Yogurt is a great substitute.

Rugbrød (Rye Bread)

Ymerdrys is a topping that is sprinkled on top of the Ymer. It is made from Danish Rugbrød (Rye Bread) and the tart and sweet taste of the bread is a perfect compliment to the slightly sour Ymer. Many years ago I purchased Ymerdrys online but I was very disappointing because it was much too sweet. Then recently I came across homemade Ymerdrys, but could it be as good as what I remember from home? Yes it can! And it is very quick and easy to make 🙂

Rugbrød (Rye Bread) crumbs

Ymerdrys is definitely one of those foods that I’ll be making on a regular basis. It’s a great source of fiber, a delicious addition to your Ymer or Yogurt and a great way to use up leftover Rugbrød. Now, Ymerdrys from back home did not have freeze dried berries in it, so that is completely optional, but I just wanted a little extra color in it and I had a bag of freeze dried raspberries sitting around waiting to be used up, besides it turned out über good. Also, when you choose your Rugbrød I would recommend choosing one that has some seeds into, it gives a little extra crunch after it’s baked.

Ymerdrys with dried raspberries

Ingredients:

200 gram Rugbrød (7 1/2 oz Dark Rye Bread)

2 tablespoons brown sugar

1/4 to 1/2 cup freeze dried raspberries, optional

Directions:

Preheat oven to 375 degrees F (190 degrees C)

Break Rye Bread into large chunks and place in a food processor. Add brown sugar. Pulse until desired consistency. Place bread onto a baking sheet lined with parchment paper and bake in oven for 10-15 minutes. Watch it closely the last 5 minutes to make sure it doesn’t burn. Allow to cool on baking sheet. Place freeze dried berries into a small plastic bag and crush into small chunks. Add berries to Rye Bread and mix. Enjoy sprinkled over top of your Ymer or Greek Yogurt!

Rugbrød

Source: adapted from Miras Madblog

Print Friendly and PDF

Read Full Post »

Older Posts »