Feeds:
Posts
Comments

Posts Tagged ‘Danish’

Delicious Leverpostej

Can you have too many Leverpostej recipes? Never! The more the merrier. This is a wonderful Leverpostej loaded with flavor. Serve it warm with sautéed mushrooms and maybe some extra bacon. This recipe is less complicated than my original Leverpostej recipe and has just a couple more ingredients than my Easy Leverpostej. If you have a food processor it’s so easy to make, or you can always make it the danish way by running the first four ingredients through a meat grinder twice and then adding remaining ingredients.

Making Leverpostej

For this recipe I wrote it up to make a full portion (which makes 5-6 small loaf pans or 3 large loaf pans) or if you want to make only half the amount, measurements are in parentheses. I personally only make half of a portion since we don’t eat Liver pate every day. If not baking right away, store the unbaked pate in the freezer.

Leverpostej (full portion makes 5-6 small or 3 large loafs)

Ingredients:

600 g or 21 oz Calf liver (300 g)

170 g  or 6 oz onion (85 g)

90 g or 3.2 oz mushrooms (45 g)

240 g or 8.5 oz bacon (120 g)

250 g or 8.8 oz butter (125 g)

200 ml or 6.8 fluid oz heavy whipping cream (100 ml)

75 g or 2.6 oz flour (38 g)

2 egg (1)

20 g or 0.7 oz anchovy paste (10 g)

1/2 tsp better than bouillon paste, beef (1/4 tsp)

1 tsp salt (1/2 tsp)

1/2 tsp pepper (1/4 tsp)

1 tsp allspice (1/2 tsp)

1 tsp paprika (1/2 tsp)

Directions:

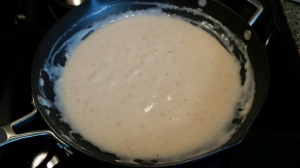
Melt butter and set aside. Cut liver, onion, mushrooms and bacon into chunks. Place onion, mushrooms and bacon into food processor and process until coarse. Add liver and process until well incorporated. Add heavy whipping cream to butter, add mixture to food processor. Add flour, egg, anchovy paste, better than bouillon paste, salt, pepper, allspice and paprika, process until smooth (several minutes).

Pour into small aluminum forms and if freezing cover top tightly with aluminum foil and store in freezer safe bags. When ready to cook Liver Pate, fill an oven-proof dish with warm water 1/2 way up the side of aluminum form. Bake uncovered in oven at 200 degree C (390 degrees F) for 1 hour 30 minutes. Enjoy!

Source: slightly adapted from Sweet, Sour, Savory

Print Friendly and PDF

Read Full Post »

Lagkage – Danish Layered Cake

There are no real rules on how to make a Lagkage (layered cake) but typically it starts with 3 to 6 cake layers. I used 4 cake layers and the recipe I link to here makes one cake which is sliced into two cake layers. I also have another recipe here which makes one cake that is sliced into 3 cake layers, but the methode is a little more involved. These cake layers incidentally freezes really well which makes for easy Lagkage making. Filling can be anything your heart desires and I chose a combination of Kagecreme, jam, whipped cream with fresh raspberries and crushed meringue cookies. The Kagecreme I used is a powder mixed with milk which is whipped into a cream, so basically it’s like a pudding. I have not tried using a vanilla pudding mix but I would think you could use it as long as it’s not too thin. Or you could choose to make a super delicious custard but it does take a little extra time. The meringue cookies was store bought but you can also bake them yourself as long as they are completely dried out and not sticky in the middle.

Hindbærlagkage

Layered Cake With Raspberries (10-12 servings)

Ingredients:

4 round cakes

1 package vanilla flavored KageCreme (or homemade custard)

raspberry jam, seedless

1 pint heavy whipping cream (473 ml)

1 tablespoon confectioners sugar

2-3 big handfull broken-up meringue cookies (or Danish macaroons)

12 oz fresh raspberries, crushed (340 g)

Directions:

Prepare KageCreme according to package directions or make your custard and set aside.

Stir up raspberry jam to loosen it.

Beat heavy whipping cream with confectioners sugar until it starts to thicken. Set aside a few raspberries for decorating, then crush the remaining raspberries using a fork. Add crushed raspberries to whipped cream. Crush meringue cookies into small pieces and add to whipped cream. Fold crushed raspberries and meringue cookies into whipped cream.

Select your serving platter. Cut 4 pieces of waxed paper (or parchment paper)and arrange on serving platter so all edges of the platter is covered with waxed paper. Place first cake on top of waxed paper. Spread with a thin layer of raspberry jam. Spread a generous layer of KageCreme (or custard). Place the second cake on top. Spread a layer of whipped cream. Place third cake on top. Spread a thin layer of raspberry jam. Spread a generous layer of KageCreme (or custard). Place fourth cake on top. Spread the remaining whipped cream on top and around the sides of cake. Decorate with the reserved fresh raspberries. Finally pull out the waxed paper from beneath the cake leaving a clean edge on the serving platter. Refrigerate until ready to serve. Enjoy!

Source: My Danish Kitchen

Print Friendly and PDF

Read Full Post »

Easy cake for making layered cakes

Layered cake is so delicious but can be a time consuming project. However, if you bake the cake layers ahead and store them in the freezer, it will save you time and the task becomes less overwhelming. Simply just pull the cakes out when needed and assemble the cake. This recipe for cake layers is quick and easy and the cakes freeze really well.

Cake layer

I did learn a lesson when baking this particular cake. To prevent the cake from taking on too much color too fast, I placed a piece of foil over the pan, however, the foil touched to top of the cake and pulled off the very top layer. Not that it really matters because the cake will be covered with cream anyway but I am a type-A kind of person so little things like that annoys me 🙂 Lesson learned, if using foil tap a dome into it so it doesn’t touch the cake…I knew that….I just forgot.

Lock parchment paper in springform pan

Lagkagebunde (makes 1 cake, cut into 2 cake layers)

Ingredients:

3 large eggs

125 g sugar (4.4 oz or 3/4 cup)

60 g flour (2.1 oz or 1/2 cup)

60 g cornstarch (2.1 oz or 1/2 cup)

1 tsp. baking powder

Directions:

Preheat oven to 390 degrees F (200 degrees C).

Use a 9 inch (23 cm) springform pan, place a piece of parchment paper in bottom of springform and lock in place. Spray a light layer of baking spray in pan, add a tablespoon of flour to pan, rotate pan to coat sides and bottom with flour, bang out excess flour into a trash can and set pan aside.

Place eggs and sugar in the bowel of an electrical mixer and mix on high-speed for 10 minutes until eggs are pale and thick. Mix dry ingredients in a small bowel and sift over egg mixture. Gently fold in the dry ingredients, careful not to deflate the dough by over-mixing. Pour batter into prepared springform pan. Bake for 15-20 minutes or until light golden, careful not to over-bake. The cake is done when the cake feels firm to the touch or test by inserting a toothpick into the middle of the cake, the toothpick should come out clean. Allow to cool completely in pan. Once cooled, run a small knife around the edges to loosen it, then open springform. Using a serrated knife cut cake horizontally into 2 cake layers. If you are not using the cake layers right away they can be frozen. Separate the two cakes with parchment paper and store in freezer-safe bags.

Source: My Danish Kitchen

Print Friendly and PDF

Read Full Post »

Making Æbleskiver pour batter, rotate 1/4 turn, backfill with more batter, rotate last 1/4 turn and finish frying until baked through.

It’s that time of year again and although it’s a little early, I just had to make some delicious danish Æbleskiver. They are wonderful served warm with a little jam and perhaps some warm red or white Gløgg (mulled wine). By the way, they can also be made ahead of time, tossed in the freezer and quickly reheated in the oven. Here’s a slightly different recipe with egg whites which makes them a little lighter. Also the technique is different than my previous Æbleskive post, in that I backfill each Æbleskive with a little more dough which helps get a rounder Æbleskive. If you want to see the previous post or want to read more about the traditions surrounding Æbleskiver click the above link. I hope you enjoy these super delicious Æbleskiver.

Æbleskiver (makes 40-45)

Ingredients:

500 g all-purpose flour (17.6 oz)

2 tsp salt

2 tsp baking soda

3 tsp vanilla sugar

3 tbsp sugar

4 egg yolks

8 dl buttermilk (27 fluid oz)

zest from 1 lemon

4 egg whites

Canola oil for frying

Directions:

Combine flour, salt, baking soda, vanilla sugar and sugar, set aside. Stir egg yolks and buttermilk together and beat into dry ingredients. Zest lemon into batter and beat to combine. In a separate bowl, beat egg whites stiff and fold into batter.

Preheat æbleskive pan to medium high. Brush pan with canola oil and pour batter. Using a knitting needle (sound odd, but works really well) or a skewer, turn æbleskiver 1/4 turn and fry a little more. Backfill each with a little more batter and turn the last 1/4 turn. Finish frying, turning æbleskiver until baked through. Serve warm with jam and/or sugar, smiles and a heavy dose of hygge. Enjoy!

Source: My Danish Kitchen

Print Friendly and PDF

Read Full Post »

Kringle with Marzipan Remonce

Danish Kringle is so delicious and it’s also surprisingly quick and easy to make. I recently made this one with a Marzipan remonce which was a big hit. Kringle also freezes really well so it’s one of those desserts you can easily make ahead and just pull out of the freezer, thaw, bake and serve. Enjoy!

Kringle (makes 2 Kringler, serves 12-16)

Ingredients:

For the dough:

1 deciliter water (3.4 fluid oz or 100 ml)

2 1/4 teaspoons active dry yeast (or 25 grams cake/fresh yeast)

2 tablespoons sugar

2 large eggs, room temperature

a pinch of salt

150 grams salted butter, cut into small cubes, room temperature

325 grams all-purpose flour

For the Remonce filling:

100 grams butter, room temperature

100 grams sugar

100 grams marzipan, room temperature and broken into small pieces

Other optional fillings: 

50 grams golden raisins

25 grams blanched almonds, chopped

Garnish:

1 egg, for egg wash

Pearl sugar (or regular sugar)

slivered almonds

Directions:

To make dough: Using hot water, confirm that the water is between 100 to 110 degrees F (no more than 110 degrees). Pour warm water into a large bowl, add 1 tablespoon of the sugar and sprinkle yeast over water, let sit for 10 minutes. Add remaining sugar, eggs, a pinch of salt, butter and flour. Using your hands, mix all ingredients until dough comes together. Dough may feel a little tacky and there may still be small pieces of butter, that is OK. Transfer dough to a clean bowl, cover with a clean, dry tea-towel, place bowl in a warm location and let rise for 1 hour.

To make Remonce filling: Beat butter and sugar until smooth. Add marzipan and continue to beat until completely smooth.

Rolling out dough: For easy clean-up, place two long pieces of plastic wrap (cling wrap) onto your work surface. Sprinkle plastic wrap with flour and give the dough a quick soft kneading, sprinkle with a little more flour until dough is soft and elastic, and no longer sticky. Divide dough into two equal portions and form each piece of dough into a log. Working with one log at the time, roll out the log (on top of the plastic wrap) to approximately 30 x 15 centimeter rectangle (11.5 x 6 inches). Spread 1/2 the Remonce filling down the middle of each dough rectangle and sprinkle with raisins and almonds (optional). Fold the ends over about 2 cm (almost 1 inch) then fold the outer 1/3 of dough over the middle and then the other outer 1/3 of dough over the middle again. Holding onto the plastic wrap, roll dough rectangle over so it’s now placed upside-down (seam side down). Carefully place dough rectangle onto baking sheet lined with parchment paper. Repeat process with second piece of dough. If planning on baking both Kringler at this time, allow both dough rectangles to rise for another 15 minutes on the baking sheet before baking.

Freezing: If you are planning on freezing the unbaked Kringle, wrap it up in parchment paper and then foil (or a large zip lock bag if you have one). When ready to bake, thaw in refrigerator for 24 hours, then place on parchment paper at room temperature for 1 hour before baking.

Baking: Preheat oven to 220 degrees C (425 degrees F). Lightly beat egg with a fork and brush dough with egg wash. Sprinkle with Pearl sugar and almonds. Bake for 12-14 minutes on middle rack in preheated oven. Allow to cool on baking sheet. Enjoy!

Source: adapted from Anne Magrethe i Hirtshals

Read Full Post »

Bedstefars Skæg

Bedstefars Skæg

This cake is one of those old-fashioned danish cake that you may, or may not, remember from your childhood. I am not really sure I tasted this cake when I was a child, but the topic came up and it just sounded so delicious that I had to make it (anything with meringue, and I’m game). And the cake did not disappoint. The cake is soft and buttery and the combination of raspberry and soft, sweet meringue is very delicious. Enjoy!

Bedstefars Skæg (16 servings)

Ingredients:

185 g unsalted butter, room temperature (6.5 oz)

225 g sugar (8 oz)

3 egg yolks

275 g all-purpose flour (9.7 oz)

3/4 tsp baking powder

1/2 tsp salt

175 ml milk (6 fl oz)

6 oz seedless raspberry jam

3 egg whites, room temperature

185 g sugar (6.5 oz)

Directions:

Preheat oven to 200 degrees C (390 degrees F). Spray a 9 x 13 inch  (23 x 33 cm) pan with baking spray and line pan with parchment paper extending over edges, set aside.

Beat butter and suger until smooth. Add egg yolks one at the time and continue to beat until homogeneous. Sift flour, baking powder and salt into butter mixture, add milk and using a spatula fold everything together until smooth, batter will be a little thick. Drop batter into prepared pan and spread out into corners. Bake for 15 minutes and let cake rest on a cooling rack while meringue is made.

Beat egg whites until frothy, slowly add sugar and beat on high speed until stiff peaks form.

Spread raspberry jam out over cake in a thin layer. Top the cake off with the meringue, sealing the edges and bake for another 15 minutes or until golden. Serve at room temperature and enjoy!

Source: slightly adapted from Anne Au Chocolat

Print Friendly and PDF

Read Full Post »

Marmorkage

Marmorkage

If you follow my blog it should be pretty obvious to you that I love Marmorkage (Marble Cake) since I have already written about this cake twice before (here and here). So why another Marmorkage on the blog? Well this time the presentation of the cake is a little more festive since I am using a bundt pan and the recipe has yogurt and cream in it which gives the cake a little extra moisture. I also increased the cocoa amount slightly from two to three tablespoons and quite frankly I think I’ll bump it up even more next time around…because I can…and because I love chocolate.

Marmorkage – Marble Cake

Ingredients:

200 g salted butter (7 oz), room temperature

250 g sugar (8.8 oz)

4 eggs

250 g all-purpose flour (8.8)

2 teaspoons baking powder

2 teaspoons vanilla sugar or beans from 1 vanilla pod

200 g plain greek yogurt (7 oz)

3 tablespoons unsweetened cocoa

2 tablespoons whipping cream

Directions:

Spray bundt pan with baking spray, toss a little flour around to coat the pan and then bang out excess flour, set pan aside. Preheat oven to 340 degrees F (175 degrees C).

Beat butter and sugar on high speed until soft and creamy, 5-10 minutes. Add eggs one at the time, beating well after each egg. Sift flour, baking powder and vanilla sugar together. Alternate adding flour and yogurt mixing on low speed, blend only until incorporated.

Place 1/2 of batter into a second bowl. Sift cocoa powder into this 1/2 of the batter and fold the cocoa into the batter until homogeneous. You now have a bowl with white batter and one with cocoa batter. Drop spoonfuls of alternating white and brown batter into your prepared bundt pan, smooth top out before baking. Bake cake for 35 to 40 minutes or until a toothpick comes out clean. Let cake cool in pan and then invert out onto serving plate. Enjoy!

Marmorkage

Marmorkage

Source adapted from: Spisestuen.dk

Print Friendly and PDF

Read Full Post »

Honningkage Med Smørcreme

Honningkage Med Smørcreme

Honningkager are thought to be from Christiansfeld in the southern of Denmark and started gaining popularity around 1783. For many, they are associated with Christmas but I would be perfectly happy eating them year round. A Honningkage is firm in texture, yet airy and filled with Christmas spices. I have made different versions of honey cakes here on my blog before, like Honninghjerter which was quite an adventure and the short-cut Honningkage which was very flavorful but more like a regular soft cake. For this particular Honey Cake with Buttercream I decided to add a thin layer of Apricot jam which is not traditional but I think it pairs really well with the spices in the cake. I know it is a little early but since it’s December 1st I want to wish all of you a very Merry Christmas. 🎄

Trim edges off cake if hard, cut cake horizontally into two, spread buttercream and apricot and fold layers together, top with melted chocolate

Trim edges off cake if hard, cut cake horizontally into two, spread buttercream and apricot and fold layers together, top with melted chocolate

Honey Cake with Buttercream and Apricot (makes 15 servings)

Ingredients

For the cake:

500 gram honey (17.5 oz)

125 gram sugar (4.5 0z)

3 eggs, room temperature

1 teaspoon ground ginger

2 teaspoon ground cinnamon

1/2 teaspoon ground cloves

1 organic orange, zested

1 dl heavy whipping creme (3.4 fl oz)

2 tablespoon plain greek yogurt

2 teaspoon Ammonium Bicarbonate (called Hjortetaksalt in Danish)

500 gram all-purpose flour (17.5 oz)

For the Buttercream:

130 gram butter, room temperature

130 gram confectioners sugar

Additional:

145 g Apricot jam (5 oz)

120 gram semi-sweet chocolate (4.2 oz)

Directions:

To make cake:

Lightly grease a 9 x 9 inch (23 x 23 centimeter) baking pan and line with parchment paper so the paper is overhanging the sides. Preheat oven to 320 degrees F (160 degrees C).

Combine honey and sugar in a small saucepan and heat until sugar is dissolved. Remove from heat and allow to cool until “finger warm”.

Beat eggs, ginger, cinnamon, cloves, orange zest, whipping cream and yogurt until combined. Add cooled honey mixture and beat until combined. Sift together flour and Ammonium Bicarbonate, then add flour to egg mixture and stir until fully incorporated and smooth. Pour batter into prepared pan and bake for 60 minutes or until done, careful not to over bake. Check for doneness by using a toothpick, it should come out clean when cake is done. Allow cake to cool completely before assembling.

To make buttercream:

Make sure butter is at room temperature. Cream butter and confectioners sugar together until smooth and creamy.

Assembly:

If cake edges feel hard, trim them off using a serrated knife. Cut cake horizontally into two layers and place them both cut-side-up, side-by-side. Stir apricot jam to loosen it up and spread jam out over bottom cake layer evenly. Spread buttercream out over top cake layer, flip it over and place top cake layer on top of bottom cake layer so buttercream and apricot are now together in the middle.

Chop chocolate coarsely and place in a microwave safe bowl. Melt chocolate in microwave, stopping every 10 seconds to stir and check to see if chocolate is melted completely. Spread melted chocolate out over top of cake and allow to set before cutting cake. If desired, trim edges off cake using a serrated knife. Enjoy!

Source: adapted from Alletiders Kogebog

Print Friendly and PDF

Read Full Post »

Stuvet Hvidkål

Stuvet Hvidkål

As a child we occasionally had Stuvet Hvidkål with Frikadeller and my Mom makes the best stewed cabbage in the world, of course 😘 I have not served this dish myself very often because my son and husband was not terribley thrilled with the idea of stewed cabbage. However, I just had such a craving for it the other day and my husband actually liked it, even told me three times that it was really delicious. So either he was starving to death or it was super delicious. I think super delicious!

Stuvet Hvidkål (4-6 servings)

Ingredients:

1 small white cabbage head

2 1/2 dl reserved water from cabbage

4 tablespoon salted butter

4 tablespoon all-purpose flour

Milk, to desired consistency

Fresh ground Nutmeg, to taste

Salt, to taste

Pepper, to taste

Directions:

Discard outer cabbage leaves. Divide cabbage head into four quarters, cut out core and chop cabbage into bite-size pieces. Boil cabbage in lightly salted water for 10 minutes. Reserve 2 1/2 cups of cabbage water, drain cabbage.

Melt butter over medium heat, add flour and whisk for 1-2 minutes until roux takes on a light golden color. Slowly add milk in small increments whisking constantly until you have a thick roux, then add cabbage water in small increments continuing to whisk until desired consistency. (If Bechamel sauce is still too thick at this point you can add a little more milk). Season to taste with fresh ground nutmeg, salt and pepper. Add cabbage to sauce and simmer covered for 5-10 minutes. Serve hot with some wonderful Frikadeller. Enjoy and Velbekomme.

Bechamel Sauce

Bechamel Sauce

Source: My Danish Kitchen

Read Full Post »

Sarah Bernhard Kager

Sarah Bernhardkager

Sarah Bernhardkager are famous danish cakes developed by pastry chef Johannes Steen in Copenhagen, Denmark back in 1911. The cakes are named after the famous french actress Sarah Bernhard who visited Copenhagen in connection with her book release and so the cakes were created in her honor. The Sarah Bernhard cake is a macaroon cookie topped with a rich genache, covered with melted chocolate and the original cake was decorated with a small candied violet flower. The cake is a decadent treat.

Making Sarah Bernhard Cakes

Making Sarah Bernhard Cakes

This recipe makes approximately 40 macaroon cookies. The extra cookies can easily be stored in a cookie tin with a tight fitting lid and used later. The process for making the cakes is long, but fairly easy. I would advice to break up the process into two days, either make the cookies on day one and then make the ganache and assemble cakes on day two or vice versa. I also simplified the chocolate coating by using Ghirardelli dark melting wafers which is so much easier than tempering chocolate and it taste eaqually wonderful. If you cannot find the Ghirardelli wafers in your local store it can be bought online.

Sarah Bernhard Cakes – makes 15 cakes

Ingredients:

For the Macaroons:

150 gram hazelnuts (5.3 ounces)

300 g sugar (10.6 oz)

approx 3 egg whites, at room temperature

For the Ganache:

4 deciliter heavy whipping creme (13.5 fl oz)

250 g dark chocolate, with about 66 % cocoa content (8.8 oz)

For chocolate coating:

300 g Ghirardelli dark melting wafers (10.6 oz)

Directions:

To make hazelnut macaroons: Preheat oven to 340 degrees F (170 degrees C). Line baking sheets with parchment paper and set aside. In a food processor combine hazelnuts and sugar and process until you have a fine crumble. Lightly beat egg whites with a fork to break up whites  a little. With the processor going on low speed, slowly add egg whites until you have a smooth, thick mixture. Drop spoonful’s of hazelnut mixture onto baking sheets, no more than 4-5 cm (1.6 to 2 inches) in diameter, beware that the mixture will spread out. Bake for 13-14 minutes or until they start taking on a golden color. Allow to cool slightly on baking sheet before moving cookies to a cooling rack. Once cooled down, store in a cookie tin until ready to use.

To make ganache: In a small saucepan, heat whipping creme until it just starts to simmer. Remove from heat and let sit covered for 10 minutes. Meanwhile, chop chocolate finely and place into a bowl. Pour whipping creme through a sieve and then back into saucepan, heat to simmer once again and remove from heat. While stirring chopped chocolate in the center, pour creme in a thin stream into chocolate and continue to stir until you have a smooth, shiny chocolate. Refrigerate for at least two hours or overnight.

Assembling cakes: Remove ganache from refrigerator and stir until smooth. Spoon a small amount of ganache onto a macaroon cookie and using a small icing spatula or a butter knife shape the ganache into a rounded cone shape. Set cookie aside and repeat with remaining macaroon cookies until ganache is used up. To cover cakes with melted chocolate, place melted chocolate into a microwave bowl and microwave chocolate in 10 seconds increments, stirring chocolate in-between each heat until chocolate is melted and smooth. Careful not to overheat, as chocolate will then burn and it become nu-usable. Over the bowl of melted chocolate, place a cake onto a fork and spoon melted chocolate over the Sarah Bernhard cake. Once covered, gently tap fork to allow excess to drip off. Place cake onto a piece of foil or parchment paper and allow chocolate to set. Repeat with remaining cakes. If melted chocolate starts to harden, place back into microwave for 10 seconds to soften back up. Once the chocolate has hardened on all cakes, store cookies in a container with a tight fitting lid in the refrigerator. Cakes can be served cold or at room temperature. Enjoy!

Print Friendly and PDF

Read Full Post »

Older Posts »