Feeds:
Posts
Comments

Posts Tagged ‘breakfast’

Flaky Buttermilk Biscuits

While I have been reading up on Buttermilk biscuits I discovered there are many different ways to make biscuits. Should you use butter versus shortening, all-purpose flour vs White Lily flour, different opinions on how to handle the dough, cutting vs dropping the dough and if you choose to cut the dough, how to cut. Not to mention the wide range in baking temperatures. Who knew biscuits were so controversial. In any case, I do know that it is important not to over-mix and to handle the dough as little as possible. Also using cold butter clumps makes sense to me since that is the way you get the wonderful flakiness in Wienerbrød. In this particular method I used here, I cut the dough ball in half and placed one half on top of the other, reshaped into ball and repeated this process 3 times. Did it make a big difference? I’m not really sure, but it didn’t hurt the dough. And so in conclusion, I love these Buttermilk biscuits. They are soft and buttery and flaky with a slight  crunch to the bottom, which I like. There is nothing better than homemade, right-out-of-the-oven flaky Buttermilk biscuits!

Buttermilk Biscuits (makes 9-12 biscuits)

Ingredients:

6 tablespoons unsalted butter, cold or frozen, grated (84 g)

2 cups all-purpose flour (265 g)

1 tablespoon baking powder

1/4 teaspoon baking soda

1 teaspoon salt

1 cup buttermilk, cold (236 milliliter)

Directions:

Preheat oven to 400 degrees F (204 degrees C), line baking sheet with parchment paper and set aside.

Use a box grater to grate cold butter, place grated butter in freezer while you prepare dry ingredients.

Sift flour, baking powder, baking soda and salt into a bowl. Place grated butter into flour. Using a pastry blender cut butter into pea size pieces. Add cold buttermilk, using a wooden spoon stir mixture just until dough comes together, do not overmix. Place dough onto a floured surface, gently pat dough into a ball. Cut dough ball into half, place one half on top of the other and gently press into a ball again. Repeat cutting the dough ball and placing one half on top of the other, shaping into a ball 3 more times.

Gently shape dough into a rectangle about 1 inch thick. Cut dough into 9 or 12 squares, place dough onto prepared baking sheet 1 inch apart. Place baking sheet in refrigerator for 10 minutes. Transfer baking sheet directly from the refrigerator to the preheated oven, bake 12-15 minutes or until golden brown. Serve while warm. Enjoy!

Buttermilk Biscuit

Source: slightly adapted from Girl versus Dough

Print Friendly and PDF

Read Full Post »

Mini Quiche

Mini Quiche

If you make your own Mørdej (shortcrust or pie/tart dough), typically you’ll have a little left-over dough. What I do with that dough, is rolling it out to a thin round disc, store it in the refrigerator or freezer, until ready to use. If frozen, let them thaw in the refrigerator. Then make these wonderful little Mini Quiches. They are super tasty, can be served as appetizers, breakfast or as a side dish. You can go crazy adding pretty much whatever ingredients you like, or you can make them pretty basic, as I did here. I any case, they are delicious and make great use of that left-over dough.

Making mini quiche

Making mini quiche

Ingredients: (make a many or as few as you like)

frozen dough, thawed

egg, 1 per tart

chives

a sprinkle of salt

Directions:

Preheat oven to 375 degrees F (190 degrees C). Butter tart shells (3 1/2 inch or 9 cm) thoroughly with butter. If dough is not already rolled out, roll a small amount of dough into a thin 5 1/2 inch circle (14 cm). Fit dough inside tart shell. Line with tinfoil and beans or pie weights to prevent dough from bubbling up. Pre-bake shells in preheated oven for 10 minutes. Remove shells from oven, take off foil and pie weights and let rest while eggs are prepared.

Use 1 egg for each shell. Beat each egg with a fork. Add chives and sprinkle a little salt. Pour 1 prepared egg into each shell. Place shells onto a baking sheet and bake in preheated oven for 20-25 minutes or until center is set. Enjoy!

Source: My Danish Kitchen

Print Friendly and PDF

Read Full Post »

Strawberry Rhubarb Champagne Jam

Strawberry Rhubarb Champagne Jam

Let me tell you about this perfectly delicious Strawberry Rhubarb Champagne Jam. This jam has a really intense flavor, a fabulous bright red color and a slightly loose set (which I like). It reminds me of a perfectly clear and sunny September afternoon with no humidity, simply perfect! My husband, who never really cared for jam before, is going crazy over this jam and it has now become his favorite special treat.

Strawberry Rhubarb Champagne Jam

Strawberry Rhubarb Champagne Jam

I have been interested in making my own jam for a long time but it always seemed really complicated. There is a lot to learn about canning, enough to write a book, which is not my intention in this post. So I am going to recommend that you invest in one or two books to help you understand the entire process and to be able to obtain a product that is safe to eat and has a long shelf life.

Making Jam

Making Jam

I don’t have all the equipment that is suggested but after having made this jam a couple of times, I now know what equipment is essential to make the process easier for myself. Ideally you want a canning pot which comes with a rack that holds the jars, however, a large stock pot can do the same job but it must be large enough to cover jars with 1 inch of water and to prevent the jars from cracking you can place a small folded clean dish towel or a stainless steel trivet at the bottom of the pan. You also need a wooden spoon, a small stainless steel ladle, stainless steel tongs to lift hot jars in and out of the boiling water, rubber coated jar lifter to transfer filled jars upright back into boiling water and finally glass Mason jars, screw-top rings and lids. You can reuse Mason jars and screw-top rings but the lids must always be new to ensure a proper seal.

Jam Test

Jam Test

There are numerous rules when you are canning and many of these rules should not be altered. To prepare myself for this adventure I went out and purchased a couple of books to learn from. The first one is Southern Living Little Jars, Big Flavors and what I love about this book is the very clear layout of the entire canning process. It explains why all of these steps are so important to follow and it points out which ingredients and methods should not be changed. Of course the book also has a lot of small-batch recipes with gorgeous pictures to get you inspired.

The second book I purchased is called Get Started Preserving. This book does a great job explaining how the natural pectin and acid content in fruit help achieve a jelly or “set”. It has some great charts which show pectin and acid content of key fruit, vegetables and fruit freezing times and a chart which shows water bath heat processing times for key fruits. The book also has an easy to read section on how foods spoil and the science of preserving. The book is loaded with photographs and it covers a wide variety of preserving from simply freezing fruit and vegetables, to bottled fruit in alcohol, salt preserves, pickling, fruit cheese, jams and jelly, fruit curd, cured fish and cured meats. The downside to this book is that the entire canning process is not as clearly laid out, when compared to the first book I mentioned.

Now that I have managed to completely turn you off to preserving your fruit, let me say this. Yes, there are a lot of rules to follow in order to keep you and your family safe when eating your wonderful canned goods. But if you set out to learn about the process (which is what I recommend) before attempting the process, and you know the steps involved, it is really a fun afternoon activity and the result is so much better than the store-bought jams. Now go do some canning and try not to kill anyone in the process, just kidding.  🙂

Strawberry Rhubarb Champagne Jam (makes approx 3 small 8 oz jars, depending on how much tasting you do along the way)

Ingredients:

460 gram strawberries (16.2 oz or about 3 cups), washed, hulled and quartered

140 gram rhubarb (4.9 oz or about 1 cup), washed and sliced

390 gram sugar (13.8 oz or 2 cups)

1 1/4 cup champagne (or sparkling wine)

4 tablespoons lemon juice

1 tablespoon pectin

Directions:

Wash mason jars and lids in hot soapy water and rinse thoroughly.

Place a couple of small saucers in the freezer to do the jam test on later.

To sterilize jars you can use a canning pot which comes with a wire rack, or if you don’t have a canning pot, you can use a large stock pot and place a trivet or a folded up clean towel in the bottom of the pot. Fill the pot with hot water and place clean jars upright into the water making sure they are covered by 1 inch (2.5 cm) of water. Bring water to a rolling boil over high heat. Boil for 10 minutes, then reduce heat and continue to simmer until you are ready to fill jars. Note: jars must be hot when the hot jam is filled into them. Place lids and rings into a heatproof dish making sure to spread them out so they don’t clump together. Fill dish with hot water and let the lids sit in water until ready to use.

Combine strawberries, rhubarbs, lemon juice and champagne in a heavy-bottomed pan. Stir over low heat and let fruit simmer for 5 minutes. Mash fruit with a potato masher if desired. Stir pectin into sugar and add to the fruit all at one time. Stir until sugar has dissolved and simmer for another 15 minutes. Then bring the jam up to a rapid, rolling boil for 5 minutes. Start testing for set when the bubbles become larger and start to “plop”.

Take the pan off the heat while you test for set. To test for set, remove one of the saucers from the freezer and pour a tablespoon of jam onto the cold plate. Let it cool for a minute then run a finger through the jam. If the jam wrinkles and your finger leaves a trail, the jam is set. If jam is still runny, continue to boil and test again.

Once your jam is set, remove from heat and skim off any foam that settles on the surface. Remove hot sterilized jars from simmering water, one at the time, and fill with hot jam leaving 1/4 inch (6 mm) head room between jam surface and lid. Wipe the rims clean of any spilled jam using a paper towel dipped in hot water. Quickly place a lid, rubber side down on top of each jar. Place a ring onto each jar and screw on until just fingertip tight, do not over-tighten. Then heat process the jam by placing the sealed jars upright back into the simmering water and heat proof for another 10 minutes. Make sure jars stand upright the whole time and the lids are covered with 1 inch (2.5 cm) of water. Use tongs to remove processed jars, making sure to continue keeping them upright. Transfer them to a clean towel-lined surface where they can sit undisturbed 12 to 24 hours. Lids may make a popping sound as the jars cool, this is a sign of an airtight seal. Test the seals 24 hours after heat processing by pressing down on the center of each lid with your finger. If the lid does not move or pop, the jar is sealed. Label and store in a cool, dark place and refrigerate after opening.

Note: if you end up having some left-over jam, ladle it into a jar, place in refrigerator and use within a few days.

Source: adapted from Downton Abbey Cooks

Print Friendly and PDF

Read Full Post »

Raspberry and Granola Parfait

Raspberry and Granola Parfait

Recently I went on a short trip to Fort Myers, Florida and I stayed at the beautiful Sanibel Harbour Marriott Resort. The hotel was gorgeous, the weather was hot and most importantly, the pool was refreshing.

Ahh lounging at the pool.

Ahh lounging at the pool.

The trip was all-inclusive and so of course the food was plenty. I have to say that their breakfast spread was amazing with anything from traditional American breakfast to a more European style breakfast with salmon and various lunch meats to plenty of fresh fruit. My favorite breakfast item was a Parfait which was layered with granola, yogurt and fresh berries. I had the Parfait on the morning of my departure, which was very early, and so I brought it with me to the airport. It made for a great on-the-go breakfast but it could also be a refreshing snack or even a light lunch or dessert. With yogurt, fresh fruit and granola made with honey, you just can’t go wrong.

Granola made with oats, coconut, almonds and honey.

Granola made with oats, coconut, almonds and honey.

Ingredients for Granola:

2 cups old fashioned quaker oats

1/3 cup shredded unsweetened coconut

1/4 cup slivered almonds, chopped

1 tablespoon brown sugar

1/4 teaspoon cinnamon

1/4 cup honey

Directions:

Preheat oven to 350 degrees F. Cover a 15 x 10 inch baking sheet with parchment paper, set aside.

Combine oats, coconut and almonds in a small bowl. Place honey, brown sugar and cinnamon into a cup and stir to combine. Pour honey mixture over the oats and stir until completely moistened.

Spread oats out onto baking sheet and bake for 15 minutes, stirring twice. Turn oven off and let the oats sit in the oven for another 10 minutes. Place baking sheet on a cooling rack and allow to cool completely. Store in an airtight container.

Ingredients for Parfait:

Vanilla flavored greek yogurt

fresh raspberries, or fruit of your choice

Granola (see recipe above)

To assemble Parfait:

In a tall glass, start with a layer of yogurt, then granola and then fresh berries. Repeat layers to fill glass. Serve immediately and enjoy!

Florida sunset.

Florida sunset.

Source: adapted from Better Homes and Gardens

Print Friendly and PDF

Read Full Post »

Rhubarb Muffins with Orange Zest

Rhubarb Muffins with Orange Zest

It’s Rhubarb season! Well actually, the season is almost over and I have been wanting to bake something special with my wonderful tart Rhubarbs that I picked up at the store. This recipe has two of my favorite ingredients in it, marzipan and rhubarb, yum! It also has orange zest which can sometimes be a little potent. The recipe calls for 2 teaspoons of orange zest and I think maybe next time I make these scrumptious muffins I may scale it back to 1 1/2 teaspoon, allowing the Rhubarbs to shine a little more. If you are looking for some more Rhubarb recipes check out these posts: Rhubarb Granita, Rhubarb Koldskål and Rød Grød Med Fløde. Enjoy your Rhubarbs!

Rhubarb Muffins With Orange Zest (makes 12-14 muffins)

Ingredients:

125 grams butter (4.5 oz), at room temperature

175 grams sugar (6.2 oz)

150 grams all-purpose flour (5.3 oz)

2 teaspoons orange zest, organic

1 1/2 teaspoon baking powder

2 eggs

100 grams shredded marzipan (3.5 oz)

200 grams rhubarb (7.0 oz)

2 tablespoons sugar

Directions:

Preheat oven to 100 degrees C (390 degrees F). Cut rhubarbs into 1 cm slices (0.4 inch). Place into small oven-proof dish and sprinkle with 2 tablespoons sugar. Bake for 15-20 minutes, set aside.

Preheat oven to 175 degrees C (345 degrees F). Place muffin liners into muffin tin, set aside.

Beat together butter and sugar until smooth. Combine flour, orange zest and baking powder. Add flour mixture to butter and mix until combined. Add eggs and mix until smooth. Fold in marzipan and baked rhubarbs. Scoop batter into muffin liners and bake for 25-30 minutes or until golden. Allow to cool completely before enjoying.

Rhubarb Muffins with Orange Zest

Rhubarb Muffins with Orange Zest

Source: hendesverden.dk

Print Friendly and PDF

Read Full Post »

Pumpkin Spice Pancakes

Fall is one of my favorite seasons of the year and this past week Fall has finally arrived in Virginia. We don’t get much Fall color here when compared to the more northern states but some of the trees are the most beautiful shades of red, orange and yellows. There are a lot of perfect days this time of year, and to me, perfect means the crisp, cool air with the still warm sun and the most amazing deep blue sky. There are Fall festivals on the weekends with pumpkins, music, hayrides, arts and crafts and more pumpkins. Which brings me to my subject for this recipe….pumpkin 😀

Making Pumpkin Spice Pancake Batter

If you follow my blog, you’ll know that I absolutely adore pumpkin. I have on occasion tried pumpkin pancakes in restaurants but it has always been a bit disappointing, too much ginger, not enough cinnamon, too greasy…you get the picture. So I decided to try my hand at making home-made pumpkin pancakes and this version did not disappoint. In my opinion, there is just the right combination of spices and when served with warm Maple syrup, they are to die for. These Pumpkin Spice Pancakes are already on my “Top 5” favorite pumpkin recipes list.

Pumpkin Spice Pancakes (makes 7 pancakes)

Ingredients:

1 1/4 cup all-purpose flour (5 1/2 oz. or 155 grams)

2 tablespoons dark brown sugar

2 teaspoons baking powder

1/4 teaspoon salt

3/4 teaspoon ground cinnamon

1/4 teaspoon ground nutmeg

1/4 teaspoon pumpkin pie spice

2 dashes of ground cloves

1 cup milk

1/2 cup pumpkin puree

1 large egg

2 tablespoons vegetable oil

Directions:

In a medium bowl mix all dry ingredients together using a fork to ensure there are no clumps of brown sugar. In a separate bowl mix together milk, pumpkin puree, egg and vegetable oil. Using a whisk combine wet ingredients with dry ingredients and whisk only until combined.

Heat a small greased pan to medium heat. Pour 1/3 cup batter onto hot pan and fry until air bubble form on top surface. Flip pancake and cook the second side until golden brown. If desired, keep pancakes warm in oven (200 degrees F) until ready to serve. Enjoy with warm Maple syrup.

Source: adapted from Annie’s Eats

// Print Friendly and PDF

Read Full Post »
Overnight Oats With Yogurt And Fruit

The overnight oats is an easy, delicious and super healthy breakfast. I have recently discovered Chia seeds which are high in Omega-3 Fatty Acids and fiber. They are easily digestible and a wonderful addition to yogurt, smoothies and cerial. So when I came across this breakfast which called for Chia seeds, I just had to try it.

The outcome of the original recipe was a very thick oatmeal which I thought was a bit much, so I cut back on the amount of oats to get a thinner result. So if you like it real thick, add 1/2 cup of oats instead of only 1/4 cup. Also it may be a bit foreign for some to eat cold oatmeal but it’s not that far of a stretch for me. Growing up we would sometimes have oats with a little sugar and milk for breakfast, served cold just like that, and then other time we would have it as a warm oatmeal. So to me this is quite delicious.

Ingredients:

1/4 cup old fashioned Oats

1/2 cup greek yogurt

1/2 cup milk

1 tablespoon Chia seeds

2 tablespoon honey

1/4 cup raspberries or strawberries, chopped, frozen or fresh

1/2 banana, sliced

Directions: Add to a glass jar the oats, yogurt and milk. Then add Chia seeds and honey, stir to combine. Add chopped strawberries or raspberries and sliced banana, stir gently and seal with lid. Place in refrigerator overnight and enjoy in the morning.

Source: adapted from Sweet Remedy

Print Friendly and PDF

Read Full Post »
Kammerjunker – Twice Baked Biscuits

Kammerjunker is a small twice-baked biscuit which is served with the Danish summer dish Koldskål. I have been promising to write a post about Kammerjunker for quite some time now and with summer right around the corner I find myself day-dreaming about cold, sweet and tart delicious Koldskål with some crunchy homemade Kammerjunker. And so here they are!

Kammerjunker – Twice baked biscuits

I have to say that the home-made Kammerjunker completely beats the store-bought kind. These turned out crunchy and so tasty that I had to fight off my husband for them. Btw he told me to tell you that they are also great with a little jam and Nutella on them (shaking her head in disbelief). They are not overly sweet like the ones from the store, which I really like, besides I find the store-bought kind more like a cookie anyway. I hope you enjoy these as much as we have.

Kammerjunker – makes 48 whole or 96 half sliced biscuits

Ingredients:

250 grams all-purpose flour (8.8 oz.)

2 teaspoons baking powder

100 grams sugar (3.5 oz.)

1/2 vanilla bean

1/2 teaspoon cardamom

100 grams butter, room temperature (3.5 oz.)

1 egg

1/2 deciliter milk (1.7 oz.)

Directions:

Scrape the seeds from the vanilla bean and mix with a small amount of the sugar to separate the seeds. In a large bowl add flour, baking powder, sugar, seeds from vanilla bean and cardamom, stir to combine. Cut butter into pieces, add to flour mixture and using your clean hands work butter and flour together until crumbly. Add egg, mix only until incorporated. Add milk and mix only until dough comes together. Wrap dough in plastic wrap and place in refrigerator for 1 hour.

Preheat oven to 345 degrees F (175 degrees C). Line two large baking sheets with parchment paper and set aside.

Roll small pieces of dough into approx. 2 centimeter (0.8 inch) balls and place on baking sheet 2 centimeter apart. Bake for max 10 minutes. Remove from oven and while biscuits are still warm slice into halves using a serrated knife. Place back onto baking sheet with cut-side down.

Lower heat in oven to 200 degrees F (100 degrees C) and continue to bake for another 45 minutes to dry biscuits out. Allow to cool completely before storing Kammerjunker in a cookie tin. Enjoy!

Source: adapted from Det Søde Liv

Print Friendly and PDF

Read Full Post »

Rundstykker

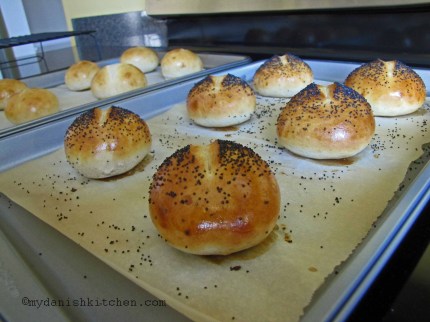
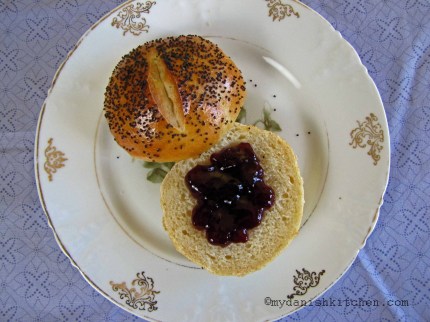
Rundstykker is a Danish breakfast buns and literally means “round pieces”. They are immensely popular, and dare I say, sold in every single bakery in Denmark. When I was younger and lived at home, my Dad would always get up early on the weekends, jump on his bicycle and ride to the baker to pick up some fresh Rundstykker. We would eat them with jam, cheese, honey or Nutella and they were wonderful.

Rundstykker

Living away from Denmark I only got to eat Rundstykker when I was home visiting. But why not make them myself? It turns out that they are fairly easy to make and the aroma of fresh baked bread on a weekend morning is simply just amazing. I will eat them warm right out of the oven or cooled off, either way, they are delicious and brings back memories of distant weekend mornings at home.

Rundstykker – 12 servings

Ingredients:

25 grams butter (3/4 ounces)

3 deciliter milk (11 ounces)

4 teaspoons active dry yeast (or 50 grams cake/fresh yeast)

400 grams flour (14 ounces)

1 teaspoon salt

poppy seeds

1 beaten egg for brushing

Directions:

Add butter to a small saucepan and melt over low heat, add milk and heat until between 100-110 degrees F (37 – 43 degrees C). Sprinkle the active dry yeast over the warm milk and let sit for 10 minutes.

Mix together flour and salt in a bowl. Pour milk/yeast mixture into the bowl of stand mixer fitted with the hook attachment. Starting on low, add the flour in increments. (If dough is still sticky after all the flour has been added, you can add a little extra flour until dough is no longer sticky). When all flour has been added, mix on medium speed for 10 minutes. (The mixing and kneading process can certainly be done by hand, make sure to knead the dough for 10 minutes as well, if you choose to do it by hand). Place dough in a bowl and cover with clean, dry tea towel. Place in a warm, draft free spot and allow to rise until double in size, 30-45 minutes.

Line two baking sheets with parchment paper and set aside. Pour dough out onto a lightly floured work surface. Divide dough into 3 equal portions. Then divide each of these portions into 4 equal parts for a grand total of 12 small pieces. Roll each piece of dough into a small dough ball, place 6 dough balls on each baking sheet. Cover each baking sheet with a clean, dry tea towel and allow to rise in a warm location for 30 minutes.

Preheat oven to 440 degrees F (230 degrees C). After the dough balls have finished rising, brush with beaten egg and sprinkle with poppy seeds. For additional decoration, using a sharp knife, cut a slit in the top of each dough ball. Bake for 10 – 12 minutes or until golden brown. Allow to cool completely or serve warm with your favorite topping. Enjoy!

This post has been submitted to YeastSpotting.

Source: adapted from Kvalimad.dk

Print Friendly and PDF

Read Full Post »

Easy Cheese Danish

Easy Cheese Danish

I saw Ina make these cheese Danish on Barefoot Contessa. They are easy, quick and very delicious. What’s not to like? They are wonderful served warm as well as the following day at room temperature. After the pastries are filled and folded, Ina tells you to refrigerate the pastries for 15 minutes before baking…which I failed to do. 😦 So the first four pastries I baked opened up during baking, not a pretty site (still tasted fantastic though). The next four I put in the refrigerator, as instructed, and these pastries stayed folded after baking. So I can only guess that the refrigeration of the pastries is an important step to keep the folded pastries closed during baking. I’ll remember this for next time 🙂

Ingredients:

2 sheets puff pastry (1 box)

8 oz cream cheese, at room temperature

1/3 cup sugar

2 extra-large egg yolks, at room temperature

2 tbsp ricotta cheese

1 tsp pure vanilla extract

1/4 tsp kosher salt

zest from 1 small lemon

1 egg, beaten, for egg wash

Directions:

Preheat oven to 400 degrees F. Line two baking pans with parchment paper.

Mix together cream cheese and sugar with an electrical mixer on low-speed. With the mixer still on low, add egg yolks, ricotta cheese, vanilla, salt and lemon zest, mix just until smooth. Place in refrigerator for 1 hour.

Unfold 1 sheet of puff pastry onto a lightly floured surface. If needed, roll it to a 10 x 10 inch square. Cut pastry into 4 smaller squares. Brush borders of each square with egg wash and then place a heaping tablespoon of cream cheese filling in the centers. Fold one corner gently over the filling, brush this corner with egg wash. Fold the opposing second corner over the first corner allowing the egg wash to seal the two corners together. Finish brushing the top of pastry with egg wash. Repeat with the second sheet of puff pastry. Makes a total of 8 pastries.

Using a spatula, place pastries on baking pans and refrigerate for 15 minutes. Then bake pastries for about 20 minutes until golden brown. Enjoy!

Cheese Danish

Source: Barefoot Contessa

Print Friendly and PDF

Read Full Post »

Older Posts »