Feeds:
Posts
Comments

Posts Tagged ‘Yeastspotting’

Gulerodsbrud

Gulerodsbrud

My sister Jonna is the one who brought this wonderful recipe to my attention. She shared pictures of her finished Gulerodsbrud on Facebook and it sounded and looked so good that I just had to try the recipe right away. And let me tell you, these rolls did not disappoint. Taste one of these rolls straight out of the oven, as is, it’s a little piece of heaven. Let them cool and you can serve them with butter, or my favorite way, with some ham and prosciutto.

Making Gulerodsbrud

Making Gulerodsbrud

Not only are these buns now one of my favorites but making them is quite an adventure. I have never encountered a process like this and it was a lot of fun. First you make your dough, it’s firm and elastic. Then you make a well in the center and add eggs, sunflower seeds and grated carrots. Wrap it up like a nice little present and then you chop up the dough until it’s in small pieces. Now it’s a real sticky mess and you make little piles of dough on your baking sheets, bake and voila…you have super soft, delicious rolls with a slight thew from the sunflower seeds. I hope you enjoy these as much as I did.

Chop dough into small pieces

Chop dough into small pieces

Gulerodsbrud, makes 12-15 buns

Ingredients:

5 1/2 dl water (18.3 fluid oz)

4 1/2 teaspoons active dry yeast (or 50 g cake/fresh yeast)

1 kg all-purpose flour (2 lb 3 oz or 35 oz)

75 g sugar (2.6 oz)

15 g salt (0.5 oz)

75 g butter (2.6 oz), at room temperature

2 eggs

150 g sunflower seeds (5.3 oz)

4 grated carrots (I got 230 g or 8 oz)

Directions:

Sprinkle yeast over warm water (100-110 degrees F) and let sit for 10-15 minutes. In your stand-mixer, combine flour, sugar and salt. Add water and yeast to flour and mix to combine, add butter and continue to mix until the dough is smooth and elastic. Place dough in a bowl and cover with a clean, dry tea towel. Allow dough to rise for one hour.

Line 2-3 baking sheets with parchment paper and set aside. Pour dough out onto your work surface and give a quick knead to deflate. Make a deep well in the center and place the eggs, sunflower seeds and grated carrots into the well. Pull outer edges of dough over the center and close like a big ball. Using a large knife or a dough scraper, cut the dough and filling into pieces. Continue to scrape the spilled eggs, seeds and carrots back into the dough and continue to cut up the dough until the dough is cut into small pieces. At this point the dough is a pretty messy affair. Take handfuls of the sticky dough and place onto the baking sheets. Let the piles of dough rise for one hour (they will not rise much).

Preheat oven to 390 degrees F (200 degrees C). Bake buns for 15 minutes or until golden in color. Enjoy!

This post has been submitted to Yeastspotting.

Source: Claus Meyer

Print Friendly and PDF

Read Full Post »

Rugbrød - Dark Rye Bread

Rugbrød – Dark Rye Bread

Rugbrød is a staple in, dare I say, all Danish households and it is the foundation for most pieces of Smørrebrød (open-faced sandwiches) whether it be the elaborate pieces bought in restaurants or the common pieces found in the daily Danish lunch box. What makes Rugbrød super healthy is that it is very low in fat, has no oils, no sugars and it is typically loaded with whole grain and fiber. That being said, there are many different versions of Rugbrød, some packed with seeds and grains, others with only the basics.

Sour Dough Starter

Sour Dough Starter

Speaking as a Dane living in the US, the lack of Rugbrød can be a source of frustration and so you have to adapt. Either you go without, or perhaps you are lucky to live close to a place where they sell a dried-out version of Rugbrød or you bake it yourself. And let me tell you that baking it yourself is worth every bit of effort you put into it, I promise! Baking Rugbrød is not difficult at all but it takes planning. It’s sometimes difficult to gather all the special ingredients required and hopefully you have the special size bread pan that everyone in Denmark possess. If not, it can be purchased on Amazon. And for all the special ingredients I use Bob’s Red Mill products because they carry everything I need. Sometimes I’ll get lucky and find some of the ingrediens at the local supermarket but I usually have to buy the rest online (once again, thank you amazon).

Making Rugbrød

Making Rugbrød

I would like to note that Danish Rugbrød is different than the German Pumpernickel bread and the two words are often a source of confusion when translating the name  into English as Dark Rye bread. Pumpernickel  is darker in color, stronger in flavor and it is steamed for a long period of time to allow the ingredients to caramelize.

Poke holes into dough to allow steam to escape.Brush with water/oil mixture. Baked Rugbrød. Place warm bread in plastic bags to soften crust.

Poke holes into dough to allow steam to escape.
Brush with water/oil mixture. Baked Rugbrød. Place warm bread in plastic bags to soften crust.

How do you maintain your sourdough starter? If you talk to ten different people you’ll likely get ten different answers. This is how I do it. To continue feeding your sourdough starter add 3 oz (1 1/2 deciliter) Dark Rye flour and 5 oz (1 1/2 deciliter) water to remaining sour dough starter, mix and allow to bubble up before storing in refrigerator. Continue to feed starter once a week while in fridge. As a general rule keep it cold when the sourdough starter is resting and at room temperature when it’s getting ready to be used for baking. Remove starter from refrigerator 24 hours before baking your bread and feed it twice (every 8 hours) at room temperature before using.

Feed your Sour Dough Starter. Keep at room temperature until it bubbles up and then refrigerate.

Feed your Sour Dough Starter. Keep at room temperature until it bubbles up and then refrigerate.

Rye Sour Dough Starter

Ingredients:

2 teaspoons active dry yeast

10 fl oz water (3 deciliter)

6.2 oz Dark Rye flour (3 deciliter or 175 gram)

Directions:

Day 1: heat water to 100-110 degrees F and remove from heat. Sprinkle yeast over water, give a quick stir and let sit for 10 minutes. Stir Rye flour into yeast mixture until smooth. Cover bowl loosely with a lid and let sit out on your counter at room temperature.

Day 2: add 2 oz Rye flour and stir (1 deciliter or 60 gram)

Day 3: stir dough.

Day 4: stir dough.

Day 5: in the morning or evening mix 1/2 of the sour dough starter with the following ingredients.

Rugbrød (makes 1 loaf)

Ingredients:

1/2 of the sour dough starter (approx 7 oz or 1 1/2 deciliter)

9.7 oz Dark Rye flour (275 gram)

11 oz Cracked Rye (Bob’s Red Mill) (5 deciliter or 315 gram)

10.5 oz Whole Wheat flour (300 gram)

2.8 oz Flaxseeds (1 deciliter or 80 gram)

23.7 liquid ounces cold water (7 deciliter)

1 tablespoon molasses

1 1/2 tablespoons sea salt

Directions:

Oil a 13 x 4 x 4 inch bread pan and set aside. Mix all of the ingredients together, stirring to make sure there are no dry pockets left within the dough. Pour into oiled pan and smooth top of dough. Cover pan with plastic wrap and allow to rise for 10 to 12 hours. Before baking, pierce the dough with a skewer 20 times. Brush top of dough with an oil/water mixture and bake in a 400 degrees F preheated oven for 1 hour 15 minutes. After baking allow bread to cool in the pan on a baking rack. When bread is still a little warm place in a plastic bag. The condensation inside the bag will help soften the very hard outer crust. Once completely cooled remove the bread from the moist bag, wipe the bag dry before placing the bread back into the bag. The bread is now ready for slicing or freezing. Enjoy!

Sliced Rugbrød

Sliced Rugbrød

This recipe has been submitted to YeastSpotting.

Source: adapted from Camilla Plum

Print Friendly and PDF

Read Full Post »

Lussekatter

Lussekatter mark the beginning of the Christmas season in Sweden and is served on December 13th. This day is St. Lucia and it’s a day which brings light into the winter darkness. St. Lucia is celebrated with a parade of girls dressed in white, carrying candles in their hands and the leading girl has a crown of candles on her head. It’s a very beautiful tradition and you can see more of it here.

In Denmark we inherited the St. Lucia tradition but not the Lussekatter, so these buns are new to me and I must say that they are super delicious when served warm right out of the oven. They have a sweet Saffron flavor and the most beautiful golden color. The down-side to the Lussekatter is that they don’t keep well and they really should be eaten the same day they are baked. However, if they feel a little hard by the end of the day you can soften them up by putting them in the microwave for 10 to 15 seconds and they will still be very delicious.

Lussekatter (makes 10 buns)

Ingredients:

100 grams butter (3.5 oz.)

0.75 gram saffron

4 1/2 teaspoons dry active yeast (50 grams cake/fresh yeast)

200 milliliter milk (6.7 oz.)

50 milliliter heavy whipping cream (1.6 oz.)

100 milliliter sugar (3.4 oz.)

1/2 teaspoon salt

1 egg

1/2 kilogram all-purpose flour (17.6 oz.)

1 egg, for egg wash

raisins (20 large)

Directions:

Line two baking sheets with parchment paper and set aside.

Melt butter and set aside.

Place saffron strands in a small dish and add a very small amount of the sugar. With the back of a spoon smash the saffron and sugar to break the saffron strands into smaller pieces. Set aside.

Heat the milk and cream to 100-110 degrees F (do not exceed 110 degrees). Add the dry yeast and saffron to the warm milk, stir to combine and let sit for 10 minutes.

In the bowl of your mixer fitted with the dough hook, add milk mixture, butter, sugar, salt and egg, start the mixer. Add flour in small increment, continue to mix until dough comes together. Do not over-mix. Transfer dough to a clean bowl, cover with a clean, dry tea-towel and let rise for 45 minutes.

Divide dough into 10 equal portions. I used my scale for this, making sure each dough ball weighed between 80-100 grams. Roll each dough ball into a long rope measuring 9 inches. Fold each rope into a tight backwards “S” figure and place on baking sheet. Press a large raisin into the middle of the swirl in each end of the dough. Cover dough with a clean, dry tea-towel and allow to rise for another 15 minutes. Preheat oven to 390 degrees F (200 degrees C).

Beat 1 egg to make an egg-wash. Press each raisin down half-way into the dough to ensure they don’t get pushed up and out during baking. Brush each bun with the egg wash. Bake for 8-10 minutes. Do not over-bake. Enjoy Lussekatter warm.

Source: adapted from Anne’s Food

This recipe will be submitted to YeastSpotting, a great site filled with Wild Yeast recipes.

Print Friendly and PDF

Read Full Post »

Brunsviger

Brunsviger is a classic Danish coffee cake of sorts. It comes from Fyn (Funen) in Denmark, the island where Hans Christian Andersen was born. It is a soft yeast dough topped with a generous serving of butter and brown sugar. It’s traditionally served warm in the morning or with afternoon coffee or tea and it’s always best the same day it is made. If you have some left-over cake you can heat it up a little and it’s still delicious.

The challenge I had making this cake was that the pan size called for, was an odd size (16×20 inch) which I don’t have. So the first time I made this coffee cake I made it “free style” if you will, simply just forming it onto a baking sheet. But it resulted in a lot of the topping flowing off the cake and making a big mess in my oven. After a weeks time of pondering I gave it another shot and this time I decided to use my 9 x 13 inch pan which is not the “correct” size but it does have tall sides as oppose to the baking sheet, and I am happy to say that it worked out great. The topping stayed on top and really seeped into the cake. Make sure to make plenty of finger dimples in the cake because this is where the yummy stuff hangs out.  🙂

Brunsviger – 12 to 16 servings

Ingredients:

1 cup whole milk, warmed to 100-110 degrees F (37-43 degrees C)

4 1/2 teaspoons active dry yeast (or 50 grams cake/fresh yeast)

6 tablespoons butter, melted

2 eggs

2 tablespoon sugar

1/4 teaspoon salt

3 1/2 cups all-purpose flour

Topping:

3/4 cup packed dark brown sugar

1 cup butter

Directions:

Heat milk to to 100-110 degrees F (37-43 degrees C), sprinkle active dry yeast over milk, give a quick stir and let sit for 10 minutes. Meanwhile melt butter and set aside.

Pour milk mixture into the bowl of a stand-mixer. Add eggs, sugar, salt and melted butter, stir to combine. Using the dough hook start the mixer on medium-low speed and add the flour in small increments. Note: you may not need all the flour. Scrape down the sides of bowl with a rubber spatula as needed and continue to add the flour until dough is soft, elastic and slightly sticky. Grease a large bowl with a small amount of baking spray or vegetable oil, place dough in bowl, cover with a clean dry tea towel and let rise for 30 minutes.

Spray a 9 x 13 inch (23 x 33 cm) baking pan with baking spray and line with piece of parchment paper extending up to the edges of pan. Deflate the dough and pour into baking pan. If dough is a little too tacky cover your fingers in a light dusting of flour. Press dough evenly out into the corners of the baking pan. Cover pan with the tea towel and let rise for another 20 minutes.

Preheat oven to 400 degrees F (200 degrees C).

To make the Topping: Over low heat melt butter with the brown sugar. Stir frequently to ensure sugar is completely melted and butter in fully incorporated. Do not boil! Remove from heat and cool slightly.

Pour 2/3 of topping over dough and spread evenly. Press your fingers into the dough to make deep dimples. Pour the remaining 1/3 of topping over dough and bake for 25-30 minutes. Serve Brunsviger warm. Enjoy!

Source: adapted from The Scandinavian Cookbook

This recipe has been submitted to YeastSpotting, a wonderful site filled with recipes containing yeast.

Print Friendly and PDF

Read Full Post »

Danish Birkes

Up until the time I decided to make Birkes, I thought there was just one type of Birkes. But that is not the case at all. When I started researching recipes I discovered three different kinds of this super delicious Danish pastry.

I was born and raised in a part of Denmark called Jylland where the pastry is referred to as Birkes or Thebirkes. This Birkes does not have a Remonce filling and the pasty at our house was always sliced in half and topped with jam or cheese…super delicious! My search lead me further east to Sjælland which is the island where Copenhagen (København) is located. Here the pastry is called Københavnerbirkes or Thebirkes and the wonderful people in the Copenhagen area makes the pastry with a Remonce filling…equally wonderful in its own way. Grovbirkes, as far as I can tell, can be found throughout Denmark and it is made with a healthy portion of flaxseed, sesame seeds and/or sunflower seeds…this one I have never tasted.

My favorite is the Birkes without Remonce, I guess because it’s the one I grew up with. The Birkes is flaky and buttery in the best true Danish style. The Københavnerbirkes is sweeter in taste, and as far as I can tell, the pastry is eaten as-is. There is a lot of conversation going on out there in Cyber-land about Birkes vs Københavnerbirkes and I was surprised to find out that people from one end of the country to the other, is not really aware of the other kind of Birkes. When I called my parents to ask them about Birkes with a Remonce filling my mother said that she had never heard of “such a thing”, so apparently I am not the only one 🙂

Notice the clumps of butter in the two pictures on the right. The butter should be the size of kidney beans.

Rolling and folding process.

The dough is rolled out, then folded into thirds and folded into thirds again.
This process in repeated three times. Notice how you still see the butter in the dough.

Puff pastry (Butterdej) with all its wonderful layers!

If making Birkes with Remonce, spread remonce over 2/3 of dough, fold into thirds and cut into 2 inch rectangles.

Note: after I filled with Remonce, I placed the dough on the baking sheet upside down so the filling was towards the top. I think this may have resulted in the Birkes that had the filling in them, turned out like The Leaning Tower of Pisa. So try to place them on the baking sheet with the filling towards the bottom.

Makes 2 portions of Puff Pastry dough (Butterdej).

Ingredients:

For the dough:

3 1/2 cups flour (15 3/4 oz) (450 grams)

1 1/2 cups cold unsalted butter (12 oz) (340 grams)

4 1/2 teaspoons active dry yeast (or 50 grams cake/fresh yeast)

1/2 cup warm water (4 oz) (118 ml) (100 – 110 degrees Fahrenheit)

1/2 cup heavy cream (4 oz) (118 ml)

1/2 teaspoon cardamom

1/2 teaspoon salt

2 eggs, room temperature

1/4 cup sugar (1 3/4 oz) (55 grams)

For Remonce filling: optional

2.8 oz butter (80 grams) at room temperature

2.8 oz sugar (80 grams)

2.8 oz marzipan (80 grams) at room temperature

For final assembly:

1 egg, slightly beaten for brushing

Poppy Seeds for sprinkling

Directions:

Place flour into bowl of food processor with steel blade. Cut cold butter into 1/4 inch slices and add to flour. Pulse flour and butter until the butter is the size of kidney beans.

In a large bowl, dissolve the yeast in the warm water. Let stand 10 minutes. Stir in the cream, cardamom, salt, eggs and sugar and mix until combined using a fork. Using a rubber spatula, turn the flour/butter mixture into the liquid and carefully mix just until the dry ingredients are moistened. Cover and refrigerate for 4 hours, overnight or up to 4 days.

Turn the dough out onto a lightly floured surface, dust top of dough with flour. Roll out dough to make a 16 to 20 inch rectangle. Fold dough into thirds, rotate dough a quarter of turn and fold into thirds again, making a small square. Turn over dough. Repeat rolling and folding another two times (making it a total 3 times of rolling and folding), ending with a small square. Using a sharp knife cut dough into two halves. Wrap each 1/2 portion of dough in plastic wrap, place both dough portions in a plastic bag and chill for at least 30 minutes.

Refrigerated dough is now divided into 2 halves. Each half of dough will make 10 birkes rolls. If you are not using the second half of dough, it can be frozen for later use. Defrost in refrigerator for 24 plus hours before using.

If using the Remonce filling, make it at this time. Use a hand-held mixer, beat the butter, sugar and marzipan to a smooth soft spreadable cream. Set aside.

Remove first half of dough from refrigerator and place on a lightly floured surface, dust top of dough with flour. Roll dough out to a 12 x 18 inch rectangle. If using Remonce filling, spread a thin layer of the filling over 2/3 of the long edge of dough. Starting with the long edge that has the filling, fold 1/3 of dough over the middle. Then fold the remaining 1/3 of dough without filling over the middle, the dough is now folded into 3 layers. Using a sharp knife, cut dough into approximately 2 inch rectangular pieces. Place pieces of dough onto a baking sheet lined with parchment paper. Allow to rise for 20-30 minutes.

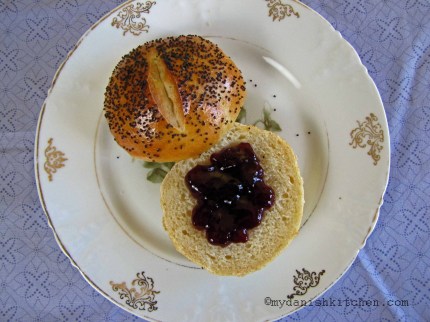
Preheat oven to 350 degrees F (180 degrees C). Lightly beat egg and brush onto top of dough. Sprinkle with poppy seeds. Bake for 15-20 minutes or until golden brown. Allow Birkes to cool on baking sheet. Birkes with Remonce filling is eaten as is. Birkes without filling is sliced in half and topped with jam or cheese. Enjoy

Source: My Danish Kitchen

This recipe will be submitted to YeastSpotting.

Print Friendly and PDF

Read Full Post »

Varme Hveder aka Hvedeknopper

It’s an old Danish tradition to eat warm Hveder Thursday evening before Store Bededag (Big Prayer Day), which is on the fourth Friday after Easter (May 4th 2012). Store Bededag was introduced in 1686 to consolidate the number of prayer days that could otherwise be used as productive working days. The tradition is from a time when Store Bededag was a work free day and this included the bakers. So the bakers made Hveder the day before Store Bededag for the people to buy and they could then toast and eat them the following day when the bakeries were closed. However, somehow the tradition turned out that people ate the Hveder the night before, perhaps because they are so good.

Hvede dough

Today fresh Hveder can still be found in all baker shops, in the days leading up to Store Bededag or you can bake them yourself. The buns are meant to be eaten when they are warm and toasted which really brings out the flavors. When they are cold they seem a bit dull and heavy. You can top them with butter, jam, cheese or cold cuts. I hope you enjoy these Danish Hveder as much as I have, it brings back wonderful memories for me. 🙂

Varme Hveder

Hveder – makes 16

Ingredients:

125 gram butter (4 1/2 oz or ~9 tablespoons)

4 teaspoons active dry yeast (or 50 grams cake/fresh yeast)

3 deciliter milk (10 oz or ~ 1 1/4 cup)

1 egg

1 tsp salt

1 1/2 tsp sugar

1 1/2 tsp ground cardamom

650 gram all-purpose flour (5 cups or 1 lb 7 oz)

1/2 deciliter milk – for brushing (~1 1/2 oz)

Directions:

Melt butter and set aside to cool down. Warm milk in microwave to 100-110 degrees F, add dry yeast to milk and let sit for 10 minutes.  In the bowl for your stand mixer fitted with the hook attachment add butter and milk/yeast mixture. Start mixer on low, add egg, salt, sugar and cardamom. Add flour in small increments until dough starts to come together (Note: you may not need all the flour). Place dough on a lightly floured surface and give it a quick needing to ensure it is homogeneous. Place dough in a large bowl, cover with a dry and clean tea towel and allow to rise for 30 minutes. Prepare a large baking sheet with parchment paper and set aside.

Place dough onto a lightly floured surface. Divide into 16 equal portions, by first dividing the dough into half and then into halves again and so on. Shape dough pieces into balls by folding the edges under and into the center until they are round. The small opening at the bottom is placed down on the baking sheet. Space dough balls 1 centimeter apart (almost 1/2 inch). Cover balls with tea towel and let them rise for 30 minutes. As they rise, they will start to grow together, this is what you want. Preheat oven to 200 degree C (390 degrees F).

Once risen, brush rolls with a little milk and bake for 15-20 minutes until golden brown. Allow to cool. To serve Hveder, cut in half and toast them. Top with butter or jam, cheese, cold cuts etc. Enjoy!

Note: Dough can easily be frozen after they are formed into balls by placing in a freezer safe bag. Once ready to use, defrost in refrigerator. Allow rolls to come to room temperature and then rise for 30 minutes before baking.

This post will be linked to YeastSpotting!

Source: slightly adapted from Kvalimad

Other sources: Naturbageriet

Print Friendly and PDF

Read Full Post »

Rundstykker

Rundstykker is a Danish breakfast buns and literally means “round pieces”. They are immensely popular, and dare I say, sold in every single bakery in Denmark. When I was younger and lived at home, my Dad would always get up early on the weekends, jump on his bicycle and ride to the baker to pick up some fresh Rundstykker. We would eat them with jam, cheese, honey or Nutella and they were wonderful.

Rundstykker

Living away from Denmark I only got to eat Rundstykker when I was home visiting. But why not make them myself? It turns out that they are fairly easy to make and the aroma of fresh baked bread on a weekend morning is simply just amazing. I will eat them warm right out of the oven or cooled off, either way, they are delicious and brings back memories of distant weekend mornings at home.

Rundstykker – 12 servings

Ingredients:

25 grams butter (3/4 ounces)

3 deciliter milk (11 ounces)

4 teaspoons active dry yeast (or 50 grams cake/fresh yeast)

400 grams flour (14 ounces)

1 teaspoon salt

poppy seeds

1 beaten egg for brushing

Directions:

Add butter to a small saucepan and melt over low heat, add milk and heat until between 100-110 degrees F (37 – 43 degrees C). Sprinkle the active dry yeast over the warm milk and let sit for 10 minutes.

Mix together flour and salt in a bowl. Pour milk/yeast mixture into the bowl of stand mixer fitted with the hook attachment. Starting on low, add the flour in increments. (If dough is still sticky after all the flour has been added, you can add a little extra flour until dough is no longer sticky). When all flour has been added, mix on medium speed for 10 minutes. (The mixing and kneading process can certainly be done by hand, make sure to knead the dough for 10 minutes as well, if you choose to do it by hand). Place dough in a bowl and cover with clean, dry tea towel. Place in a warm, draft free spot and allow to rise until double in size, 30-45 minutes.

Line two baking sheets with parchment paper and set aside. Pour dough out onto a lightly floured work surface. Divide dough into 3 equal portions. Then divide each of these portions into 4 equal parts for a grand total of 12 small pieces. Roll each piece of dough into a small dough ball, place 6 dough balls on each baking sheet. Cover each baking sheet with a clean, dry tea towel and allow to rise in a warm location for 30 minutes.

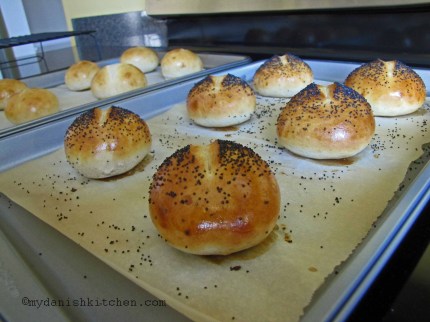
Preheat oven to 440 degrees F (230 degrees C). After the dough balls have finished rising, brush with beaten egg and sprinkle with poppy seeds. For additional decoration, using a sharp knife, cut a slit in the top of each dough ball. Bake for 10 – 12 minutes or until golden brown. Allow to cool completely or serve warm with your favorite topping. Enjoy!

This post has been submitted to YeastSpotting.

Source: adapted from Kvalimad.dk

Print Friendly and PDF

Read Full Post »

Fastelavnsboller

Fastelavn is a Nordic holiday celebrated on Sunday or Monday before Ash Wednesday. It is similar to the American Halloween where children dress in customes and beg for candy. Some towns may have a parade followed by the traditional “slå katten af tynden” which is a wooden barrel that has cats painted on it and is filled with candy. The children takes turn hitting the barrel with a bat and the one to hit the bottom out, spilling the candy, is crowned “kattedronning” (queen of the cats). Hitting of the barrel continues and the one hitting down the last plank is crowned “kattekonge” (king of the cats).

If the children go door to door begging for candy they will come to the door and sing a little tune called Boller op, boller ned. This song basically says: Buns up, buns down, buns in my stomach, if I get no buns, then I will make trouble. The buns mentioned in the song is reffering to the Fastelavnsboller which is a popular pastry served on this particular day.

There are many different varieties of Fastelavnsboller recipes. Some is made from a Wienerbrød dough and some are a regular yeast dough. Some are prefilled with a custard or jam while others are sliced open and then filled with a custard or whipped cream filling. The Fastelavnesboller which I made here is a regular yeast dough which was prefilled with custard. I absolutely adore custard and would (if no one was watching) eat it by the spoonful. However, for these particular Fastelavnsboller which I choose to prefil and then bake, it turned out that the wonderful custard got almost completely absorbed into the bread and loosing its intensity. So next time I make this recipe I think I’ll prefil with jam instead because the jam still has its intensity even if some of it gets absorbed into the bread.

Ingredients:

Dough:

2 deciliter milk (1 cup)

25 grams butter (2 tablespoons)

50 grams cake/fresh yeast (or 4 teaspoons dry active yeast)

1 tablespoon sugar

1/2 teaspoon salt

1 egg

450-475 grams flour (3 3/4 cups)

1 additional egg for glazing (optional)

Custard filling:

1 vanilla bean

1 cup milk

2 egg yolks

2 tablespoons superfine sugar

1 tablespoon cornstarch

Jam filling:

your favorite jam (if using)

Chocolate icing:

1 cup confectioners sugar

2 tablespoons unsweetened cocoa

hot water

White icing:

1 cup confectioners sugar

hot water

Sprinkles for decorating

Directions:

In a small saucepan heat up milk and butter to finger temperature, melting the butter. Break up cake yeast and place  in a small bowl, pour warm milk over and stir to dissolve yeast. Add sugar, salt and egg, stir to mix. Add flour a little at the time, stir to combine. Note: it may not be necessary to add all the flour. Knead the dough until smooth. Leave dough in bowl and cover with a dry tea towel. Place in a warm location and let rise for 1 hour.

While dough is rising, make the filling. Cut vanilla bean in half lengthwise and scrape out seeds with the tip of a knife. Place vanilla seeds and milk in a small saucepan and bring to a boil. Meanwhile, beat the egg yolks and sugar together until pale in color and fluffy. Add cornstarch and mix together. While continuing to beat the eggs, slowly pour half of the hot milk into the eggs to temper it. Then pour the tempered egg mixture back into the saucepan and return to low temperature on the stove. Continue to whisk mixture over low temperature until the custard starts to thicken, making sure the custard does not boil. Remove from heat, place in a small bowl, cover with cling wrap directly on the custard surface to prevent a skin from forming and place in refrigerator to cool.

Line two large baking sheets with parchment paper and set aside.

Lightly dust with flour and turn dough out onto the working surface. Knead dough a little until smooth and elastic. Roll out into a 40 by 40 cm square (15 x 15 inches) and cut dough into 12 pieces. Place a heaping teaspoonful custard or jam (if using) in center of each square. Using the leftover egg whites, brush the edges of the square dough to help seal the edges. Fold each of the four corners up to the center and press to seal all edges, letting the air inside escape. Turn the dough ball over, tuck under all edges and place on baking sheet with seam side down. Repeat with remaining squares. When done forming dough balls, cover with a dry tea towel and let rise for 30 minutes in a warm location.

Preheat oven to 190 degrees Celsius (375 degrees Fahrenheit). After dough has been allowed to rise, break open an egg and lightly beat it in small bowl. Brush egg-wash onto each dough ball before baking. Bake for 10-12 minutes or until golden brown. Allow to cool before icing.

To make icing, combine ingredients in a small bowl and mix until desired thickness (somewhat thick but spreadable). Spread icing onto each fastelavnsbolle and place sprinkles on top before glaze sets. Enjoy.

Source: dough from Lone Kjær – Hverdag de luxe and custard filling adapted from Trina Hahnemann – The Scandinavian Cookbook

Print

Read Full Post »