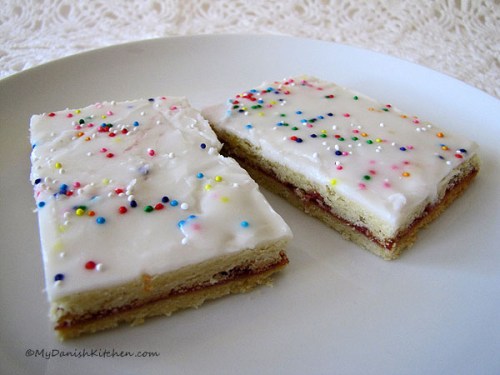
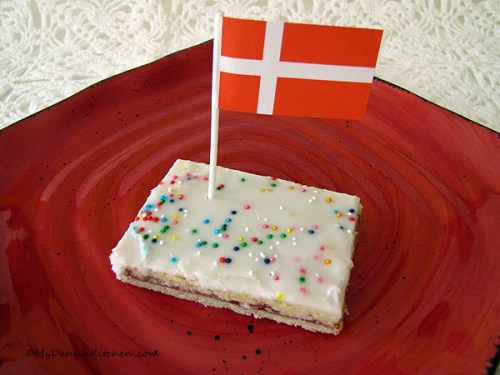
Feeds:
Posts
Comments

Posts Tagged ‘glaze’

Hindbærsnitter

Hindbærsnitter

Hindbærsnitter remains one of my all-time favorite Danish pastries and while we were vacationing home in Denmark this summer, I had my fair share of them from the bakery (that, and Træstammer). So after coming home I was looking for an excuse to bake them again and finally got the opportunity when a friend of ours came for a short stay, thanks Vince 🙂

This recipe is not that different from my other post about Hindbærsnitter, it probably differs mostly in technique. The result was a very, very tasty Hindbærsnit, although the cake turned out very delicate and frail. I think that was due to the fact that I interpreted the directions to roll out the dough to a 25 by 30 cm rectangle. Looking back, I think what Lone Landmand (from Beretninger fra et autentisk landbrug) meant was to roll the dough out to a 25 or 30 cm square. I believe that if you roll it out to a 25 by 25 cm square you will get a slightly thicker, and therefor a less delicate outcome. If you decide to try this recipe for Hindbærsnitter, I know you’ll love them.

Making Hindbærsnitter

Making Hindbærsnitter

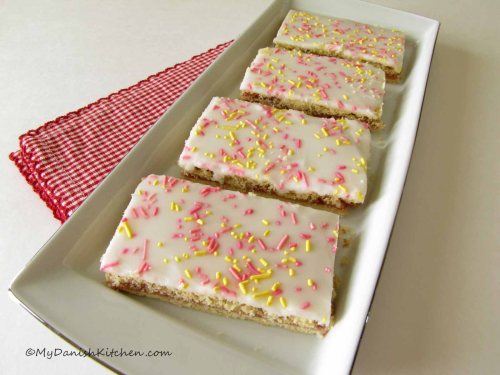
Hindbærsnitter (makes 12-16 pieces)

Ingredients:

300 gram all-purpose flour (10.5 oz)

100 gram confectioners sugar (3.5 oz)

200 gram butter, at room temperature (7 oz)

2 large egg yolks

280 gram seedless raspberry jam (10 oz)

For the glaze:

270 gram confectioners sugar (approx 2 1/2 cups)

3-4 tablespoons cold water

Colored sprinkles for decorating

Directions:

In a mixer fitted with the paddle attachment, combine flour, confectioner sugar and cut-up butter. On low speed, combine until mixture is crumbly. Add egg yolks one at the time, gradually increasing speed to medium, mix until dough comes together. Divide dough into two equal portions, place each half of dough on a piece of parchment paper and slightly press dough into a square shape. Place both pieces of dough in refrigerator for 1 hour to rest and chill.

Preheat oven to 175 degrees C (345 degrees F)

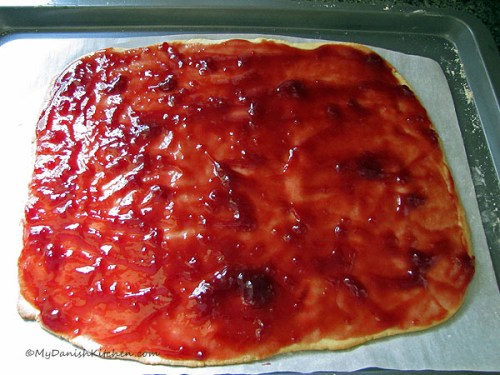
Keeping the dough on parchment paper, roll dough out to approximately 25 x 25 cm (9.5 x 9.5 inches), repeat with the second piece of dough. Place each parchment paper with rolled out dough onto a baking sheet. Bake dough, one sheet at the time, for 12 minutes or until edges turn golden. Allow baked cake to cool a little. Meanwhile, make the glaze by mixing confectioners sugar and water until smooth. Prepare raspberry jam by stirring it to make a loose flowing jam. Spread jam onto the first baked cake, this will be the bottom piece. Gently slide a flexible plastic cutting board under the second cake and lift it up. Then slide it off the cutting board onto the first raspberry covered cake. If the cake crack a little don’t worry, the glaze will cover it up. Spread the glaze over the top and add sprinkles before the glaze sets. Allow glaze to set completely before cutting. Enjoy!

Source: Beretninger fra et autentisk landbrug

Print Friendly and PDF

Read Full Post »

Best Kranskage

Best Kranskage

I was making Kransekage again the other day and decided to try a new recipe. It turned out to be the best tasting Kransekage recipe I have come across so far. It is less dense than the Kransekage I posted about earlier, the dough is softer so you can pipe it out and the finished product is slightly more “cake-like”. That being said, if you intend on making a Kransekage tower like I did for our 25th wedding anniversary, I would not used this recipe because it does not hold its shape as nicely as the other recipe.

Pipe marcipan out with a large plain round tip and shape into triangle.

Pipe marcipan out with a large plain round tip and shape into triangle.

The original directions asked you to pipe it out using a triangular tip, which I don’t have. So I used a large round plain tip (#809) instead and shaped the marcipan into it’s classic triangular shape with my wet fingers. When you do this, careful not to use too much water on your fingers and keep rinsing and wetting your fingers to avoid the marcipan from sticking. Also the Kransekage cookies seemed to brown faster than the other Kranskage recipe so keep a very close eye on them (lower your oven temperature by 10-20 degrees, if needed). And finally, the original recipe called for Odense Bagemarcipan which I am not able to get here in the US so I used my regular Odense Original 60 % almonds (used to be called Ren Rå marcipan). These cookies are really wonderful and I hope you enjoy them. 🙂

Best Kransekager

Best Kransekager

Kransekage (makes 15 pieces)

Ingredients:

For Cakes:

250 gram Odense Original marcipan (used to be called Ren Rå)

125 gram sugar

55 gram pasteurized egg whites

For Glaze:

40 gram confectioners sugar (sifted),( plus more if needed)(1.4 oz)

15 gram pasteurized egg whites(0.5 oz)

For the chocolate:

55 gram bittersweet chocolate

Directions:

Double up two large baking sheets for extra insulation to avoid burning the bottom of cakes. Line baking sheet with parchment paper. Preheat oven to 390 degrees F (200 degrees C).

For the cakes: Pour egg whites into a small dish and add sugar, stir and let sit for 30 to 60 minutes. Using your stand-mixer fitted with the paddle attachment, cut the marcipan into smaller pieces and add egg whites/sugar mixture, beat until you have a completely smooth mass without any lumps (5+ minutes). Scrape dough into a pastry bag fitted with a large plain round tip and pipe out logs onto baking sheet that are finger length (about 8 cm/3 inches). Wet your fingers with a little water and gently press each log into a rounded triangle, continue to wet fingers as needed but careful not to get marcipan too wet. Bake for 14 to 18 minutes or until golden.  Allow to cool completely.

For the glaze: Beat together confectioners sugar and pasteurized egg whites on high-speed for at least 5 minutes. The glaze should be pretty thick and no longer flow together when beaters are stopped, add more sifted confectioners sugar if needed. Load glaze into a plastic bag and snip off tip to create a very tiny opening. Begin decorating, moving the tip back and forth across the logs making sure to extend the tip out over the edge to allow the glaze to droop down the outside in a loop style fashion. Allow glaze to dry completely before dipping ends into chocolate.

For the chocolate: Chop chocolate into small pieces and melt over a water-bath of gently simmering water. Dip each end of Kransekager into melted chocolate and place on baking sheet. Allow chocolate to set (to speed up this process place Kransekager in refrigerator for 10 minutes, take out and bring back to room temperature. Store Kransekager in an airtight container. Enjoy!

Source: Odense

Print Friendly and PDF

Read Full Post »

Kransekage Bites

The last day of the year has arrived and I wish all of you a Happy New Year and since it’s New Years Eve today lets wrap up the year with some traditional Danish Kransekage.

Kransekage is a classic Danish pastry made with Marzipan. It is often eaten for New Years, Weddings, Anniversaries, Baptisms – occasions when a celebration is in order. Kransekage can sometimes be made into quite elaborate presentations such as my Anniversary cake but other times they are made as small triangular bite-size pieces of Kransekage, equally delicious!

You can also make them into small Kransekage Tops as in the picture at the bottom of the page. If you choose this, don’t refrigerate the marzipan dough as it will be softer and more manageable at room temperature. Place dough in a pastry bag with a large star tip, but I have to forewarn you that it will take a lot of strength to press the dough out of the pastry bag onto the parchment paper. Another thing you can do to your Kransekage, which I did not do here, is to dip the bottom in some chocolate. Very delicious! I hope you have a safe and happy New Year. 😀

Kransekage Bites (makes 10-12 pieces)

Ingredients:

Cake:

250 gram Marzipan (cut into slices)(8.8 oz or 8 3/4 oz)

75 gram confectioners sugar(2.5 oz or 2 3/4 oz)

20 gram pasteurized egg whites(0.7 oz or 3/4 oz)

Glaze:

40 gram confectioners sugar (sifted),( plus more if needed)(1.4 oz)

15 gram pasteurized egg whites(0.5 oz)

Directions:

For the Cake: In a stand mixer with the paddle attachment, place 75 grams confectioners sugar and 20 grams pasteurized egg whites. Start the mixer on low and add marzipan pieces one by one. When the cake mass is homogeneous, remove from mixer and place in a zip lock bag. Store in refrigerator for at least 2 hours or until the following day.

Double up two large baking sheets for extra insulation to avoid burning the bottom of cake. Use parchment paper. Preheat oven to 390 degrees F (200 degrees C).

Note: when rolling out marzipan, wash and dry your hands as often as needed to avoid working with sticky fingers. If marzipan feels too sticky use a small amount of confectioners sugar to work into dough. Sprinkle work surface lightly with confectioners sugar. Roll dough into a long log approximately 1 1/2 cm (0.6 inch) in thickness. Cut log into finger length pieces (8 cm/3 inches). With two fingers lightly pinch and press down on each log piece to form a soft triangular-shape. If needed, use an icing spatula or a regular spatula to loosen marzipan from tabletop by pressing down hard while sliding spatula under the log. Place each triangular log on parchment paper and bake for 14 to 18 minutes or until golden brown. Allow logs to cool completely on a rack.

For the glaze: Beat together sifted confectioners sugar and pasteurized egg whites on high-speed for at least 5 minutes. The glaze should be pretty thick and no longer flow together when beaters are stopped. Add more sifted confectioners sugar as needed. Load glaze into a plastic bag and snip off tip to create a very tiny opening. Begin decorating, moving the tip back and forth across the logs making sure to extend the tip out over the edge to allow the glaze to droop down the outside in a loop style fashion. Allow glaze to dry at room temperature for a couple of hours before storing Kransekage Bites in an airtight container. Enjoy.

Kransekage Tops

Source: My Danish Kitchen

Print Friendly and PDF

Read Full Post »

Vetekrans – Swedish Tea Ring

Vetekrans aka Swedish Tea Ring is a very delicious coffee cake. The cake is called a coffee cake but there is no coffee in it, it just means it’s served with coffee or tea. The dough is surprisingly light in texture and the cake is simply just amazing when served right out of the oven, which I would recommend.

This recipe uses the cold rise method. It tells you to let your dough rest in the refrigerator for 2 to 24 hours. I was pressed for time when I made this wonderful Tea Ring because my husband Joe was taking it with him to his Blacksmith meeting, so I could only let it rest in the fridge for 1 hour but it still turned out beautifully. The recipe makes a huge amount of dough which I thought was a bit much, so I cut off four 1 inch pieces of the rolled up dough and baked them separately as cinnamon rolls, yum! And as you can see there was still plenty for the Tea Ring to go around.

Word of advise: Just to simplify rolling out the dough, I marked off my work surface for how big the dough was supposed to be. I used four pieces of white sticker labels (you could also use small pieces of post-it-notes). Also, make sure the dough is rolled out as even as you can get it on your work surface. This will ensure your finished roll/ring will be the same thickness throughout. If you have a thicker area in your ring, baking can be a little uneven. 😉

This post will be submitted to YeastSpotting.

Ingredients:

For the dough:

4 1/2 teaspoons active dry yeast (or 50 grams cake/fresh yeast)

1 cup warm water (100-110 degrees F)

1/2 cup butter, melted

1/2 cup sugar

3 eggs, lightly beaten

1 teaspoon salt

1 teaspoon ground cardamom

4 to 4 1/2 cups all-purpose flour

vegetable oil, for greasing bowl

For the filling:

1/2 cup butter, softened

1/2 cup sugar

1 tablespoon ground cinnamon

For the glaze:

1 cup confectioners sugar

2 tablespoons milk

1/2 teaspoon almond extract

Directions:

Pour warm water (100-110 degrees F) into a bowl and sprinkle active dry yeast into water, let sit for 10 minutes. In the bowel of a stand mixer fitted with the dough hook, add the 1/2 cup melted butter, sugar, eggs, salt, cardamom and dissolved yeast/water. With the mixer on medium-low speed, add the flour in increments and mix until dough is smooth (you may not need all the flour). Lightly grease a large bowel with vegetable oil. Place dough into oiled bowel, cover with plastic wrap and refrigerate dough for 2-24 hours.

Fit a large baking sheet with parchment paper and set aside. Place dough onto a floured work surface and roll out to a 20 x 24 inch  diameter. Make sure dough is rolled out evenly without any high spots. Gently spread a thin layer of the softened butter all the way out to the edge of the dough. Mix sugar and cinnamon together and sprinkle over the butter. Starting from the long edge, roll dough tightly as a jelly roll. Move roll from work surface to baking sheet and shape into a ring. Gently press edges together to seal. With scissors, cut 2/3 way through the ring at 3/4 inch intervals. Twist each cut piece so the inside is visible. Cover ring with a dry, clean tea towel and let rise for 1 hour. Preheat oven to 375 degrees F. Bake for 15-20 minutes or until golden brown. Allow Tea ring to cool on baking sheet for 10 minutes. Mix glaze ingredients together and sprinkle on top of ring. Enjoy!

Source: The Great Scandinavian Baking Book

Print Friendly and PDF

Read Full Post »

Kanelsnegle

I made my first Kanelsnegle (Cinnamon Buns) in Home-Ed class. Does any high schools offer Home Education classes anymore? The class gave me a basic knowledge of cooking and baking. It sparked an interest for baking in particular and I baked quite a bit when I was a teenager. This is still something that I truly enjoy. By the way, I also took woodworking, but no sparks came from that class ha ha 🙂

Rolling up dough

Kanelsnegle ready for baking

Just a note about yeast. In Europe the preferred type of yeast is Fresh Active Yeast as compared to the American preference of Dry Active Yeast. Fresh yeast (also called Cake yeast or Bakers compressed yeast) can sometimes be found in the dairy section of certain grocery stores. It has a short expiration date and so it’s very perishable but works faster and longer. Fresh yeast is dissolved in liquid 70-80 degrees F. Store it in the refrigerator or freeze for up to 4 months. Dry yeast on the other hand has a much longer expiration date and is more forgiving of mishandling. To activate it sprinkle on water that’s between 100-110 degrees F and wait to see small bubble (about 10 minutes). Note if your liquid is too warm you’ll kill the yeast and adding a teaspoon of sugar to the liquid will provide a little food for the yeast, encouraging it to “wake up”. Typically, 50 grams of Fresh yeast = 4 teaspoons Dry yeast (12 grams).

Fresh active yeast

Ingredients:

25 grams Fleischmann’s Fresh Active Yeast

2 1/2 deciliter milk (1 cup)

2 tablespoons vegetable oil

1 tablespoon sugar

1 teaspoon salt

1 teaspoon cardamom

400 grams flour (3 1/2 cups)

small amount of oil for the bowl

plus 1 egg for brushing cinnamon buns

Filling:

75 grams butter at room temperature (5 tablespoons)

75 grams sugar (1/2 cup)

2 tablespoons cinnamon

50 grams marzipan (about 1/4 cup) (optional)

Glaze:

1 cup confectioners sugar

1-2 tablespoons hot water

Directions:

Dissolve yeast in cold milk stirring gently. Add oil, sugar, salt and cardamom. Add flour a little at the time and knead until you have a firm dough. Place a small amount of oil in the bowl and turn the dough in the bowl. Cover bowl with plastic wrap and let dough rise to double in size (30-60 minutes).

Place room temperature butter, sugar and cinnamon in a small bowl. If you’re using marzipan, break it up into small pieces and mix into butter using a fork to help break it up a little.

Prepare two round 8 inch baking pans by placing a round piece of parchment paper in bottom of pan and spray with non-stick oil. Or you can place parchment paper on a baking sheet.

Sprinkle tabletop with flour and roll out dough to 40 x 50 centimeter (15 x 19 inches). Spread butter filling onto dough and roll into a log starting at the long edge. Cut dough into 14 even slices. If using round baking pans, place cinnamon slices in a circular fashion – 7 slices in each pan. If you using a baking sheet, place cinnamon slices right next to one another. By placing slices close to one another during baking is keeps the finished cinnamon buns moister. Cover baking pans or baking sheet with a dry kitchen towel, place in a warm location and allow to rise for another 30 minutes.

Preheat oven to 225 degrees Celsius (about 425 degrees Fahrenheit). Bake for 12 to 15 minutes. Let cool for 5-10 minutes before glazing. To make glaze, simply combine confectioners sugar and water until desired consistency. Enjoy!

Kanelsnegl

Source: Signes Mad

Print

Read Full Post »

Danish Fedtebrød cookies

Danish Fedtebrød cookies

To me, Christmas time is the best time a year. It is filled with joy, excitement and what the Danes call “Hygge”. Hygge is a cozy, happy and relaxed atmosphere. Live candles are an important part of creating Hygge and Christmas time is filled with candles. Some of my fondest childhood memories are from the days leading up to Christmas Eve. Being in the kitchen with my mom and dad baking cookies. Yes you heard me right, my dad always took as much a part of baking and cooking as my mother and they are both excellent in the kitchen. They would bake about 4 or 5 different types of cookies and I would do my best to get in the way to help them. Fedtebrød is one of those cookies which bring me back to Christmas in Denmark. It is a soft coconut cookie with a mild rum glaze on top.

Advent reef

Danish Christmas Tradition: Adventskransen  (Advent Reef)

The Advent Reef is a round reef typically decorated with pine, pine cones, red berries etc and four candles. It is either free standing or hung with ribbons and the colors are typically a red and white combination. The first candle is lit on the fourth Sunday before Christmas, then the first and seconds candle is lit on the third Sunday before Christmas and so on, until all four Candles are lit on the last Sunday before Christmas. I should mention that Christmas is celebrated in Denmark on the Eve of December 24th. The Advent Reef has been a tradition in almost all Danish homes since the 1930’s and it’s a celebration of what is coming at Christmas, that being the Birth of the Jesus Child. Whether you are a religious person or not, it’s a beautiful tradition to make the reef and lighting the candles every Sunday in anticipation of Christmas. It brings a sense of joy, Hygge and excitement into those hectic days.

Fedtebrød Ingredients

Fedtebrød Cookies

Ingredients:

For cookie dough:

125 gram flour (1 cup 2 tablespoons)

1/4 teaspoon baking powder

125 gram butter (9 tablespoons) cut into small pieces

65 gram sweetened coconut (3/4 cup loosely packed)

65 gram sugar (5 tablespoon)

For glaze:

100 gram powdered sugar (1 cup)

2 tablespoon water

1 teaspoon rum

1 teaspoon flour

Roll dough into cylinder

Roll dough into a rectangle

Directions:

Preheat oven to 200 degrees C ( 392 degrees F ) and line a large baking sheet with parchment paper.

Place flour, baking powder, butter, coconut and sugar in a medium bowl and mix with a hand-held mixer. The mixture will be crumbly. Dust flour on working surface and on your hands. Then press mixture together using your hands until it forms a ball of dough. Divide dough into three balls of dough. Using your hands, form ball of dough into long rolls approx 9 x 1 inch long. Place on floured surface and using your rolling-pin gently roll dough into a 12 x 2 1/2 – 3 inch rectangle. Move the dough (with the help of a spatula) onto prepared baking sheet and using your hands and spatula press dough edges to make a more uniform edge. Repeat with two remaining dough balls.

Bake until golden brown, approx 10 minutes. Remove from oven and let cool on baking sheet for 4-5 minutes. While cookies are cooling, mix glaze together. While cookies are still warm, spread the glaze over cookies. Cool for another 4-5 minutes and then cut cookies diagonally. Complete cooling on baking sheet.

Glædelig Jul and Merry Christmas♥

Put glaze on while still warm

Cut diagonally

Source: adapted from my Mother’s recipe

Print

Read Full Post »

Hindbærsnitter

Hindbærsnitter

Hindbærsnitter is a very popular Danish pastry that can be found, dare I say, in any Danish bakery. To this day, it remains one of my favorite Danish pastries. Ok, so I realize that I say that about every Danish dessert that I make, but Danish pastries are simply just to die for. Hindbærsnitter consist of two pieces of pastry that is sandwiched together with a generous amount of seedless raspberry preserves and then topped off with glaze and sprinkles. It’s sweet and simply delicious.

Danish Hindbærsnit

Danish Hindbærsnit

Ingredients:

375 gram flour (3 1/3 cup flour)

1/2 teaspoon baking powder

125 gram confectioners sugar (1 1/4 cup)

40 gram egg (1 large egg)

250 gram margarine (2 sticks plus 2 tablespoon)

1 – 1 1/2 cup seedless raspberry preserves

For glaze:

2 cups confectioners sugar

2-3 tablespoons cold water

For decoration:

sprinkles of your choice

Directions:

Line two large baking sheets with parchment paper and preheat oven to 430 degrees F ( 220 C).

Cut margarine into small cubes. In a small bowl combine flour, baking powder and confectioners sugar. Place dry ingredients in a food processor. Add margarine and egg and pulse until dough starts to come together and let go from walls. Remove from food processor and press together to form a ball of dough. Do not overwork. Wrap dough in cling wrap and place in refrigerator for 1 hour to chill. You can also leave dough in refrigerator until the following day.

Remove dough from refrigerator and divide into half. Quickly with your hands, form dough ball into a rectangular shape. Place on floured surface and roll out to a 9 x 14 inch rectangle. Roll dough back up onto your rolling-pin and lift onto lined baking sheet. Repeat with second half of dough. Bake in preheated oven for 10 minutes until golden along edges.

Once the dough comes out of the oven things will move a little fast so make sure glaze, raspberry preserves and sprinkles are ready on your counter. While dough is baking, make the glaze by mixing confectioners sugar and water together. Stir up the seedless raspberry preserves until smooth and pliable and have sprinkles ready.

As soon as the cakes come out of the oven, spread raspberry preserves over the first cake. This will be the bottom piece. Gently slide a flexible plastic cutting board under the second cake and lift it up. Then slide it off the cutting board onto the first raspberry covered cake. If the cake crack a little don’t worry, the glaze will cover it up. While the cake is still warm, start spreading the glaze out over the cake. Add the sprinkles quickly before the glaze sets. You may have to do this as you go along. Let glaze set a little but while the cake is still warm, cut into rectangular pieces. Enjoy!

Baked cake topped with raspberry jam, top with second baked cake

Baked cake topped with raspberry jam, top with second baked cake

Source: adapted from Arla

Print

Read Full Post »

%d bloggers like this: