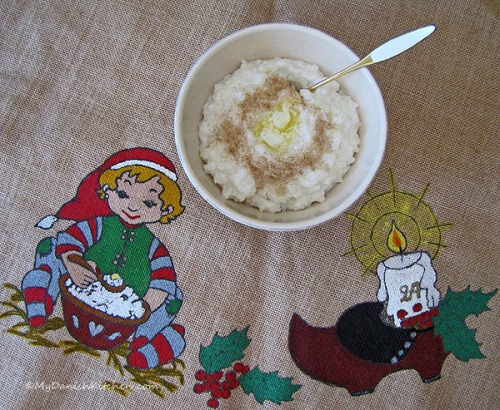
Feeds:
Posts
Comments

Archive for the ‘Danish’ Category

Ris a la Mande

Risalamande

During the 1800’s the citizen’s of Copenhagen felt the need to separate themselves from the farming community and this also affected our Christmas food. They added whipped cream and almonds to our beloved Danish Risengrød and called it Risalamande to give it some French flair, because that is what was in fashion at that time. Kristeligt Dagblad

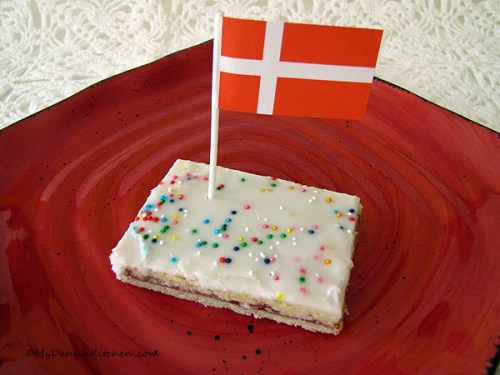
Danish Christmas Tradition: Mandelgaven (the Almond Present)

Today you still see Ris a la mande served in most Danish households on Christmas Eve. Since then, we have add a warm Cherry Sauce to top it off and traditionally a fun game goes along with eating this wonderful Christmas treat. A single whole Almond is blanched and stirred into the Risalamande to hide it. The dish is served after Christmas dinner and whoever finds the almond wins a gift. The problem with the Almond gift is that the winner could be anyone from a child to grandmother. This is often solved by giving a traditional small Marzipan pig as the gift, but today, the gift could be anything. Also, there is a lot of cheating going on with this game. Some may choose to place an Almond in each of the children’s bowls so all the children gets a gift. I think my Mom did that one year but we thought the game should be done “the right way”. I can honestly say that I have never won this game. The winner in our home was typically my Dad. He would often times get the almond and then he would keep it hidden against his cheek until all the Risalamande was eaten up. Sneaky.  One year my Dad took pity on me and gave me the Almond under the table 🙂 but I didn’t feel right taking the gift since I did not honestly win it.

I should also mention that some households may chop blanched Almonds into small pieces and add them to the dish. We have never done this at our house, instead pure Almond Extract is added giving the dish a wonderful Almond flavor. This dish is by far one of the biggest highlights of Christmas for me and I continue to serve it every single year, for it would not be Christmas without it.

Risalamande with warm Cherry sauce

Update:

I am very honored to be asked to participate in the LexioPhiles International Recipe Advent Calendar 2011. My recipe for Risalamande with warm Cherry sauce will appear on December 2nd, 2011.  LexioPhiles will feature a new recipe every day during the month of December from bloggers around the world.

Ingredients for 1st stage – Risengrød:

1 1/4 cup water

1 cup rice (Grødris)

4 1/2 cup milk

1 teaspoon vanilla sugar

Ingredients for 2nd stage – Risalamande:

1 1/2 cup whipping cream

3 tablespoon confectioners sugar

4 teaspoon pure almond extract

2 whole almonds

For the Cherry Sauce:

15 oz can Oregon Bing Cherries in heavy syrup

1 tablespoon cornstarch

water

Directions:

Place water and rice in a medium cooking pot, cover with a lid and simmer for 2 minutes. Add milk and vanilla sugar and simmer covered over low heat for 40-45 minutes. Stir often to make sure the milk does not burn, especially the last 30 minutes. You may have to turn the heat all the way down as low as your stove will allow for the last 15 minutes.

Place in Tupperware and refrigerate for several hours or overnight.

Once mixture is completely cooled remove from refrigerator and break it up with a spoon. In a small bowl add whipping cream, confectioners sugar and almond extract. Beat with a handheld mixer until you see tracks from beaters in the cream. Add half of the whipping cream to rice mixture and combine well with a spoon, add remaining whipping cream in small increments. The final  texture should be creamy and easily mixed with the spoon. Place covered in refrigerator until ready to serve.

To blanch almonds. Place almonds in a small dish and pour boiling water over to cover. Let sit in water for 1 minute, drain and rinse with cold water. Pat dry and slip the skins off. I usually blanch two almonds in case I have trouble with one. Before serving Risalamande, place one blanched almond in mixture and stir well to hide almond.

In a small dish mix together the cornstarch and some water to form the thickening agent. In a small saucepan bring cherry and syrup to a simmer. Add the cornstarch/water mixture to cherries a little at the time, stirring until syrup starts to thicken. Simmer for 1 minute and remove from heat.

Serve Risalamande cold with the warm cherry sauce on top.

Glædelig Jul and Merry Christmas♥

Source: My Danish Kitchen

Print

Read Full Post »

Risengrød

Risengrød

Danish Christmas Tradition: Nissen (a mythical creature of Scandinavian Folklore)

The Danish Nisse is a fictional character which has its roots from the 1800’s farming community. Nissen would help with the successful drift of the farm, that is, if you were respectful of the nisse and if you behaved yourself. A special dish which were served for Christmas is Risengrød. It may not seem special by todays measure, but back then milk, rice, butter, sugar and cinnamon was a commodity. And so, it makes sense that Nissen would be part of a festive event like Christmas.

Today, the Nisse folklore is still alive and well, but in a different way. Songs have been written about the Nissen and he’s often seen in Children’s Christmas calendars whether it be on TV or on paper. He is an important part of decorating for Christmas in Denmark and Risengrød is still his favorite meal. In the picture above, which is part of my Christmas Tree skirt, you can see the Nissen getting ready to eat his Risengrød.

Risengrød

Ingredients:

1 1/4 cup water

1 cup rice (Grødris)

4 1/2 cup milk

1/2 teaspoon salt

1 teaspoon vanilla sugar

butter

sugar

cinnamon

Directions:

Place water and rice in a medium cooking pot, cover with a lid and simmer for 2 minutes. Add milk, salt and vanilla sugar and simmer covered over low heat for 40-45 minutes. Stir often to make sure the milk does not burn, especially the last 30 minutes. You may have to turn the heat all the way down as low as your stove will allow for the last 15 minutes.

Mix sugar and cinnamon together according to your taste. Serve the Risengrød warm, sprinkled with sugar/cinnamon mixture and place a dollop of butter in the center, letting the butter melt.

Glædelig Jul and Merry Christmas♥

Source: My Danish Kitchen

Print

Read Full Post »

Red Wine Gløgg

In the weeks leading up to Christmas there are many “get togethers” at work, in town, schools, clubs, friends and family stopping by to say hello. You can serve just about anything for your guests, really, or you could serve the traditional warm drink Gløgg and some warm Danish Æbleskiver. This combination is especially wonderful when you are coming in from the freezing cold outside.

Gløgg was imported to Denmark from our neighbors in Sweden and it started to take hold on the Danes in the years around WWII. There are many variations of Gløgg recipes out there and no one correct way to make it. Some contain brandy, cognac, port wine, vodka or snaps but the base is almost always red wine, although there are also some white wine versions, as well as non-alcoholic children’s versions. Back in the old days it was also thought to have some healing effects for winter depression, well at least for a short while 😉

Ingredients:

1 bottle red wine

1 cup white port wine

1 tablespoon Cardamom pods

1 stick Cinnamon

8 whole Cloves

4 pieces crystalized ginger

1 1/2 deciliter dark brown sugar (1/2 cup)

1 cup raisins

slivered almonds

Directions:

Place the cardamom pods, cinnamon stick, cloves, crystalized ginger and sugar in the port and red wine overnight or at least 1-2 hours before serving. Before serving, gently heat the liquid on the stove but do not allow to boil. Run the wine through a sieve to remove the spices, then add the raisins and almonds to the wine and serve warm.

Glædelig Jul and Merry Christmas ♥

Source: My Danish Kitchen

Print

Read Full Post »

Danish Æbleskiver

Æbleskiver is a tasty Danish dessert that looks like round puffy pancakes. The word æbleskive means apple slice and it first appeared in the middle ages where slices of apple were dipped in a batter and fried. When the æbleskive pan was introduce sometime in the 1700’s, æbleskiver were baked with small pieces of apple or prunes in the center. Today in Denmark æbleskiver is typically baked without anything in the center and they are served with a strawberry, lingonberry or raspberry jam or simply just dipped in sugar.

Æbleskiver are often served during the Christmas month perhaps as a special treat at a Christmas fair, when family or friends are visiting, little Christmas Eve (Dec 23rd) or maybe New Years Day. These Danish delicacies are served warm with a dusting of powdered sugar and sometimes with a warm glass of either red or white Gløgg.

Æbleskiver

Æbleskiver (makes 35)

Ingredients:

60 gram butter (4 tablespoon) – melted and set aside

250 gram flour (2 cups)

1 teaspoon baking powder

3 large eggs

4 tablespoon sugar

1/2 teaspoon Cardamom

1 cup whipping cream

1 cup buttermilk

a pinch of salt

zest of 1 lemon

Directions:

Melt butter and set aside. Sift flour and baking powder in a bowl. In a second bowl, beat eggs, sugar and cardamom until frothy and lighter in color. In a third bowl, stir together the buttermilk and cream. Taking turns, add flour and buttermilk to egg mixture while beating, mix until smooth. Add salt, lemon zest and cooled butter, stir to mix. Place batter in refrigerator and let rest 30 minutes. If batter is very thick after resting add a little more buttermilk. Use Canola oil or butter for frying.

Tips:

Must have a Æbleskive pan for cooking, making sure it is well seasoned if cast iron.

Traditionally, æbleskiver are turned with a thin knitting needle (why a knitting needle ? not sure, but you can find a knitting needle in most Danish households and the metal needle works really well grabbing the æbleskive to rotate in a cast iron pan). If you don’t have a knitting needle, try using a metal skewer or it can be done with a fork although a bit clumsy.

Make sure your heat is high enough, medium heat.

Make sure to preheat your pan, 5 to 10 minutes.

Use enough oil or butter for frying.

Some source recommend turning the æbleskiver in 1/3 turns or 1/4 turns while others turn them in 1/2 turns. Try the different methods and see what you feel most comfortable with. Here is a link with a video on how to make and turn the æbleskiver.

If you’re having trouble with the æbleskiver turning out right, don’t worry, the first pan-full rarely turn out perfect, keep going.

Æbleskiver can be refrigerated for up to 3 days or frozen for up to 4 months.

Glædelig Jul and Merry Christmas♥

Æbleskiver pan

Æbleskiver

Source: My Danish Kitchen

Print

Read Full Post »

Vaniljekranse

Vaniljekranse

Vaniljekranse is a traditional Danish cookie made in the weeks leading up to Christmas.  I have very fond memories of helping my Mom and Dad make vaniljekranse when I was a little girl. It’s a fun process of the dough coming out of the grinder into strips, cutting the strips into pieces and forming them into circles. The cookies have a sweet vanilla flavor and are slightly crunchy on the outside. Making Vaniljekranse makes for wonderful Danish family “hygge” (coziness).

Vaniljekranse are not difficult to make, however, it took some doing to actually make it happen. The reason being, that in Denmark there is an attachment to your meat grinder that has a star shape on it. So the dough is run through the meat grinder with the star attachment. I could probably just have used a pastry bag with a star tip, I tried it, but it takes a lot of muscle to get the dough out. The other option would be to use a cookie press and you can get some sort of circle pattern, but I really wanted to show the making of this cookie the authentic way.

Vaniljekranse

Vaniljekranse

So I described the attachment to my wonderful husband Joe, he looked at the thickness of the meat grinder discs, and him being a Blacksmith and all, he was able to fabricate the disc for me…Yeah! My wonderful husband is so brilliant, I think I’ll keep him  🙂  He helped me make this cookie the authentic way. Thanks Joe.

Update: I have since then been able to buy a star attachment in Bilka in Denmark while we were home for a visit, it fits my KitchenAid mixer perfectly.

Star attachment for KitchenAid

Star attachment for KitchenAid

Star attachment for KitchenAid

Star attachment for KitchenAid

Vaniljekranse

Ingredients:

375 grams flour (13 oz)

125 grams cornstarch (4.4 oz)

375 grams salted butter (13 oz)

100 grams slivered almonds (3.5 oz)

250 grams sugar (8.8 oz)

1 vanilla bean

2 teaspoon vanilla powder

1 egg

Directions:

Place slivered almonds in food processor and blend until a powder. Set aside.

In a large bowl add flour and cornstarch, blend together. Cut butter into small pieces, add butter to flour mixture and blend together on low-speed with a handheld mixer until it starts to become crumbly. Cut open vanilla bean and scrape out seeds. Add vanilla seeds, vanilla powder, almonds and sugar, blend to combine. Add egg and mix to combine. Using your hands, press mixture together until it forms a dough. Wrap in plastic wrap and refrigerate for 1 hour.

Preheat oven to 390 degrees F (200 degrees C). Line baking sheets with parchment paper.

Using the star attachment for your meat grinder, pastry bag or cookie press to form your cookies. Traditionally, you will use a star attachment for your meat grinder. Cut dough into small segments and load into the meat grinder. Run the dough through the star attachment into long strips, place dough onto floured surface. Then cut dough into 4 inch long pieces and form into circle. Place on prepared baking sheets.  Bake in the middle of oven for 8 minutes or until slightly golden. Cool on baking sheets.

Glædelig Jul and Merry Christmas♥

Ground up slivered almonds

Dough coming out of grinder

Strips of dough

Vaniljekranse

Source: adapted from my Mother’s recipe

Print

Read Full Post »

Danish Pebernødder

Danish Pebernødder

Pebernødder is a natural part of Christmas in Denmark and there is almost always a small bowl of Pebernødder accompanying the afternoon or evening coffee/tea time. Pebernødder may also be found in decorative paper cones (kræmmerhuse) which are hung on the Christmas tree and pebernødder are also used in Childrens games. Although Pebernødder can be found in practically any store in Denmark, it’s really a fun activity to bake them at home, espically if you have younger children in your household. Baking with your children at Christmas time is an activity that brings closeness and hygge into the home (“hygge” danish word meaning coziness, togetherness, warmth). Kids love rolling the dough into long rolls and cutting them up into bite size pieces, not to mention the added benefit of getting first dips on tasting the cookies once out of the oven. Baking was one of my favorite activities with my parents when I was growing up and they are memories I’ll treasure forever.

Pebernødder is thought to be the oldest Christmas cookie in Denmark and it came, like so many things, from Germany (Pfeffernussen). Directly translated Pebernødder means pepper nuts. In the old days “to pepper” meant to season and they were reffered to as nuts because there was no baking soda back then and so the cookies were hard like nuts. Todays Pebernødder is not hard like nuts but rather crunchy and mildly spicy. Some Pebernødder recipes will have a small amount of white pepper in them, just enough to leave a warm sensation on your tongue, this one does not. This particular recipe is a little milder with a warm cardamom flavor.

Pebbernødder hygge

Pebernødder dough

Pebernødder

Ingredients:

80 gram salted butter (6 tablespoons)

225 gram sugar (1 cup plus 1 tablespoon)

1 egg

1 deciliter whipping cream (1/2 cup)

350 gram flour (3 cups) (add more flour if needed to bring dough together)

1/2 teaspoon baking soda

1 teaspoon ground cardamom

Directions:

Preheat oven to 225 degrees C (400 degrees F). Line baking sheets with parchment paper and set aside.

In a bowl, sift together flour, baking soda, cardomom and set aside.

In your mixer using the paddle attachment, mix together butter and sugar until creamy and smooth. Add egg and mix. Then add whipping cream and mix. Add the sifted dry ingredients to the wet ingredients and mix just until combined. Remove dough from mixing bowl onto a floured surface. Using your hands bring dough together, adding a little more flour if needed until it holds together and forms a ball. Divide dough into smaller pieces and roll into long rolls measuring the width of your fingers. Cut into 1 1/2 centimeter pieces. Place on baking sheets about 1 inch apart and bake for approximately 12 minutes until just turning golden.

Glædelig Jul and Merry Christmas♥

Pebbernødder Christmas parade

Source: Faster Philip

Print

Read Full Post »

Danish Fedtebrød cookies

Danish Fedtebrød cookies

To me, Christmas time is the best time a year. It is filled with joy, excitement and what the Danes call “Hygge”. Hygge is a cozy, happy and relaxed atmosphere. Live candles are an important part of creating Hygge and Christmas time is filled with candles. Some of my fondest childhood memories are from the days leading up to Christmas Eve. Being in the kitchen with my mom and dad baking cookies. Yes you heard me right, my dad always took as much a part of baking and cooking as my mother and they are both excellent in the kitchen. They would bake about 4 or 5 different types of cookies and I would do my best to get in the way to help them. Fedtebrød is one of those cookies which bring me back to Christmas in Denmark. It is a soft coconut cookie with a mild rum glaze on top.

Advent reef

Danish Christmas Tradition: Adventskransen  (Advent Reef)

The Advent Reef is a round reef typically decorated with pine, pine cones, red berries etc and four candles. It is either free standing or hung with ribbons and the colors are typically a red and white combination. The first candle is lit on the fourth Sunday before Christmas, then the first and seconds candle is lit on the third Sunday before Christmas and so on, until all four Candles are lit on the last Sunday before Christmas. I should mention that Christmas is celebrated in Denmark on the Eve of December 24th. The Advent Reef has been a tradition in almost all Danish homes since the 1930’s and it’s a celebration of what is coming at Christmas, that being the Birth of the Jesus Child. Whether you are a religious person or not, it’s a beautiful tradition to make the reef and lighting the candles every Sunday in anticipation of Christmas. It brings a sense of joy, Hygge and excitement into those hectic days.

Fedtebrød Ingredients

Fedtebrød Cookies

Ingredients:

For cookie dough:

125 gram flour (1 cup 2 tablespoons)

1/4 teaspoon baking powder

125 gram butter (9 tablespoons) cut into small pieces

65 gram sweetened coconut (3/4 cup loosely packed)

65 gram sugar (5 tablespoon)

For glaze:

100 gram powdered sugar (1 cup)

2 tablespoon water

1 teaspoon rum

1 teaspoon flour

Roll dough into cylinder

Roll dough into a rectangle

Directions:

Preheat oven to 200 degrees C ( 392 degrees F ) and line a large baking sheet with parchment paper.

Place flour, baking powder, butter, coconut and sugar in a medium bowl and mix with a hand-held mixer. The mixture will be crumbly. Dust flour on working surface and on your hands. Then press mixture together using your hands until it forms a ball of dough. Divide dough into three balls of dough. Using your hands, form ball of dough into long rolls approx 9 x 1 inch long. Place on floured surface and using your rolling-pin gently roll dough into a 12 x 2 1/2 – 3 inch rectangle. Move the dough (with the help of a spatula) onto prepared baking sheet and using your hands and spatula press dough edges to make a more uniform edge. Repeat with two remaining dough balls.

Bake until golden brown, approx 10 minutes. Remove from oven and let cool on baking sheet for 4-5 minutes. While cookies are cooling, mix glaze together. While cookies are still warm, spread the glaze over cookies. Cool for another 4-5 minutes and then cut cookies diagonally. Complete cooling on baking sheet.

Glædelig Jul and Merry Christmas♥

Put glaze on while still warm

Cut diagonally

Source: adapted from my Mother’s recipe

Print

Read Full Post »

Pandekage (Crepe) With Strawberry Yogurt

Pandekage (Crepe) With Strawberry Yogurt

Have you ever walked into an old-time ice cream parlor where they make the waffle cones fresh? It is one of the most pleasing aromas I can think of. When I make these pancakes the scent of sweet vanilla fills the entire house and it smells just like the ice cream parlor I remember from back home.

Crepes in Denmark is referred to as pancakes and the typical Danish way to eat these, is with a light sprinkle of sugar, then rolled up tightly and dipped in either strawberry or raspberry jam. You get a slight crunch from the sugar and the sweet vanilla flavor is simply wonderful. For this post, I also made a yogurt filling and served it with fresh sliced strawberries which everyone really liked as well.

Pandekager or Crepes can be a little tricky to make and usually the first one falls apart, but don’t let that stop you, after making a couple of crepes you’ll be a turning them out faster than you thought possible.  They are truly wonderful and I hope you enjoy them, should you decide to try them.

Crepe with Yogurt and sliced Strawberries

Pandekager (Crepes)

Crepes Ingredients:

3 eggs

5 tablespoons sugar

1 teaspoon vanilla sugar

10 tablespoons flour

1 1/2 cup buttermilk (kærnemælk)

1 cup milk

Yogurt filling Ingredients:

1 cup vanilla yogurt

a pinch ground cinnamon

6 ounces seedless strawberry jam

1/2 quart fresh strawberries, sliced

Eating Pandekager/Crepes the Danish way:

Sprinkle Pandekage/Crepe with a light coating of sugar, roll up and dip in strawberry or raspberry jam. Delicious.

Directions:

Combine eggs, sugar and vanilla sugar, beat on high-speed until lighter in color. Add flour, buttermilk and milk, beat on medium speed until combined and free of lumps.

Heat a small non-stick pan. Add butter to coat and pour batter into the center of pan and swirl to spread evenly. Cook until golden and flip. Continue to cook the other side until golden and remove from pan onto a large plate to stack.

For filling: mix together yogurt, cinnamon and strawberry jam. Place yogurt mixture in center of crepe and top with sliced strawberries. Roll crepe up and enjoy.

Note: if you have left-over crepes, you can place parchment paper in between each crepe and stack them. Store in a sealable bag in refrigerator for several days or in freezer for up to two months.

Pandekager rolled with sugar and dipped in jam

Source: My Danish Kitchen

Print

Read Full Post »

Today, Monday October 4th is a special day for My Danish Kitchen. I am honored and so pleased to announce that my dish Koldskål is being featured as the Daily Recipe on the Food News Journals website.

Danish Koldskål

Danish Koldskål

Read Full Post »

Hindbærsnitter

Hindbærsnitter

Hindbærsnitter is a very popular Danish pastry that can be found, dare I say, in any Danish bakery. To this day, it remains one of my favorite Danish pastries. Ok, so I realize that I say that about every Danish dessert that I make, but Danish pastries are simply just to die for. Hindbærsnitter consist of two pieces of pastry that is sandwiched together with a generous amount of seedless raspberry preserves and then topped off with glaze and sprinkles. It’s sweet and simply delicious.

Danish Hindbærsnit

Danish Hindbærsnit

Ingredients:

375 gram flour (3 1/3 cup flour)

1/2 teaspoon baking powder

125 gram confectioners sugar (1 1/4 cup)

40 gram egg (1 large egg)

250 gram margarine (2 sticks plus 2 tablespoon)

1 – 1 1/2 cup seedless raspberry preserves

For glaze:

2 cups confectioners sugar

2-3 tablespoons cold water

For decoration:

sprinkles of your choice

Directions:

Line two large baking sheets with parchment paper and preheat oven to 430 degrees F ( 220 C).

Cut margarine into small cubes. In a small bowl combine flour, baking powder and confectioners sugar. Place dry ingredients in a food processor. Add margarine and egg and pulse until dough starts to come together and let go from walls. Remove from food processor and press together to form a ball of dough. Do not overwork. Wrap dough in cling wrap and place in refrigerator for 1 hour to chill. You can also leave dough in refrigerator until the following day.

Remove dough from refrigerator and divide into half. Quickly with your hands, form dough ball into a rectangular shape. Place on floured surface and roll out to a 9 x 14 inch rectangle. Roll dough back up onto your rolling-pin and lift onto lined baking sheet. Repeat with second half of dough. Bake in preheated oven for 10 minutes until golden along edges.

Once the dough comes out of the oven things will move a little fast so make sure glaze, raspberry preserves and sprinkles are ready on your counter. While dough is baking, make the glaze by mixing confectioners sugar and water together. Stir up the seedless raspberry preserves until smooth and pliable and have sprinkles ready.

As soon as the cakes come out of the oven, spread raspberry preserves over the first cake. This will be the bottom piece. Gently slide a flexible plastic cutting board under the second cake and lift it up. Then slide it off the cutting board onto the first raspberry covered cake. If the cake crack a little don’t worry, the glaze will cover it up. While the cake is still warm, start spreading the glaze out over the cake. Add the sprinkles quickly before the glaze sets. You may have to do this as you go along. Let glaze set a little but while the cake is still warm, cut into rectangular pieces. Enjoy!

Baked cake topped with raspberry jam, top with second baked cake

Baked cake topped with raspberry jam, top with second baked cake

Source: adapted from Arla

Print

Read Full Post »

« Newer Posts - Older Posts »