Chicken Scallopine With Basil And Fontina Cheese
I have made this Chicken Scallopine many times before and it is absolutely lovely. The Fontina cheese is what really makes this dish. I like to use a Danish Fontina which is mild, sweet and nutty. It is also a very soft cheese so it can be a bit challenging to shred. Try placing the cheese in the freezer for 10-15 minutes before shredding. Of course, you could simply just cut the cheese into very thin slices instead and place onto chicken. It should roll just fine since the cheese is so soft. This recipe was originally made with sage but I just love the basil flavor with the tomatoes.
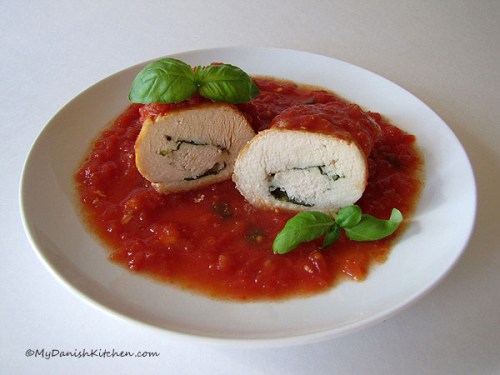
Chicken Scallopine With Basil And Fontina Cheese
Ingredients:
6 skinless, boneless chicken breasts, pounded thin
salt and freshly ground pepper
6 large basil leaves, plus more
3 ounces grated Fontina cheese, shredded
3 tablespoons olive oil
1 large garlic clove, cut into thick slices
1/2 cup white wine
1 (28 ounces) can whole San Marzano tomatoes
a pinch of red pepper flakes
1 teaspoon salt
1/2 teaspoon freshly ground pepper
Special Equipment: toothpicks
Directions:
Rinse chicken breasts under cold running water and cut off any excess fat. Place one chicken breast in a large zip lock bag, press out inside air and close. Pound chicken breast thin using the smooth end of a meat tenderizer or a rolling-pin. Repeat with remaining chicken breasts.
Place chicken breast on plastic cutting board, narrow end facing you. Sprinkle with salt and pepper. Place on large basil leaf on top of chicken. Sprinkle with 1/2 ounce Fontina cheese (about 2 tablespoons). Starting with the narrow end, roll up chicken and seal with two toothpicks. Repeat with remaining chicken.
Warm the olive oil and garlic slices in a large heavy skillet over medium-high heat until garlic is fragrant. Add the chicken and brown on all sides. Remove the chicken to a plate and discard the garlic. Add the wine and simmer for 2 minutes, scraping the brown bits from the bottom of the skillet with a wooden spoon.
Meanwhile, combine the tomatoes and red pepper flakes in a blender or food processor and blend until smooth. Add the tomato mixture to the reduced wine, season with salt and pepper, stir to blend. Place the browned chicken breasts back into the skillet with the tomato sauce, cover and simmer for 10 minutes. Turn the chicken over and simmer covered for another 10 minutes. Chop extra basil and add to sauce, stir. Remove all toothpicks.
Spoon tomato sauce onto a warm serving platter. Cut each chicken breasts into half and place on top of tomato sauce. Serve immediately.

Chicken breasts rolled up and secured with toothpicks

Brown chicken on all sides.
Source: adapted from Giada De Laurentiis

Read Full Post »


