Feeds:
Posts
Comments

Posts Tagged ‘Danish’

Danish Fedtebrød cookies

Danish Fedtebrød cookies

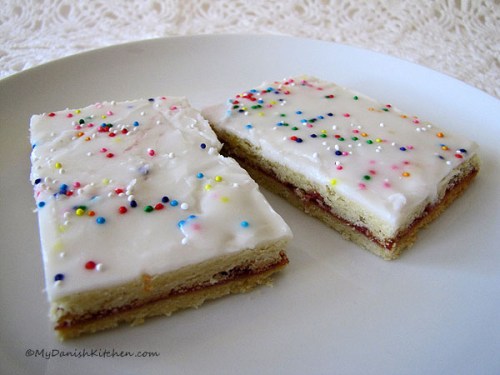
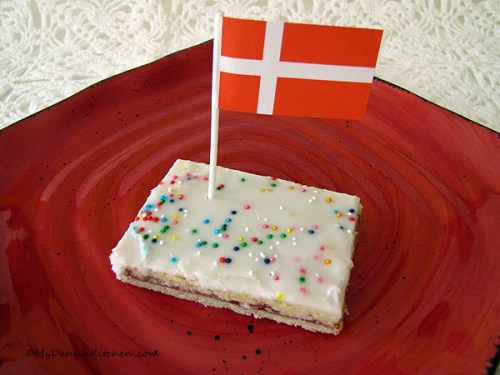
To me, Christmas time is the best time a year. It is filled with joy, excitement and what the Danes call “Hygge”. Hygge is a cozy, happy and relaxed atmosphere. Live candles are an important part of creating Hygge and Christmas time is filled with candles. Some of my fondest childhood memories are from the days leading up to Christmas Eve. Being in the kitchen with my mom and dad baking cookies. Yes you heard me right, my dad always took as much a part of baking and cooking as my mother and they are both excellent in the kitchen. They would bake about 4 or 5 different types of cookies and I would do my best to get in the way to help them. Fedtebrød is one of those cookies which bring me back to Christmas in Denmark. It is a soft coconut cookie with a mild rum glaze on top.

Advent reef

Danish Christmas Tradition: Adventskransen  (Advent Reef)

The Advent Reef is a round reef typically decorated with pine, pine cones, red berries etc and four candles. It is either free standing or hung with ribbons and the colors are typically a red and white combination. The first candle is lit on the fourth Sunday before Christmas, then the first and seconds candle is lit on the third Sunday before Christmas and so on, until all four Candles are lit on the last Sunday before Christmas. I should mention that Christmas is celebrated in Denmark on the Eve of December 24th. The Advent Reef has been a tradition in almost all Danish homes since the 1930’s and it’s a celebration of what is coming at Christmas, that being the Birth of the Jesus Child. Whether you are a religious person or not, it’s a beautiful tradition to make the reef and lighting the candles every Sunday in anticipation of Christmas. It brings a sense of joy, Hygge and excitement into those hectic days.

Fedtebrød Ingredients

Fedtebrød Cookies

Ingredients:

For cookie dough:

125 gram flour (1 cup 2 tablespoons)

1/4 teaspoon baking powder

125 gram butter (9 tablespoons) cut into small pieces

65 gram sweetened coconut (3/4 cup loosely packed)

65 gram sugar (5 tablespoon)

For glaze:

100 gram powdered sugar (1 cup)

2 tablespoon water

1 teaspoon rum

1 teaspoon flour

Roll dough into cylinder

Roll dough into a rectangle

Directions:

Preheat oven to 200 degrees C ( 392 degrees F ) and line a large baking sheet with parchment paper.

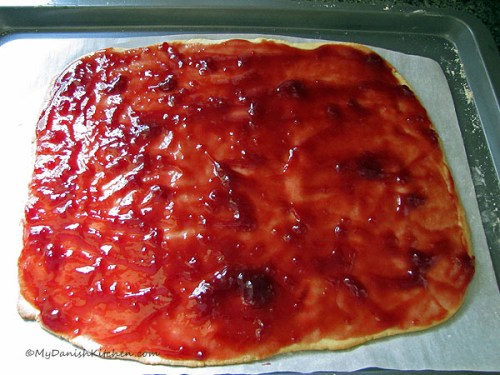
Place flour, baking powder, butter, coconut and sugar in a medium bowl and mix with a hand-held mixer. The mixture will be crumbly. Dust flour on working surface and on your hands. Then press mixture together using your hands until it forms a ball of dough. Divide dough into three balls of dough. Using your hands, form ball of dough into long rolls approx 9 x 1 inch long. Place on floured surface and using your rolling-pin gently roll dough into a 12 x 2 1/2 – 3 inch rectangle. Move the dough (with the help of a spatula) onto prepared baking sheet and using your hands and spatula press dough edges to make a more uniform edge. Repeat with two remaining dough balls.

Bake until golden brown, approx 10 minutes. Remove from oven and let cool on baking sheet for 4-5 minutes. While cookies are cooling, mix glaze together. While cookies are still warm, spread the glaze over cookies. Cool for another 4-5 minutes and then cut cookies diagonally. Complete cooling on baking sheet.

Glædelig Jul and Merry Christmas♥

Put glaze on while still warm

Cut diagonally

Source: adapted from my Mother’s recipe

Print

Read Full Post »

Pandekage (Crepe) With Strawberry Yogurt

Pandekage (Crepe) With Strawberry Yogurt

Have you ever walked into an old-time ice cream parlor where they make the waffle cones fresh? It is one of the most pleasing aromas I can think of. When I make these pancakes the scent of sweet vanilla fills the entire house and it smells just like the ice cream parlor I remember from back home.

Crepes in Denmark is referred to as pancakes and the typical Danish way to eat these, is with a light sprinkle of sugar, then rolled up tightly and dipped in either strawberry or raspberry jam. You get a slight crunch from the sugar and the sweet vanilla flavor is simply wonderful. For this post, I also made a yogurt filling and served it with fresh sliced strawberries which everyone really liked as well.

Pandekager or Crepes can be a little tricky to make and usually the first one falls apart, but don’t let that stop you, after making a couple of crepes you’ll be a turning them out faster than you thought possible.  They are truly wonderful and I hope you enjoy them, should you decide to try them.

Crepe with Yogurt and sliced Strawberries

Pandekager (Crepes)

Crepes Ingredients:

3 eggs

5 tablespoons sugar

1 teaspoon vanilla sugar

10 tablespoons flour

1 1/2 cup buttermilk (kærnemælk)

1 cup milk

Yogurt filling Ingredients:

1 cup vanilla yogurt

a pinch ground cinnamon

6 ounces seedless strawberry jam

1/2 quart fresh strawberries, sliced

Eating Pandekager/Crepes the Danish way:

Sprinkle Pandekage/Crepe with a light coating of sugar, roll up and dip in strawberry or raspberry jam. Delicious.

Directions:

Combine eggs, sugar and vanilla sugar, beat on high-speed until lighter in color. Add flour, buttermilk and milk, beat on medium speed until combined and free of lumps.

Heat a small non-stick pan. Add butter to coat and pour batter into the center of pan and swirl to spread evenly. Cook until golden and flip. Continue to cook the other side until golden and remove from pan onto a large plate to stack.

For filling: mix together yogurt, cinnamon and strawberry jam. Place yogurt mixture in center of crepe and top with sliced strawberries. Roll crepe up and enjoy.

Note: if you have left-over crepes, you can place parchment paper in between each crepe and stack them. Store in a sealable bag in refrigerator for several days or in freezer for up to two months.

Pandekager rolled with sugar and dipped in jam

Source: My Danish Kitchen

Print

Read Full Post »

Hindbærsnitter

Hindbærsnitter

Hindbærsnitter is a very popular Danish pastry that can be found, dare I say, in any Danish bakery. To this day, it remains one of my favorite Danish pastries. Ok, so I realize that I say that about every Danish dessert that I make, but Danish pastries are simply just to die for. Hindbærsnitter consist of two pieces of pastry that is sandwiched together with a generous amount of seedless raspberry preserves and then topped off with glaze and sprinkles. It’s sweet and simply delicious.

Danish Hindbærsnit

Danish Hindbærsnit

Ingredients:

375 gram flour (3 1/3 cup flour)

1/2 teaspoon baking powder

125 gram confectioners sugar (1 1/4 cup)

40 gram egg (1 large egg)

250 gram margarine (2 sticks plus 2 tablespoon)

1 – 1 1/2 cup seedless raspberry preserves

For glaze:

2 cups confectioners sugar

2-3 tablespoons cold water

For decoration:

sprinkles of your choice

Directions:

Line two large baking sheets with parchment paper and preheat oven to 430 degrees F ( 220 C).

Cut margarine into small cubes. In a small bowl combine flour, baking powder and confectioners sugar. Place dry ingredients in a food processor. Add margarine and egg and pulse until dough starts to come together and let go from walls. Remove from food processor and press together to form a ball of dough. Do not overwork. Wrap dough in cling wrap and place in refrigerator for 1 hour to chill. You can also leave dough in refrigerator until the following day.

Remove dough from refrigerator and divide into half. Quickly with your hands, form dough ball into a rectangular shape. Place on floured surface and roll out to a 9 x 14 inch rectangle. Roll dough back up onto your rolling-pin and lift onto lined baking sheet. Repeat with second half of dough. Bake in preheated oven for 10 minutes until golden along edges.

Once the dough comes out of the oven things will move a little fast so make sure glaze, raspberry preserves and sprinkles are ready on your counter. While dough is baking, make the glaze by mixing confectioners sugar and water together. Stir up the seedless raspberry preserves until smooth and pliable and have sprinkles ready.

As soon as the cakes come out of the oven, spread raspberry preserves over the first cake. This will be the bottom piece. Gently slide a flexible plastic cutting board under the second cake and lift it up. Then slide it off the cutting board onto the first raspberry covered cake. If the cake crack a little don’t worry, the glaze will cover it up. While the cake is still warm, start spreading the glaze out over the cake. Add the sprinkles quickly before the glaze sets. You may have to do this as you go along. Let glaze set a little but while the cake is still warm, cut into rectangular pieces. Enjoy!

Baked cake topped with raspberry jam, top with second baked cake

Baked cake topped with raspberry jam, top with second baked cake

Source: adapted from Arla

Print

Read Full Post »

Blommekage

Blommekage

When I first saw this cake I knew I had to make it immediately. And this recipe didn’t lay around on the kitchen counter in my to-do pile for weeks and weeks on end, no sir, it moved right up to the top of the list. Besides, I had been eyeballing the most beautiful plums at the store. I love this cake, but, it did give me quite a bit of trouble. The first time I made it, I placed the plums at the bottom of the pan, as instructed. But when I removed the cake from the pan, some of the plums stayed at the bottom of the pan. Fiasco! But that only got me more determined to make this cake work for me. So I slept on it and decided to try it again. This time I started by placing dough in the bottom of the pan, then plums and topping it off with the remaining dough. It worked like a charm and I was very pleased with myself  🙂 The cottage cheese makes the cake itself moist and sweet which is a great contrast to the slightly tart plums. I know my pictures does not show it, but I also added a glaze to the top which turned out to be the icing on the cake (pun intended). I would recommend serving this the same day it’s baked when the cake is at its freshest.

Plum Cake Ingredients

Ingredients:

For Cake:

125 gram butter at room temperature (9 tablespoons)

225 gram sugar (1 cup plus 2 tablespoons)

4 eggs

200 gram cottage cheese (3/4 cup)

1 1/2 teaspoon lemon zest

250 gram flour (2 1/4 cup)

2 teaspoon baking powder

4 plums

1-2 cinnamon Biscotti, crumbled

For Glaze:

100 gram powdered sugar (1 cup)

2 tablespoon water

1 teaspoon rum

1 teaspoon flour

Butter and sugar, crumbly

Plum Cake with sugar on top


Directions:

Preheat oven to 175 degrees C (347 degrees F)

Plums should be pretty firm, not too soft and juicy. Cut plums into half and twist in opposite directions to separate. Cut pit out with knife. Place plums on paper towel with cut side down to absorb excess juices.

Place Biscotti in zip lock bag, close tightly and pound to crumble. Coat inside of loaf pan (5 x 9 inch) with butter and sprinkle Biscotti crumbs inside pan to coat sides and bottom with crumbs, discard excess crumbs. Set aside.

Place butter and sugar in a bowl and beat with mixer until blended well and crumbly. Add eggs one at the time, mixing well after each egg. Add cottage cheese, lemon zest and mix to blend. Stir flour and baking powder together and fold dry ingredients into batter.

Pour half of batter into prepared pan. Add plum half’s onto the batter, cut side down. Pour the remaining batter on top of plums and spread batter evenly. Sprinkle top with sugar. Bake cake in the middle of preheated oven for 60 to 65 minutes until golden brown. Let cake cool off completely before removing from pan. Once removed from pan, mix glaze and spread over top of cake. Enjoy.

Plum cake with cottage cheese

Plum Cake With Cottage Cheese

Source: adapted from Arla

Print

Read Full Post »

Danish Koldskål

Danish Koldskål

This is a traditional Danish dish served in the summertime. I recall having this either as a dessert, breakfast or even as a light dinner on a warm summer evening. I don’t think my husband and son would easily accept this as a dinner dish…. what, where is the meat 🙂 ….but I actually think this makes a perfect dinner because it’s so refreshing and light, especially in 90 degree weather. Some make this with eggs but I prefer to leave them out. You can also add vanilla sugar and lemon for added flavor. Buttermilk has a tangy flavor which is offset by the sugar. It has high levels of lactic acid which makes it’s easily digested and increases the absorption of calcium. Serve this refreshing dish cold with your choice of topping.

Koldskål ingredients

Koldskål ingredients

Koldskål – 3 servings

Ingredients:

2 cups buttermilk

1 cup plain nonfat yogurt

3 – 4 tablespoons sugar

Directions:

Whip buttermilk, yogurt and sugar together. Serve very cold with a topping of your choice.

Toppings:

Kammerjunker – sweet cookies typically served with Koldskål

fresh fruit (sliced strawberries, raspberries, peaches)

biscotti

toasted oatmeal (toast on pan; 1/2 cup oatmeal, 1-2 tbsp butter, sliced almonds or hazelnuts, careful not to burn)

tvebakker – twice baked cookies popular during WWII

Koldskål

Koldskål

Source: My Danish Kitchen

Print

Read Full Post »

Danish Gulerodsalat

Danish Gulerodsalat

Danish Gulerodsalat (Carrot Salad) is very popular in Denmark and it’s so easy to make, it only has four ingredients. It’s a refreshing, crunchy, sweet and sour….and as an added bonus, guess what, it’s good for you. If you’re not keen on lemon you can use an orange instead, but I like the little bite that lemon gives you. Enjoy this as a side dish, for lunch or as a snack. Serve cold.

Gulerodsalat (Carrot Salad)

Ingredients:

5 carrots

1 lemon

1 to 2 tsp sugar

1/4 to 1/2 cup raisins

Directions:

Peel and grate carrots using a box grater or food processor. Place in a small bowl and add the juice of 1 medium lemon. Add sugar to taste. Start with 1 tsp sugar and add more if you prefer the salad a little sweeter. Finally add the raisins, I used Golden raisins but regular raisins would actually add a little more contrast against the orange carrot color. Place in refrigerator to chill for at least 1/2 hour.

Source: Adapted from maduniverset.dk

Print

Read Full Post »

Kiksekage

Kiksekage

This is another cake from my childhood. I actually don’t think I’ve had this cake more than a few times but it definitely made an impression on me. It’s creamy, chocolaty and a very rich dessert. Serve it with a dollop of Amaretto Whipped Cream and it’s like a piece of heaven. It’s typically made with a type of Crisco and egg which doesn’t sound too good to me, considering it’s a no bake cake, but then I came across this recipe and I’m so glad I tried it. It’s just like I remember it!  This was one of the desserts I served for my Danish Tea Party and also for my Mother In-law Mary Helen for Mother’s Day and just about the entire cake disappeared. Trust me on this one, it is delicious.

Making Kiksekage

Making Kiksekage

Kiksekage

Ingredients for Kiksekage:

8 oz. semi-sweet chocolate (227 grams)

1 1/3 cup heavy whipping cream (10 oz. or 295 ml)

3/4 cup confectioners sugar (3 oz. or 85 grams)

7 tbsp butter (3.5 oz. or 100 grams)

7 oz butter biscuits (ex. Leibniz)

Ingredients for Amaretto Whipped Cream

1 cup heavy whipping cream

2 tbsp powdered sugar

2 tbsp Amaretto liqueur

Directions:

Line a 9 x 5  in. loaf pan with parchment paper by placing one big piece of paper across bottom and long sides and cut two smaller pieces of paper for the ends of the pan. Chop chocolate into small pieces and place in a bowl. Pour whipping cream and confectioners sugar in to a small cooking pot, stirring occasionally bring to a simmer. Slowly pour the hot cream mixture over the chopped chocolate. Stir the mixture until shiny and smooth. Let cool for 5 minutes. Cut butter into small pieces and add to chocolate mix, stir until completely melted. Place mixture in refrigerator for 15 minutes to cool. Cover bottom of loaf pan with chocolate, then place a layer of biscuits, repeat chocolate, biscuit, ending with a layer of chocolate. Cover the top of chocolate with cling wrap and place in refrigerator overnight. The following day gently and slowly lift the cake out of the form. Invert cake onto a plate and slowly peel off parchment paper. Decorate the top of cake with your choice of topping, serve with Amaretto whipped creme, if desired.

Making Amaretto whipped creme: In a small bowl combine whipping cream, powdered sugar and Amaretto. Whisk until desired consistency. Serve with Kiksekage.

Source: madgal.dk

Print

Read Full Post »

Kyskager - Meringue Cookies

Kyskager – Meringue Cookies

Who doesn’t love Meringue cookies. Light, fluffy, crunchy and oh so sweet little tasty treats and good for you and they contain no fat what so ever 🙂 Meringue cookies are called Kyskager in Danish and they are always a popular cookie on the coffee table, especially with the children.

These cookies are really fun to make. Yeah you get all sticky, at least I did, but the piping is awesome. Helpful hints: it’s easier to separate the egg whites from the yolks when the eggs are cold. Once separated make sure egg whites are brought up to room temperature before making the meringue. Make sure your bowl and beaters are very clean. If there is grease on your equipment it will prevent the egg whites from expanding. Store meringue cookies in a dry airtight container.

Kyskager - Meringue Cookies

Kyskager – Meringue Cookies

Ingredients:

 4 whole egg whites, at room temperature

1 cup sugar

1 tsp almond extract

1/2 tsp cream of tartar

10 drops food coloring

Directions:

Preheat oven to 225 degrees F. Beat egg whites in a large bowl with an electrical mixer on medium speed until frothy. Add cream of tartar and beat until soft peaks form. Increase speed to medium-high. Add sugar 1 tablespoon at a time, beating until sugar is dissolved and stiff peaks form. Beat in extract and food color until blended. Spoon meringue into pastry bag and pipe out cookies onto parchment paper about 1 inch apart. If you don’t have a pastry bag with tip attachments, you can use a ziplock bag by snipping off one corner of the bag or you can simply drop the meringue onto the parchment paper by the teaspoon full. The meringue cookies will fill up 2 large baking sheets. Bake both sheets of cookies at the same time for 45 minutes. Turn the oven off. Let the meringues stay in the oven for 1 hour or until cool.

Source: Tasty Kitchen

Print

Read Full Post »

Frikadeller

Frikadeller

And then there’s Frikadeller, a wonderful traditional Danish dish.  I practically grew up on these delicious little Danish meatballs and so I carried on the tradition by feeding them to my son and husband, and they love them as well. They freeze well, are easy to make  and they are great as cold leftovers. My mother uses flour in her recipe, as do most everybody, but I once upon a time tried using House Autry Seafood Breader instead of flour and it worked out great. The seafood breader is basically just a seasoned type of flour and it does not taste like seafood. 🙂 I hope you enjoy these little treasures.

Ingredients:

2 lbs ground pork

2 eggs

3/4 to 1 tsp salt (to taste)

1/2 tsp pepper

1 shallot, minced

5 tbsp flour

Directions:

Mix all ingredients together. Spray a pan with olive oil. Form 1 1/2 inch rounded meatballs using a tablespoon and the palm of your hand. Brown meatballs on all sides over medium heat. This may be done in batches. Finish baking meatballs in a preheated 350-degree oven for 10 minutes to ensure they are cooked all the way through.

Source: My Danish Kitchen

Print

Read Full Post »

Danish Napoleonshat

Danish Napoleonshat

These delicious little Danish cookies are called Napoleon Hats (remember Napoleon Bonaparte, the French dude with the funny hat). Napoleon Hats were some of my favorite cookies growing up, still is. Whenever we go home to visit I always pick up some of these cookies at the local Bakery, along with a lot of other Danish pastries. These cookies are really easy and fun to make, oh and did I mention that they’re delicious.

Napoleonshat dipped in chocolate

Napoleonshat dipped in chocolate

Ingredients:

7 oz Marzipan (Odense)

1 3/4 cup flour

1 stick + 1 tbsp. butter

3/4 cup powdered sugar

1 1/2 egg yolk

1/2 stick vanilla bean

5 oz. semi-sweet chocolate

Directions:

Break up butter into flour and place in a food processor. Pulse to blend. Slice open the vanilla bean and scrape out the seeds. Add powdered sugar, egg yolk and vanilla seeds to flour mixture. Blend until a smooth powdery mix. Remove mixture from food processor and press it together to form a dough ball. Place dough in refrigerator for 30 minutes to cool. Place dough in between two pieces of cling wrap and roll out to 3 mm thickness. Cut out circles using a glass approximate 2 1/4 inch in size. Roll a small ball of marzipan and place in center of round dough. Lift up dough circle and marzipan ball and gently squeeze edges closed using your thumbs and index fingers to form three points (like a Napoleon Hat). Place on parchment paper. Bake at 350 degrees F for 10-12 minutes. Let cool on baking sheet.

Melt 5 oz. semi-sweet chocolate over a water bath. Once cookies are cooled, dip each corner and bottom of cookie in the melted chocolate. Place on baking rack or parchment paper to let chocolate set.

Making Napoleonshat

Making Napoleonshat

Source: My Danish Kitchen

Print

Read Full Post »

« Newer Posts - Older Posts »