Feeds:
Posts
Comments

Archive for December, 2010

Chili

Winter Wonderland

We actually had a white Christmas this year, as a matter of fact, we had record snow falls here in Virginia. It may not have been as much snow as some of our more Northern neighbors got, but for Virginia this amount of snow has been very unusual. It started snowing on the evening of Christmas Day and continued on through 1st Christmas Day. I ♥ snow and of course I had to go out and explore it. It was beautiful and magical and the air was cold and refreshing. I must say that I enjoyed every moment of it.

Chili

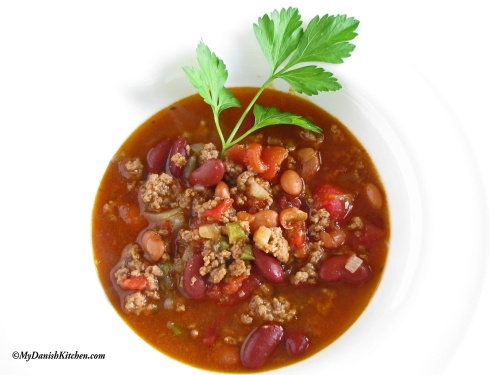
Chili is such a great comfort food, perfect for when it’s cold outside. It’s quick and easy to put together and then just let it simmer away on the stove. I prefer to make my Chili one day in advance to allow the flavors to really come together. Of course, you can adjust the seasoning to your liking. I don’t make my Chili too spicy but if you like it hot, then by all means, add more Chipotle in Adobo sauce. Not only does this ingredient bring heat but it also brings a wonderful flavor as well. By the way, this Chili freezes very well making it an easy grab and go dinner. Enjoy!

Wizards made by jganvil

Ingredients:

2 pounds ground beef

1 onion, chopped

1 green pepper, seeded and chopped

1 tablespoon garlic paste

2 tablespoon tomato paste

2 cans diced tomatoes (14.5 ounces)

plus 2 cans water (14.5 ounces)

1 can pinto beans, rinsed (16 ounces)

1 can red kidney beans, rinsed (16 ounces)

1/2 tablespoon chili powder

2 teaspoons cumin

1 teaspoon chipotle in Adobo sauce

salt and pepper to taste

Directions:

In a large heavy cooking pot, brown the ground beef over medium-high heat. Lower the heat to medium, add the chopped onion and green pepper, continue to cook until onions are translucent. Add garlic and tomato paste and mix well. Add diced tomatoes, water, beans, chili powder, cumin, chipotle, salt and pepper. Let it simmer for 2-3 hours. Remove from heat and let it cool for a little for 15 minutes. Place in storage containers and refrigerate. Serve Chili the following day or freeze for later.

Simmering Chili

Iron Wizards are made by Artist Blacksmith Joseph Gentile. To see more of his ironwork go to jganvil.com

Source: My Danish Kitchen

Print

Read Full Post »

Marshmallow Fudge

Marshmallow Fudge

I have been going a little crazy with the Fudge recipe that I got from Stacie’s blog Eating in Denmark. In this version I used Marshmallows and added a little raspberry schnapps, just enough to give it a hint of raspberries. I can’t believe how easy this recipe is and how quickly the Fudge disappears. Note: it is best when served cold.

Marshmallow Fudge

Ingredients:

12 oz semisweet chocolate

14 oz sweetened condensed milk

2 tablespoon butter

a pinch of salt

4 tablespoon raspberry schnapps

1 cup mini marshmallows

Directions:

Line a 9 x 9 inch pan with foil, letting the foil extend out over the two edges.

Melt the chocolate, sweetened condensed milk, butter and salt over very low heat.

Add the marshmallows to the melted chocolate mixture and stir to cover all the marshmallows. Pour mixture into prepared pan and place in refrigerator to cool completely. You can place it in the freezer to help speed up the cooling process.

Once the fudge is completely cooled and set, lift the fudge out of pan using the extra foil extending over edges. Cut into 1 inch pieces. I recommend to keep fudge cooled in refrigerator until serving. Enjoy.

Marshmallow Fudge

Source: adapted from Eating in Denmark

Print

Read Full Post »

Marmorkage

This cake was the very first cake I learned to bake and I made it quite often when I was a young girl. It was my favorite cake at that time. It had been years since I last baked this cake that I had almost forgotten about it. Then when I played the blogging game “Tag” I was reminded of it and I decided it was time for a revisit. This version of Marmorkage is a dense cake which is not overly sweet. The original version has more white cake than chocolate, but since I love chocolate I always reverse it.

Marmorkage

Ingredients:

130 gram salted butter (1 stick plus 1 tablespoon)

200 gram sugar (1 cup)

3 eggs

1 teaspoon baking powder

250 gram flour (2 1/4 cup)

1 deciliter milk (1/2 cup plus 2 tablespoon)

6 tablespoon cocoa

Directions:

Preheat oven to 170 degrees Celcious (340 degrees Fahrenheit). Coat loaf pan with butter and dust with flour, shake out excess flour and set aside.

Place butter in small saucepan and melt over low heat. Once melted, place in a mixing bowl, add sugar and mix well. Add eggs one at a time and mix well. Stir flour and baking powder together. Add flour and milk in small increments until incorporated. Remove 1/3 of dough to a small separate bowl, this will remain the white colored dough. To the remaining 2/3 dough, add cocoa and stir until well blended.

Place 1/2 of cocoa dough in bottom of loaf pan, add white dough, then add the remaining cocoa dough as the top layer. Take a fork and run it up and down the dough layers a couple of times to create a marbeling effect. Bake in preheated oven for 1 hour 15 minutes or until a toothpick comes out clean. Enjoy.

Chocolate and white dough, top off with chocolate dough.

Source: My Danish Kitchen

Print

Read Full Post »

Chicken Noodle Soup

Chicken Noodle Soup

Tis the season…for soup. Ahhh good old Chicken Noodle soup. Feeling cold and in need of some comfort food? this soup ought to pick you right up. I get a little excited when it comes to soup and after having made so many sweet cookies and desserts lately, it is time for something savory. It’s warm, delicious, an easy dinner or a soothing lunch. It’s loaded with vegetables and it is not at all difficult to make. I would really like to recommend that you make this soup with homemade Chicken Stock which will intensify the flavors and give you an amazing soup. In this particular soup recipe I used rutabaga, but if it’s not available to you, just use parsnip or turnip. I hope it will keep you nice and warm.

Ingredients:

2 tablespoon extra-virgin olive oil

1 medium onion, chopped

2 garlic cloves, minced

3 large carrots, cut into 1/2-inch slices

1/2 medium rutabaga, cut into 1/2-inch cubes

2 celery ribs, cut into 1/2-inch slices

4 fresh thyme sprigs

1 bay leaf

2 quarts chicken stock

4-8 ounces dried wide egg noodles, as you prefer

1 1/2 cups cooked shredded chicken

Salt and pepper to taste

small handful fresh flat-leaf parsley, finely chopped

Directions:

Place olive oil in soup pot over medium heat and add onion, garlic, carrots, rutabaga, celery, thyme and bay leaf. Cook and stir until vegetables are softened but not browned, about 6 minutes. Pour in chicken stock and bring to a boil. Add noodles and simmer for 5 minutes or until tender. Season with salt and pepper. Add chicken and heat through. Sprinkle with chopped parsley before serving.

Source: adapted from Tyler Florence

Print

Read Full Post »

Pistachio Fudge

I first saw this recipe on my friend Stacie’s blog Eating in Denmark and I knew that I had to make this immediately, and so this recipe shoot right up to the top of my mile long to-do-list. It is super delicious, easy and quick to make, and it looks so festive with the green pistachios. I have also made it with coconut, which was equally delicious, and I suppose you could make this fudge with just about any of your favorite filling. Thank you Stacie for this fabulous Fudge recipe 🙂

Pistachios

Mixing in the Pistachios

Ingredients:

12 ounce semisweet chocolate, chopped

12 ounce can sweetened condensed milk

2 tablespoon unsalted butter

a pinch of salt

1 cup shelled unsalted pistachios

Directions:

Line a 9 x 9 inch pan with foil, letting the foil extend out over the two edges.

Melt the chocolate, sweetened condensed milk, butter and salt over very low heat.

While the chocolate mixture is melting, place pistachios in a zip lock bag and break them up into small and bigger pieces by pounding them with a rolling-pin.

Add the pistachios to the melted chocolate mixture and stir to mix well. Pour mixture into prepared pan, smooth out the top and place in refrigerator to cool completely. You can place it in the freezer to help speed up the cooling process.

Once the fudge is completely cooled and set, lift the fudge out of pan using the extra foil extending over edges. Cut into 1 inch pieces. I recommend to keep fudge cooled in refrigerator until serving. Enjoy.

Chocolate Pistachio Fudge

Source: Eating in Denmark Blog (originally from Nigella Express)

Print

Read Full Post »

My Mom and Dad’s old julestjerne hangs in my window every Christmas

First of all, I just wanted to thank everyone for all of your nice comments and emails that you have left me during the 12 Days of Christmas series. It has been such a great pleasure and I have had a lot of fun in creating this series and now that it has come to a conclusion it is almost a little bittersweet. The positive response I have gotten has been unexpected and very impressive, it has brought back a lot of wonderful memories for myself and I am happy that I have been able to share some of them with you. I look forward to bringing you more delicious food and desserts and feel free to stop by My Danish Kitchen any time you like. Merry Christmas and Glædelig Jul to everyone.

Our Christmas tree with Danish and American flags

Read Full Post »

Ris a la Mande

Risalamande

During the 1800’s the citizen’s of Copenhagen felt the need to separate themselves from the farming community and this also affected our Christmas food. They added whipped cream and almonds to our beloved Danish Risengrød and called it Risalamande to give it some French flair, because that is what was in fashion at that time. Kristeligt Dagblad

Danish Christmas Tradition: Mandelgaven (the Almond Present)

Today you still see Ris a la mande served in most Danish households on Christmas Eve. Since then, we have add a warm Cherry Sauce to top it off and traditionally a fun game goes along with eating this wonderful Christmas treat. A single whole Almond is blanched and stirred into the Risalamande to hide it. The dish is served after Christmas dinner and whoever finds the almond wins a gift. The problem with the Almond gift is that the winner could be anyone from a child to grandmother. This is often solved by giving a traditional small Marzipan pig as the gift, but today, the gift could be anything. Also, there is a lot of cheating going on with this game. Some may choose to place an Almond in each of the children’s bowls so all the children gets a gift. I think my Mom did that one year but we thought the game should be done “the right way”. I can honestly say that I have never won this game. The winner in our home was typically my Dad. He would often times get the almond and then he would keep it hidden against his cheek until all the Risalamande was eaten up. Sneaky.  One year my Dad took pity on me and gave me the Almond under the table 🙂 but I didn’t feel right taking the gift since I did not honestly win it.

I should also mention that some households may chop blanched Almonds into small pieces and add them to the dish. We have never done this at our house, instead pure Almond Extract is added giving the dish a wonderful Almond flavor. This dish is by far one of the biggest highlights of Christmas for me and I continue to serve it every single year, for it would not be Christmas without it.

Risalamande with warm Cherry sauce

Update:

I am very honored to be asked to participate in the LexioPhiles International Recipe Advent Calendar 2011. My recipe for Risalamande with warm Cherry sauce will appear on December 2nd, 2011.  LexioPhiles will feature a new recipe every day during the month of December from bloggers around the world.

Ingredients for 1st stage – Risengrød:

1 1/4 cup water

1 cup rice (Grødris)

4 1/2 cup milk

1 teaspoon vanilla sugar

Ingredients for 2nd stage – Risalamande:

1 1/2 cup whipping cream

3 tablespoon confectioners sugar

4 teaspoon pure almond extract

2 whole almonds

For the Cherry Sauce:

15 oz can Oregon Bing Cherries in heavy syrup

1 tablespoon cornstarch

water

Directions:

Place water and rice in a medium cooking pot, cover with a lid and simmer for 2 minutes. Add milk and vanilla sugar and simmer covered over low heat for 40-45 minutes. Stir often to make sure the milk does not burn, especially the last 30 minutes. You may have to turn the heat all the way down as low as your stove will allow for the last 15 minutes.

Place in Tupperware and refrigerate for several hours or overnight.

Once mixture is completely cooled remove from refrigerator and break it up with a spoon. In a small bowl add whipping cream, confectioners sugar and almond extract. Beat with a handheld mixer until you see tracks from beaters in the cream. Add half of the whipping cream to rice mixture and combine well with a spoon, add remaining whipping cream in small increments. The final  texture should be creamy and easily mixed with the spoon. Place covered in refrigerator until ready to serve.

To blanch almonds. Place almonds in a small dish and pour boiling water over to cover. Let sit in water for 1 minute, drain and rinse with cold water. Pat dry and slip the skins off. I usually blanch two almonds in case I have trouble with one. Before serving Risalamande, place one blanched almond in mixture and stir well to hide almond.

In a small dish mix together the cornstarch and some water to form the thickening agent. In a small saucepan bring cherry and syrup to a simmer. Add the cornstarch/water mixture to cherries a little at the time, stirring until syrup starts to thicken. Simmer for 1 minute and remove from heat.

Serve Risalamande cold with the warm cherry sauce on top.

Glædelig Jul and Merry Christmas♥

Source: My Danish Kitchen

Print

Read Full Post »
Risengrød

Risengrød

Danish Christmas Tradition: Nissen (a mythical creature of Scandinavian Folklore)

The Danish Nisse is a fictional character which has its roots from the 1800’s farming community. Nissen would help with the successful drift of the farm, that is, if you were respectful of the nisse and if you behaved yourself. A special dish which were served for Christmas is Risengrød. It may not seem special by todays measure, but back then milk, rice, butter, sugar and cinnamon was a commodity. And so, it makes sense that Nissen would be part of a festive event like Christmas.

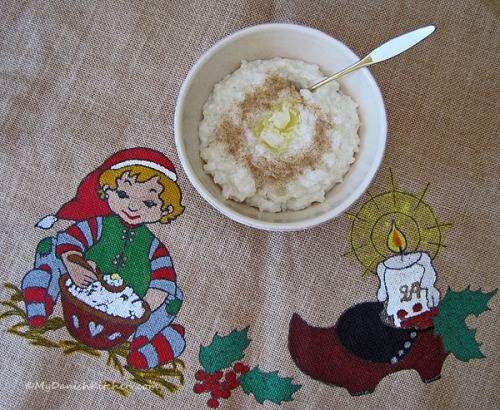
Today, the Nisse folklore is still alive and well, but in a different way. Songs have been written about the Nissen and he’s often seen in Children’s Christmas calendars whether it be on TV or on paper. He is an important part of decorating for Christmas in Denmark and Risengrød is still his favorite meal. In the picture above, which is part of my Christmas Tree skirt, you can see the Nissen getting ready to eat his Risengrød.

Risengrød

Ingredients:

1 1/4 cup water

1 cup rice (Grødris)

4 1/2 cup milk

1/2 teaspoon salt

1 teaspoon vanilla sugar

butter

sugar

cinnamon

Directions:

Place water and rice in a medium cooking pot, cover with a lid and simmer for 2 minutes. Add milk, salt and vanilla sugar and simmer covered over low heat for 40-45 minutes. Stir often to make sure the milk does not burn, especially the last 30 minutes. You may have to turn the heat all the way down as low as your stove will allow for the last 15 minutes.

Mix sugar and cinnamon together according to your taste. Serve the Risengrød warm, sprinkled with sugar/cinnamon mixture and place a dollop of butter in the center, letting the butter melt.

Glædelig Jul and Merry Christmas♥

Source: My Danish Kitchen

Print

Read Full Post »

Hazelnut Truffles

Truffles, small delectable treasures. These particular truffles have toasted hazelnut in them which gives a slight crunch. Of course, hazelnut paired with chocolate is a match made in heaven. You just can’t go wrong. Or can you? Well not with the truffles themselves but I did have quite a bit of trouble with this recipe, but I worked out the kink. The original recipe instructed me to melt the bittersweet chocolate in the microwave, which turned out to be a horrible mess. I think my microwave oven was heating at too high heat. The chocolate would harden up and become unmanageable after just dipping 1/3 of the truffles. So I tried again, but this time melting the chocolate over a water bath which turned out so much better.  And so, in the end everything turned out alright. Now we can finally enjoy these delicious little truffles.

Flettet julestjerne

Danish Christmas Tradition: Juleklip (Paper cut-outs)

Paper cut-outs such as flettede hjerter (braided hearts), kræmmerhuse (cones), angelsChristmas trees and flettede stjerner (braided stars) is a common part of Danish Christmas decorations. They are made by children and adults alike, possibly at home but always in schools planned as a special day of fun with colored paper, glue, scissors and baked goods. These homemade treasures often times end up as an important part of the Christmas Tree decorations.

I first learned to make the braided star as an adult. I meet once a month with other Danish ladies for an evening of stimulating conversation and good food. It was during one of these evenings many years ago that my Danish friend Lise’s husband Bill taught me how to make the braided star. He would make them at any given time of the year and he was very enthusiastic about making them. I now make them every year around Christmas time and they remind me of Lise and Bill, who has since passed away. It’s a happy memory.

Hazelnut Truffle Ingredients

Ingredients:

2 cups heavy cream

1 (11.5 ounce package) semi-sweet chocolate chunks

8 (1 ounce) semi-sweet chocolate squares – chopped

2 cups hazelnut – chopped, toasted and divided

1 teaspoon vanilla extract

1 (11.5 ounce package) bittersweet chocolate chips (60% cacao)

Directions:

Chop hazelnuts and toast them on a dry pan over medium heat until fragrant. Stir often to make sure they don’t burn. Remove nuts from heat.

Place chocolate chunks in a medium bowl. Chop chocolate squares and add to bowl. Bring heavy cream to a simmer and then add the hot cream to the chocolate, stirring well to melt the chocolate. Add vanilla and 1 1/2 cups of the toasted hazelnuts. Stir to combine. Place in refrigerator to chill for 1 to 2 hours or until hard enough to keep a shape.

Line 2 large baking sheets with parchment paper. Scoop 1-inch balls from chocolate mixture and roll quickly between hands to smooth edges. Place on prepared baking sheets and refrigerate for 1 hour or until cold and firm.

Bring a saucepan filled with 1 inch water to a simmer. Once water is simmering turn heat all the way down to low. Place bittersweet chocolate in a medium heat-proof bowl and place over the saucepan, making sure bowl is not touching water. Stir chocolate occasionally until melted and smooth. Place chocolate ball on a fork and drizzle warm melted chocolate over the chocolate ball to cover. Use a toothpick to help push the truffle off the fork onto to the baking sheet. Sprinkle with remaining hazelnuts and refrigerate to harden.

Glædelig Jul and Merry Christmas♥

Chocolate and cream

Chocolate Hazelnut Truffles

Source: adapted from Taste of the South

Print

Read Full Post »