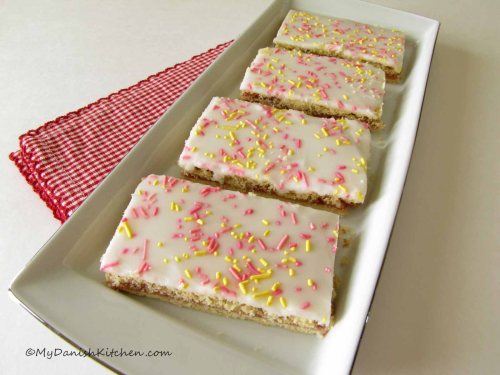
Feeds:
Posts
Comments

Archive for the ‘Dessert’ Category

Magic Cake

Magic Custard Cake

If you are a custard lover like me, this cake is for you! When I first came across this cake, it was love at first sight and the recipe moved straight to the top of to-do-list. The magic with this cake is that when you’re making it, it seems a little impossible that this batter will ever turn into a delicious, silky cake. But it does. The cake is suppose to come out with three distinct layers. Well, mine really only came out with two layers, but I’m not complaining about it because it was still magical to me.

Magic Custard Cake

Magic Custard Cake

A couple of notes for you. The batter will be thin like a crepe batter, don’t freak out, it’s OK, it’s suppose to be like that. Another thing to take note of, is the baking time. It will vary greatly from oven to oven and as you can see the range is pretty big, from 45-60 minutes. Mine took 45 minutes, so I would check on the cake at 40 minutes and then keep a close eye on it. The cake should be golden in color when finished and it will have a slight jiggle to it when you take it out of the oven. Finally, to speed up the cooling process you can place the cake in the refrigerator. I hope you enjoy this cake as much as we did.

Magic Custard Cake: makes one 8 x 8 inch cake

Ingredients:

113 gram unsalted butter (4 oz)

480 milliliter whole milk (2 cups or 16 fluid oz)

4 large eggs, separated and at room temperature

150 gram confectioner’s sugar (5.3 oz), sifted

1 tablespoon water

1 teaspoon vanilla extract

115 gram flour (4 oz), sifted

Directions:

Cut-to-fit and line two pieces of parchment paper into an 8 x 8 inch (20 x 20 cm) baking dish with the sides overhanging a little. Set pan aside.  Preheat oven to 325º F (162º C).

Melt butter, set aside to cool slightly. Warm milk to lukewarm, set aside. Beat egg whites to stiff peaks, set aside.

Add egg yolks and sifted confectioner’s sugar to a large bowl, beat until thick and pale yellow (2-3 min). Mix in water and vanilla extract. Pouring in a thin stream, add melted butter while mixing. Add sifted flour and mix until fully incorporated. At low speed, add the milk and beat until everything is well mixed together. Gently fold in the egg whites, 1/3 at a time, repeat until all egg whites are folded in.

Pour batter into prepared pan and bake in the middle of oven for 45-60 minutes or until the top is golden in color. Allow cake to cool completely before sprinkling with confectioner’s sugar and serving. Enjoy!

Source: adapted from White On Rice Couple

Print Friendly and PDF

Read Full Post »

Kærnemælksuppe

Kærnemælksuppe

Kærnemælksuppe is an old-fashioned Danish soup which I had forgotten all about, until the topic came up on a Facebook page. I have very fond memories of this soup which I absolutely love and I think we typically had it as a dessert although I think we may also have had it for dinner. Reading some of the comments online about Kærnemælksuppe, it appear that a lot of people don’t like this soup, maybe it’s an acquired taste? In any case, buttermilk is a special tasting dairy product, it’s tart. But with the combination of sweet vanilla pudding, a little extra sugar which is optional and raisins, the heated buttermilk becomes down-right delicious, at least to me.

Kærnemælksuppe – Warm Buttermilk Soup (makes 2 servings)

Ingredients:

16 fl. oz buttermilk (470 ml)

4 tablespoons vanilla flavored instant pudding (Jell-O for example)

1 tablespoon sugar (optional for extra sweetness)

a handful raisins

Directions:

Mix 1/2 of the buttermilk with pudding powder and sugar (optional), using a hand-mixer beat until it starts to thicken. Pour remaining 1/2 of buttermilk into a small saucepan and turn heat to medium. Add thickened buttermilk/pudding mixture and raisins to saucepan, stirring occasionally bring to a simmer. Serve hot and Enjoy!

Source: My Danish Kitchen

Print Friendly and PDF

Read Full Post »

Key Lime Pie

Key Lime Pie

Key lime pie is one of my husband’s favorite desserts and I have been wanting to make this pie for the longest time. And since we are now, well through the holidays and with the anticipation of Spring (yes, I know it’s still a little far off) this particular pie says spring to me. It is tart and sweet, and it has a real freshness about it and it makes me fall in love with the sunshine all over again.

Making Graham Cracker Crust

Making Graham Cracker Crust

Now this is a Key Lime Pie, short of actually having any Key Limes in it. Key Limes, which is associated with the Florida Keys, was nowhere to be found around here, so my delicious Key Lime pie is made with plain-old Limes and it’s still taste fantastic to me.

Making Pie Filling

Making Pie Filling

Key Lime Pie (makes 1 pie)

Ingredients:

Graham cracker crust:

125 grams Graham crackers (4.4 oz or 8 1/2 sheets)

30 grams sugar (2 tablespoons)

85 grams unsalted butter, melted (3 oz or 6 tablespoons)

Pie filling:

3 large egg yolks, at room temperature

395 grams sweetened condensed milk (14 oz can)

2 teaspoons lime zest (approx. regular 1 lime)

120 milliliter lime juice (4 fluid oz or 1/2 cup) (approx. 2 1/2 regular limes)

Pie topping:

240 milliliter cold heavy whipping cream (8 fluid oz or 1 cup)

30 grams sugar (2 tablespoons)

1 handful sweetened coconut

Directions:

Graham cracker crust: Preheat oven to 350 degrees F (177 degrees C). Spray or butter a 9 inch (23 cm) pie dish. Place butter into small saucepan and melt over low heat. Place Graham crackers in a food processor and process into fine crumbs. (If you do not have a food processor, place crackers into a sealed plastic bag and break-up crackers by beating them with a rolling pin). Add sugar to crumbs and pulse to combine. While food processor is running, pour melted butter into crumbs. Place moist cracker crumbs into pie dish, press crackers up along side of dish and then out over the bottom of dish. Bake in oven for 10 minutes or until set and golden. Remove from oven and set aside.

Pie filling: Beat egg yolks until thickened and pale yellow (3 min). Gradually add sweetened condensed milk and continue beating until light and fluffy (3-5 min). Scrape down sides and add lime zest and lime juice, beat until fully incorporated. Pour filling into pie crust and bake for 10-15 minutes or until filling is set. Allow to cool down to room temperature and then refrigerate for several hours or overnight.

Pie topping: Preheat oven to 350 degrees F (177 degrees C). Place coconut in a single layer on a small baking sheet and toast for 4-10 minutes, keeping a close eye on them. Remove toasted coconut from oven and set aside.

Beat whipping cream and sugar until cream is starting to thicken (almost stiff peaks). Place mounds of whipped cream onto pie filling and top with toasted coconut. Can be stored in refrigerator for a few days. Enjoy!

Key Lime Pie without topping

Key Lime Pie without topping

Source: slightly adapted from Joy of Baking

Print Friendly and PDF

Read Full Post »

Pumpkin Spice Bread

Pumpkin Spice Bread

Fall is finally here, my favorite time of year. I love Autumn here in Virginia, the sun is still nice and warm but the air is cool and crisp and the sky is the most brilliant blue color. The trees are showing off their beautiful Fall foliage, Pumpkins are everywhere and the evenings are for hot apple cider. What’s not to like. And to really get us into the Autumn mood, here is a delicious, soft and moist Pumpkin Spice bread which I lightened up a little by substituting some of the oil with applesauce. I promise that you can’t tell it’s a little on the healthy side. The recipe makes two regular loaves (9 x 5 inch pan) or 1 regular and 2 mini loaves (7 x 2.5 inch pan) or maybe you could make 4 mini loaves to give to friends and family. The regular size loaves bake for 60-70 minutes and the mini loaves bake for about 25 to 30 minutes or until a toothpick inserted into the center comes out clean. Happy baking!

Pumpkin Spice Bread

Pumpkin Spice Bread

Pumpkin Spice Bread (makes 2 loaves)

Ingredients:

1/2 cup vegetable oil

1/2 cup applesauce

4 eggs, at room temperature

15 oz canned pumpkin

3 cups sugar

3 1/2 cups all-purpose flour

1 teaspoon baking soda

1/2 teaspoon baking powder

1 teaspoon salt

1 teaspoon ground cinnamon

1 teaspoon ground nutmeg

1/2 teaspoon ground cloves

1/2 teaspoon ground allspice

1/2 cup water

Directions:

Preheat oven to 350 degrees F. Spray two 9×5 inch loaf pans with baking spray and set aside.

In a large bowl combine oil, applesauce, eggs, pumpkin and sugar, mix well to combine. In a second bowl combine flour, baking soda, baking powder, salt, cinnamon, nutmeg, cloves and allspice. With the mixer set to slow speed, add dry ingredients to the pumpkin mixture, while alternating with the water, mix until combined.

Pour batter into prepared pans and bake for 60-70 minutes or until a toothpick inserted into the center comes out clean. Cool in pans for 10 minutes before removing to a wire rack to cool completely. Enjoy!

Source: adapted from Taste of Home

Print Friendly and PDF

Read Full Post »

Honningkage

Honningkage

I bought a package of Dr. Oetker Honningkage spice mix which I have been wanting to try out for quite some time now. The cake turned out very delicious and it was super easy to make. It brought back childhood memories of a wonderful Honningkage that my mother used to make, I’ll have to ask her if she still has that recipe. The spice package is a mixture of cinnamon, cloves, ginger, allspice and baking soda so it is a really nice combination of spices. I topped the cake with a little glaze of confectioners sugar and water, which gave it a nice sweet contrast. So if you come across a package of Dr. Oetker Honningkage spice mix, give it a try, it’s really very easy to make and delicious. (Wow, that almost sounded like a commercial, it not though, just a personal recommedation 🙂 )

Honningkage – Honey Cake (makes 2 small or 1 large loaf)

Ingredients:

100 grams butter (or 3.5 oz)

1 1/2 deciliter sugar (or 145 grams or 5.1 oz)

1 deciliter honey (150 grams or 5.3 oz)

1 egg

1 deciliter buttermilk (4 liquid oz or 1/2 liquid cup)

4 deciliter all-purpose flour (235 grams or 8.2 oz)

1 package (15 grams) Dr. Oetker Honningkage spice

Directions:

Preheat oven to 150 degrees C (300 degrees F). Spray your baking pan of choice with baking spray and set aside. I used 2 small 7 x 2.5 x 1.8 inch pans (approx 17.5 x 6 x 4.5 cm). Melt butter, sugar and honey in a small saucepan, remove from heat and let it cool down a little. Beat egg and buttermilk together. Mix honningkage spice package in with the flour. Add honey mixture and flour to the buttermilk in alternating increments. Beat until incorporated, do not over-mix. Pour into baking pan and bake in center of oven for 50 minutes or until a toothpick inserted into center of cake comes out clean. If desired you can serve cake with glasur (mix confectioners sugar with a small amount of cold water). Enjoy!

Source: adapted from Dr. Oetker Honningkage spice package

Honningkage Spice Package

Honningkage Spice Package

Print Friendly and PDF

Read Full Post »

Hindbærsnitter

Hindbærsnitter

Hindbærsnitter remains one of my all-time favorite Danish pastries and while we were vacationing home in Denmark this summer, I had my fair share of them from the bakery (that, and Træstammer). So after coming home I was looking for an excuse to bake them again and finally got the opportunity when a friend of ours came for a short stay, thanks Vince 🙂

This recipe is not that different from my other post about Hindbærsnitter, it probably differs mostly in technique. The result was a very, very tasty Hindbærsnit, although the cake turned out very delicate and frail. I think that was due to the fact that I interpreted the directions to roll out the dough to a 25 by 30 cm rectangle. Looking back, I think what Lone Landmand (from Beretninger fra et autentisk landbrug) meant was to roll the dough out to a 25 or 30 cm square. I believe that if you roll it out to a 25 by 25 cm square you will get a slightly thicker, and therefor a less delicate outcome. If you decide to try this recipe for Hindbærsnitter, I know you’ll love them.

Making Hindbærsnitter

Making Hindbærsnitter

Hindbærsnitter (makes 12-16 pieces)

Ingredients:

300 gram all-purpose flour (10.5 oz)

100 gram confectioners sugar (3.5 oz)

200 gram butter, at room temperature (7 oz)

2 large egg yolks

280 gram seedless raspberry jam (10 oz)

For the glaze:

270 gram confectioners sugar (approx 2 1/2 cups)

3-4 tablespoons cold water

Colored sprinkles for decorating

Directions:

In a mixer fitted with the paddle attachment, combine flour, confectioner sugar and cut-up butter. On low speed, combine until mixture is crumbly. Add egg yolks one at the time, gradually increasing speed to medium, mix until dough comes together. Divide dough into two equal portions, place each half of dough on a piece of parchment paper and slightly press dough into a square shape. Place both pieces of dough in refrigerator for 1 hour to rest and chill.

Preheat oven to 175 degrees C (345 degrees F)

Keeping the dough on parchment paper, roll dough out to approximately 25 x 25 cm (9.5 x 9.5 inches), repeat with the second piece of dough. Place each parchment paper with rolled out dough onto a baking sheet. Bake dough, one sheet at the time, for 12 minutes or until edges turn golden. Allow baked cake to cool a little. Meanwhile, make the glaze by mixing confectioners sugar and water until smooth. Prepare raspberry jam by stirring it to make a loose flowing jam. Spread jam onto the first baked cake, this will be the bottom piece. Gently slide a flexible plastic cutting board under the second cake and lift it up. Then slide it off the cutting board onto the first raspberry covered cake. If the cake crack a little don’t worry, the glaze will cover it up. Spread the glaze over the top and add sprinkles before the glaze sets. Allow glaze to set completely before cutting. Enjoy!

Source: Beretninger fra et autentisk landbrug

Print Friendly and PDF

Read Full Post »

Nougatmandler

Nougatmandler

Nougat is a sinfully delicious paste that is used quite often in Denmark. Nougat can be made from sugar or honey, toasted almonds, hazelnuts, walnuts and/or pistachios. There are a number of different variations of nougat but the one I am using here is a soft nougat made with hazelnuts.

The melted Nougat is added in three additions and then gently tossed and separated with confectioners sugar.

Nougatmandler is quick and easy to make. Make sure the ceramic bowl you’re using is chilled all the way and be aware that you may have to place the bowl back in the refrigerator for a few minutes, in-between each addition of the warm melted nougat. The final outcome is a crunchy toasted almond  hidden in a soft shell of sweet nougat. Makes for a perfect little snack.

Nougatmandler – Nougat Wrapped Almonds

Ingredients:

100 grams whole almonds with skin on

100 grams nougat

50 grams confectioner sugar

Directions:

Preheat oven to 350 degrees F, place almonds on a baking sheet and toast for 5 minutes. Remove almonds from oven and place in a ceramic bowl in refrigerator until completely cold.

Place confectioner sugar in a small bowl and set aside. Over a waterbath melt the nougat. Bring the cold bowl with almonds out of refrigerator and add 1/3 of melted nougat, stir with a small rubber spatula until nougat starts to set and thicken. Add the second 1/3 of nougat and repeat stirring. Place bowl back into refrigerator between nougat additions if needed. Finally, add the last 1/3 of nougat and repeat stirring. Pour nougat almonds into bowl with confectioners sugar and gently, using your fingers, work the confectioners sugar around each almond. In the end, place almonds into a sieve and gently tap the excess sugar off the almonds. Store almonds a covered container in a cool location. Makes for a wonder snack, enjoy!

Source: Mette Blomsterberg

Soft Nougat

Soft Nougat

Print Friendly and PDF

Read Full Post »

Chocolate Amaretto Pudding

Chocolate Amaretto Pudding

This is a very easy dessert to put together but somehow I managed to make it really complicated. You would think that after all these years living in the US that I would have some sort of sense of how much a liquid ounce is, but nooooo. So I am making this lovely dessert and measuring out the amount of Amaretto. The measuring glass I am using is small with tiny numbers on it and I need approximately 2 1/2 ounces. I see the number 5 and figure I need about half that amount. I go about my business and finish the dessert. Now tasting time, that’s funny, I don’t taste any Amaretto, only delicious chocolate. I then go back and look at the measuring glass again, this time putting on my reading glasses and see that what I thought was a 5 really said .5 🙂 No wonder I don’t taste any Amaretto. Round two, so I make another portion, determined that I want a pudding that is loaded with wonderful Amaretto flavor and the second time around I finally succeeded. This is indeed a lovely, lovely Amaretto pudding.

How many Smiths does it take to make a hammer head?

How many Smiths does it take to make a hammer head?

But the story doesn’t end there. You see, this makes 6 small or 4 good size portions and the pudding is to be served for the ABGT blacksmiths and these guys are not small portion kinda guys and I need at least 6 portions. So what’s a girl to do? I want to make some cups with Amaretto pudding and some with the plain chocolate pudding. But my husband suggested that if I mix it all together it might still taste like Amaretto. Big mistake, the wonderful Amaretto flavor has virtually disappeared. Oh well 😦 but it doesn’t stop there. So I send Joe on his way with the pudding only to realize, I didn’t get any finished pictures of the pudding. So the pictures in this blog post is courtesy of my blacksmith husband Joe, which may I add, did an excellent job taking them. Thank you honey 😉

Chocolate Amaretto Pudding

Chocolate Amaretto Pudding

Chocolate Amaretto Pudding (makes 4 to 6 servings)

Ingredients:

500 milliliter whole milk (17 fl oz)

1 tablespoon all-purpose flour

2 tablespoon sugar

1 vanilla bean, seeds scraped out

80 milliliter Amaretto liqueur (2.7 fl oz)

100 gram dark chocolate (3.4 oz), chopped finely

50 gram unsalted butter (1.7 oz)

Topping:

whipped heavy cream, optional

Danish Makroner or Amaretti cookies, crushed, optional

Directions:

Warm milk in a saucepan over low heat. In a second cold saucepan add flour, sugar and vanilla seeds, whisk to combine. Whisk in the warm milk, a little at a time, until smooth. Place saucepan on stove and heat to medium-low stirring frequently. Whisk in Amaretto liqueur and continue to stir until you start to see a slight bubble, remove pan from heat. Add chocolate and butter, continue to stir until it starts to thicken a little. Pour pudding into storage container or serving dishes and chill in refrigerator 4-6 hours before serving. To prevent skin from forming on pudding surface, place plastic wrap directly onto surface before chilling. To serve top with whipped cream and crushed Danish Makroner or Amaretti cookies. Enjoy!

Source: Gennaro Contaldo

Print Friendly and PDF

Read Full Post »

Delicious Æblekage

Delicious Æblekage

I am really enjoying this wonderful Fall weather we are having here in Virginia Beach. It’s raining, as I am typing up this blog post and I love the sound of rain drumming on the roof. What goes perfectly with a day like this? Danish Æblekage (Apple Cake) of course. And this cake is a perfectly wonderful, super delicious cake. It’s easy to make and it will fill your house with the aroma of baking apples and cinnamon. Bring on the season 🙂

Add apples, sprinkle with cinnamon sugar, pour batter, add more apples, sprinkle with cinnamon sugar and bake.

Add apples, sprinkle with cinnamon sugar, pour batter, add more apples, sprinkle with cinnamon sugar and bake.

I had to do a few minor adjustments to this cake. The original recipe called for a 28 cm (11 inch) spring-form pan which I did not have, so I used my 23 cm (9 inch) pan instead. The cake piled up nice and high but I had to adjust the baking time to make sure it was baked through. I also placed a piece of foil loosely over the cake the last 10 minutes of baking to prevent it from browning any further. It turned out fabulous.

Æblekage – Apple Cake

Ingredients:

250 gram butter (8.8 ounces), room temperature

250 gram sugar (8.8 ounces)

4 large eggs, room temperature

250 gram flour (8.8 ounces)

1 teaspoon baking powder

4 teaspoons vanilla sugar

6 large red apples

5 tablespoons sugar

3 teaspoon cinnamon

Directions:

Line a 9 inch (23 centimeter) spring-form pan with parchment paper and set aside.

Peel and core apples, cut into quarters and then slices, set aside. Preheat oven to 350 degrees F (180 degrees C).

In a large bowl beat butter and sugar until thick and smooth. Add eggs one at the time, beating well after each addition. Add baking powder and vanilla sugar to flour. With mixer on low speed, add flour mixture to wet ingredients and mix only until combined.

Stir together the 5 tablespoons of sugar with the cinnamon, set aside. Line bottom of baking pan with 1/2 of the apples, sprinkle with 1/2 of the sugar/cinnamon mixture. Pour batter over apples and smooth batter to edges of pan. Add remaining apples on top on the batter. Sprinkle remaining sugar/cinnamon mixture on top of apples.

Bake cake for 1 hour and 25 minutes or until set in the center. I placed a piece of tinfoil loosely over top surface of cake for the last 10 minutes to prevent further browning. Let cake cool completely on a baking rack. Serve with a dollop with whipped cream or ice cream. Enjoy!

Source: adapted from Beretninger fra et autentisk landbrug

Sweet apples

Sweet apples

Print Friendly and PDF

Read Full Post »

Blackberry Bars

Blackberry Bars

Blackberry Bars

Growing up back home in Denmark my father always had an elaborate garden with berry bushes, fruit trees, a vegetable garden and a green house. Needless to say he has always had a very green thumb. As for myself, I do well with herbs and I have tried my hand at growing tomatoes which turned out pretty good and this summer my blackberry bush actually gave me beautiful, juicy berries. The bush didn’t quite give me enough berries for these delicious Blackberry bars but it did give me about half of the amount I needed. I have to say, that there is something very satisfying about being able to use produce that you have grown yourself.

Blackberry bars

Cut butter into dry ingredients, pulse until only small pieces of butter remain and mixture is crumbly.

As for these gorgeous little bars they are a wonderful summer treat. I think they taste best when chilled and then cut up and served. The cake itself is soft, yet firm, a little sweet with a great crumb on top and the berries give a nice tartness to the cake.

Blackberry bars 2

Baked crust, topped with berries and filling, topped with crumble mixture and baked until golden.

Blackberry Bars (makes 16 bars)

Ingredients for crust and topping:

1 1/2 cups all-purpose flour (190 grams or 6.7 ounces)

3/4 cup sugar (160 grams or 5.6 ounces)

pinch of salt

zest of 1/2 lemon

3/4 cup unsalted butter, cold (12 tablespoons or 170 grams or 6.0 ounces)

Ingredients for filling:

2 large eggs

1 cup sugar (205 grams or 7.2 ounces)

1/2 cup plain greek yogurt or sour cream (135 grams or 4.8 ounces)

6 tablespoons all-purpose flour (52 grams)

pinch of salt

juice of 1/2 lemon

1 teaspoon pure vanilla extract

16 ounces fresh blackberries (453 grams), if using frozen berries thaw and drain of excess juices

Directions:

Line a 9 x 9 inch (22 x 22 cm) pan with foil and spray lightly with baking spray. Preheat oven to 350 degrees F (176 degrees C).

In the bowl of a food processor or electrical mixer, combine flour, sugar, salt and lemon zest. Give a quick stir to combine. Cut cold butter into 1/2 inch slices (1.3 cm), add to dry ingredients and pulse/mix until only small pieces of butter remain and the mixture is crumbly. Reserve 3/4 cup of mixture for topping the bars. Add the remaining mixture to prepared pan and gently press to form and even layer of crust at the bottom of the pan. Bake 12-15 minutes or until light golden. Let crust cool for 15 minutes before proceeding.

In a medium bowl combine eggs, sugar, yogurt (or sour cream), flour, salt, lemon juice and vanilla extract. Beat until smooth. Gently fold in the blackberries. Pour filling over baked crust and spread evenly. Sprinkle evenly with remaining 3/4 cup topping mixture. Bake for approximately 45 minutes or until the filling is set and the top is starting to brown a little. Let cool completely on a wire rack at room temperature. Chill in refrigerator before cutting into bars. Enjoy!

Source: Annie’s Eats via The Pastry Queen

Print Friendly and PDF

Read Full Post »

« Newer Posts - Older Posts »

%d bloggers like this: